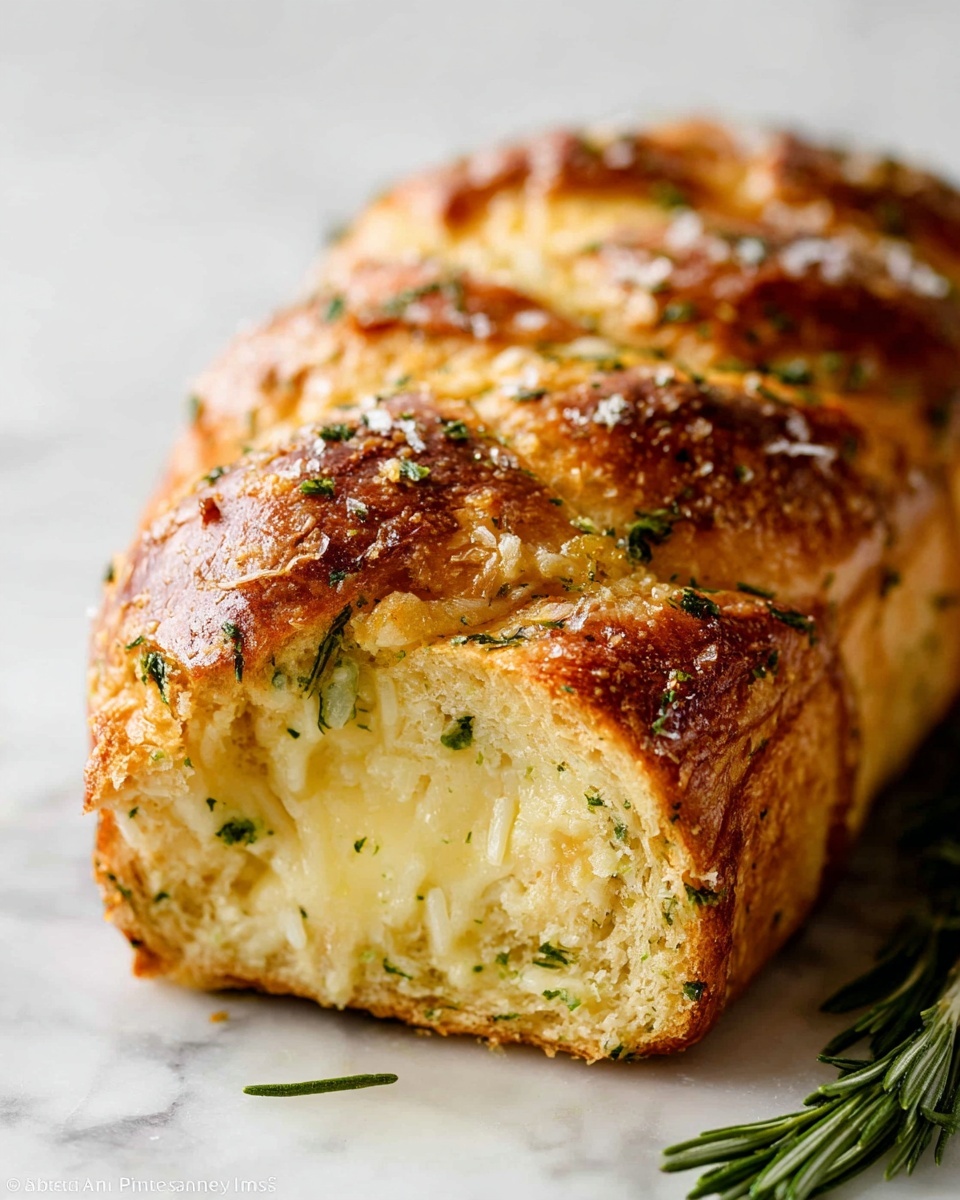
Rosemary Garlic Pull Apart Bread Recipe
If you’ve ever wanted to impress your friends or family with a stunning, flavorful bread that’s as fun to eat as it is to make, you’re going to love this Rosemary Garlic Pull Apart Bread Recipe. Seriously, there’s something so irresistible about tearing off cheesy, garlicky, buttery chunks of bread that’s fresh out of the oven. It’s the perfect centerpiece whether you’re serving it at a casual game night, a cozy dinner, or just whenever you want warm, comforting carbs in your life.
What makes this Rosemary Garlic Pull Apart Bread Recipe so special is the perfect balance of fragrant rosemary and garlicky goodness baked right into a soft, fluffy dough that’s studded with melty cheese. The pull-apart nature means everyone can grab a piece easily, making it super social and interactive. Plus, once you nail the dough and filling combo, you’ll find yourself wanting to make it again and again—I know I do!
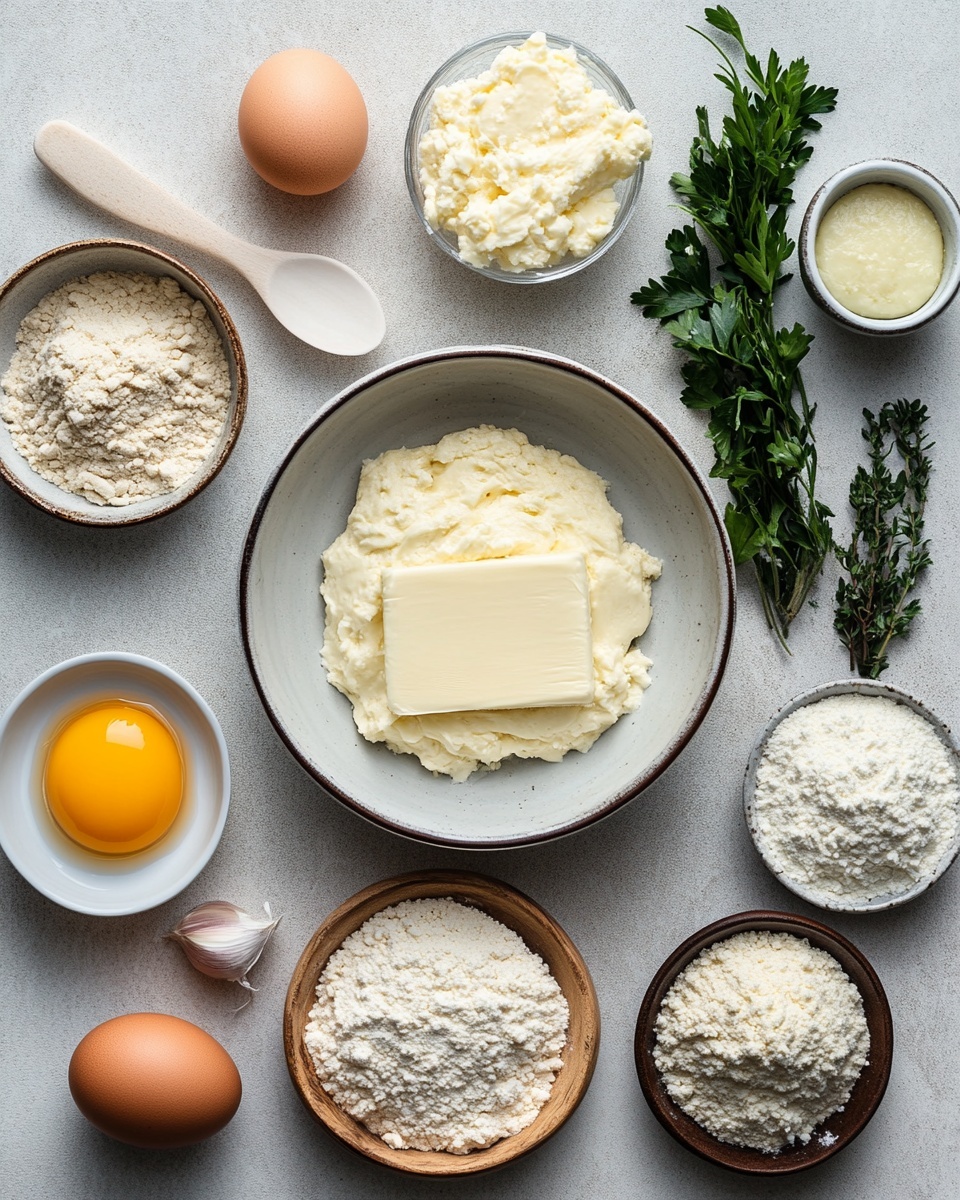
Ingredients You’ll Need
Each ingredient in this Rosemary Garlic Pull Apart Bread Recipe plays a vital role to create that perfect fluffy yet richly flavored bread. Using fresh herbs and quality butter makes a noticeable difference, so don’t shy away from good ingredients—they really bring out the best in this recipe.
- Platinum Yeast from Red Star: This yeast is reliable and gives consistent rise, ensuring your bread will be airy and light every time.
- Granulated sugar: Helps activate the yeast and adds a slight touch of sweetness to balance flavors.
- Whole milk: Adds richness and moisture to the dough, making it tender and soft.
- Unsalted butter: Use softened, room temperature for easy mixing. It’s key for that rich buttery flavor that complements rosemary and garlic beautifully.
- Large egg: Enriches the dough, giving it a nice golden color and subtle flavor.
- All-purpose flour: The foundation of the dough. Spoon and level it for accurate measurement to get the texture just right.
- Salt and garlic powder: Essential seasonings that enhance all the other flavors without overpowering.
- Fresh rosemary: Finely chopped—fresh really makes a difference here for that piney, citrusy aroma. Dried rosemary can work in a pinch but fresh is sweeter.
- Fresh parsley: Adds a pop of green freshness to the filling and balances the garlic’s intensity.
- Garlic cloves: Freshly minced for maximum flavor in the filling. Garlic powder can substitute, but fresh is more vibrant.
- Cheese: Parmesan, mozzarella, or white cheddar all bring something different to the party. I sometimes mix mozzarella with parmesan for melty stretch and sharp bite.
- Coarse or flaky sea salt: Sprinkle on top for a lovely finishing touch that adds crunch and pops of saltiness.
Variations
What I love most about this Rosemary Garlic Pull Apart Bread Recipe is how flexible it is. You can easily tailor the flavors to suit whatever mood or occasion you’re in. I encourage you to experiment and make it your own—you might find a new favorite twist!
- Herb Swap: I sometimes swap rosemary for thyme or add a bit of oregano for an Italian vibe. Fresh herbs make the biggest difference, but dried herbs work in a pinch.
- Cheese Variety: Using a combination of cheeses adds complexity. For instance, sharp cheddar with mozzarella gives both gooeyness and tang.
- Dietary Modifications: If you want a dairy-free version, swap butter for olive oil and use a vegan cheese. The bread still pulls apart beautifully!
- Spicy Kick: Toss in a pinch of red pepper flakes into the filling for a subtle heat that elevates the garlic flavor.
How to Make Rosemary Garlic Pull Apart Bread Recipe
Step 1: Wake Up Your Yeast and Build the Dough
Start by warming your milk until it’s about 110°F (warm to the touch but not hot) – this temperature jumpstarts the yeast without killing it. Combine the yeast and sugar in your mixing bowl and pour the warm milk over, whisking gently. Cover it with a kitchen towel and watch for that foamy froth in about 5-10 minutes—that’s your signal that the yeast is alive and kicking.
Step 2: Mix in the Dough Ingredients
Add softened butter, egg, flour, salt, garlic powder, and freshly chopped rosemary to your yeast mixture. Using a stand mixer with a dough hook makes this step a breeze, but no worries if you don’t have one—you can mix with a sturdy spoon or silicone spatula. Beat on low until the dough pulls away from the bowl sides but stays soft. If it’s too sticky, sprinkle in flour a tablespoon at a time—just don’t go overboard.
Step 3: Knead Until Smooth and Elastic
Knead your dough for about 5 minutes until it’s soft and slightly tacky. If you want to check your kneading progress, try the windowpane test: stretch a small piece of dough gently—if it stretches thin enough for light to shine through without tearing, you’re good. This kneading builds gluten, giving you that perfect bread texture.
Step 4: Let the Dough Rise
Shape the dough into a ball and place it in a greased bowl, covering it tightly. Set it somewhere cozy and warm—it’ll double in size in about 60-90 minutes. I like using my warm oven trick (switch it on for a minute and then off) to create the ideal rising environment.
Step 5: Prepare the Flavorful Filling
While your dough is rising, mix softened butter, parsley, garlic, salt, and cheese in a bowl. This mixture will get spread between the dough pieces for pockets of melty, flavorful goodness. Leave it at room temperature so it’s easy to spread later; if refrigerated, allow it to soften again before assembling.
Step 6: Shape, Fill, and Layer
Punch down your risen dough and divide it into 12 equal pieces. Flatten each piece into a roughly 4-inch circle, spread with a teaspoon or two of your butter-herb-cheese filling, then fold the circle in half. Line these folded dough pieces snugly into a greased 9×5-inch loaf pan with the rounded side up. This layering creates the easy-to-pull-apart effect we love.
Step 7: The Final Rise and Bake
Cover the pan and let this assembled loaf rise again for about 45 minutes until it looks puffy and inviting. Then, bake at 350°F (177°C) for about 50 minutes, tenting with foil if you notice the top browning too quickly. Don’t worry about any butter melting off—it soaks deliciously back into the bread.
Step 8: Finishing Touches and Cooling
Right when the bread is out of the oven, brush the top with melted butter and sprinkle with flaky sea salt if you like a bit of crunch and added layers of flavor. Let it cool for 10 minutes in the pan so it sets nicely, then remove and serve warm for the best pull-apart experience.
How to Serve Rosemary Garlic Pull Apart Bread Recipe
Garnishes
I love finishing this bread with a light sprinkle of flaky sea salt and a few fresh rosemary sprigs on the serving plate—that subtle pop of green always makes it look extra inviting. Sometimes, a drizzle of good quality olive oil or a shave of parmesan on top adds a little gourmet flair just before serving.
Side Dishes
This Rosemary Garlic Pull Apart Bread pairs beautifully with hearty soups like tomato basil or creamy potato leek. I also love serving it alongside a fresh salad or dipping it into a warm bowl of marinara sauce for added comfort and flavor. It’s versatile enough for fancy dinners or casual meals.
Creative Ways to Present
For special occasions, try baking this bread in a round bundt pan for a beautiful ring of pull-apart pieces. You could even stuff some pieces with little bits of cooked bacon or sun-dried tomatoes before folding them for a surprise flavor pop. I once served it at a holiday brunch with herb-infused butter curls on top—everyone asked for the recipe!
Make Ahead and Storage
Storing Leftovers
Once cooled, I wrap the Rosemary Garlic Pull Apart Bread tightly in plastic wrap or store it in an airtight container at room temperature—it keeps well for about 2 days. The crust does lose some crispness overnight, but that’s totally normal and easily fixed upon reheating.
Freezing
This bread freezes wonderfully either before or after baking. If freezing before baking, assemble as directed, then wrap tightly and freeze. When ready, let it thaw and rise again before baking. If freezing baked bread, slice or leave whole, wrap well, and defrost on the counter or in the fridge overnight. Just be sure to reheat to bring back that fresh-from-the-oven magic.
Reheating
I reheat leftovers wrapped in foil at 300°F (149°C) for about 10-15 minutes. This warms the bread through and softens the interior without drying it out. You can also zap individual pieces in the microwave for 15-20 seconds if you’re in a rush, but baking is my preferred way to bring back that just-baked texture.
FAQs
-
Can I make this Rosemary Garlic Pull Apart Bread Recipe without a stand mixer?
Absolutely! While a stand mixer makes mixing and kneading easier, you can mix the dough by hand with a wooden spoon and then knead on a lightly floured surface. It takes a bit more elbow grease, but the results are just as delicious. Just be sure to knead thoroughly until the dough passes the windowpane test for best texture.
-
Can I use dried rosemary instead of fresh in this recipe?
Yes, you can! Use about two teaspoons of dried rosemary as a substitute for one tablespoon of fresh. Just keep in mind fresh rosemary offers a brighter flavor and aroma. If using dried, crush it lightly to release the oils before adding to the dough and filling.
-
How do I know if the bread is baked through?
The bread should be golden brown on top and pull apart easily. If you want to be sure, you can gently poke the center with a skewer or toothpick; it should come out clean or with just a few moist crumbs. Also, the bread will sound hollow when tapped on the bottom once fully baked.
-
Can I prepare the dough the day before?
Definitely! You can make the dough, let it rise once, then refrigerate overnight. The next day, shape, fill, and proceed with the second rise and baking. This is a great way to break up the work and have fresh bread with less stress.
Final Thoughts
This Rosemary Garlic Pull Apart Bread Recipe has become one of my absolute go-to comfort foods—and I’m sure it will for you too. There’s just something magical about the way the fresh herbs, garlic, and gooey cheese melt together in soft, buttery dough. It’s perfect for sharing, gifting, or just treating yourself to a little something special. So next time you want a cozy kitchen project with an impressive payoff, I hope you’ll give this recipe a try and enjoy every warm, savory pull-apart bite.
Print
Rosemary Garlic Pull Apart Bread Recipe
- Prep Time: 3 hours
- Cook Time: 50 minutes
- Total Time: 4 hours
- Yield: 1 loaf (12 pull-apart pieces) 1x
- Category: Bread
- Method: Baking
- Cuisine: American
- Diet: Vegetarian
Description
This Rosemary Garlic Pull Apart Bread recipe creates a soft, flavorful loaf infused with fresh herbs, garlic, and gooey cheese. The bread is made from a yeast dough enriched with butter and milk, layered with a savory garlic herb butter and cheese filling, then baked until golden and tender, perfect for sharing or serving alongside meals.
Ingredients
Dough:
- 2 teaspoons Platinum Yeast from Red Star
- 1 Tablespoon granulated sugar
- 3/4 cup (180ml) whole milk
- 3 Tablespoons (43g) unsalted butter, softened to room temperature
- 1 large egg
- 2 and 1/3 cups (291g) all-purpose flour (spooned & leveled), plus more as needed
- 1 teaspoon salt
- 1 teaspoon garlic powder
- 1 Tablespoon finely chopped fresh rosemary (or 2 teaspoons dried)
Filling:
- 5 Tablespoons (71g) unsalted butter, extra soft
- 1 Tablespoon finely chopped fresh parsley (or 2 teaspoons dried)
- 2 garlic cloves, minced or 1/2 teaspoon garlic powder
- 1/4 teaspoon salt
- 3/4 cup (95g) shredded parmesan, mozzarella, or white cheddar cheese (or your favorite shredded cheese)
Optional Topping:
- 1 Tablespoon (14g) unsalted butter, melted
- Coarse or flaky sea salt for sprinkling
Instructions
- Make the dough: Place the yeast and sugar in a stand mixer bowl fitted with a dough hook or paddle attachment or in a large mixing bowl. Warm the milk until about 110°F (43°C) and pour it over the yeast and sugar. Whisk gently and cover loosely to let it become frothy after 5-10 minutes.
- Combine ingredients: Add softened butter, egg, flour, salt, garlic powder, and rosemary to the yeast mixture. Beat on low speed until the dough forms and pulls away from the bowl sides, about 3 minutes. Add more flour if dough is too sticky.
- Knead the dough: Using the dough hook, knead for 5 additional minutes or knead by hand on a floured surface for 5 minutes. Dough should be soft but elastic, passing the windowpane test.
- First rise: Shape dough into a ball, place in a greased bowl, cover with plastic wrap or foil, and let rise in a warm spot until doubled in size, about 60-90 minutes.
- Prepare filling and pan: While dough rises, mix the filling ingredients and grease a 9×5-inch loaf pan.
- Make the filling: Combine soft butter, parsley, garlic, and salt until smooth; cover and keep at room temperature until needed.
- Assemble the bread: Punch down risen dough and divide into 12 equal pieces. Flatten each piece into a roughly 4-inch circle, spread 1-2 teaspoons filling onto each, then sprinkle with 1 tablespoon of cheese. Fold circles in half and arrange them round side up in the prepared loaf pan.
- Second rise: Cover the loaf and let it rise again until puffy, about 45 minutes in a warm environment.
- Preheat oven: Place the oven rack on the lower third position and preheat the oven to 350°F (177°C).
- Bake the bread: Bake the loaf for about 50 minutes until golden brown. Tent with foil if browning too quickly. Expect some melted butter to seep around the edges during baking. After baking, transfer pan to a wire rack, brush the top with melted butter if desired, and sprinkle with sea salt.
- Cool and serve: Let the bread cool in the pan for 10 minutes before removing. Serve warm for best flavor and texture.
- Storage: Store leftovers covered at room temperature for up to 2 days or in the refrigerator for up to 1 week. Reheat in a 300°F (149°C) oven for 10-15 minutes or in the microwave to soften crust.
Notes
- Use Platinum Yeast from Red Star for best dough rise and texture.
- Butter for the filling should be very soft but not melted; bring to room temperature before mixing.
- To speed dough rising, place covered dough in a warm (not hot) oven or use the warm oven trick described in baking guides.
- If dough feels overly sticky during kneading, add flour by tablespoon increments but avoid adding too much to keep bread soft.
- Feel free to adjust cheese type for different flavors; parmesan, mozzarella, or cheddar all work well.
- Baking pan size is important; a standard 9×5-inch loaf pan is recommended.
- Optional: Brush top with melted butter and sprinkle sea salt after baking for extra flavor and a glossy finish.
- To test dough readiness, use the windowpane test for gluten development.
Keywords: Rosemary pull apart bread, garlic pull apart bread, cheesy pull apart bread, herb bread loaf, homemade pull apart bread, yeast bread recipe