Mini Pumpkin Pies with Whipped Cream Recipe
Nothing says cozy quite like the warm, spicy scent of pumpkin pie baking in the oven. That’s why I’m so excited to share this Mini Pumpkin Pies with Whipped Cream Recipe with you—a perfect little twist on the classic that’s just as comforting but way more fun to serve. These bite-sized treats are not only adorable but great for parties, casual fall gatherings, or when you just want a personal pumpkin fix without committing to a whole slice.
What I love most about this Mini Pumpkin Pies with Whipped Cream Recipe is how approachable it is. You don’t need fancy tools or complicated techniques; just simple ingredients and a regular muffin tin transform into these delicious pies topped with pillowy homemade whipped cream. Trust me, your kitchen will smell incredible, and everyone’s going to want the recipe—so let’s dive in!
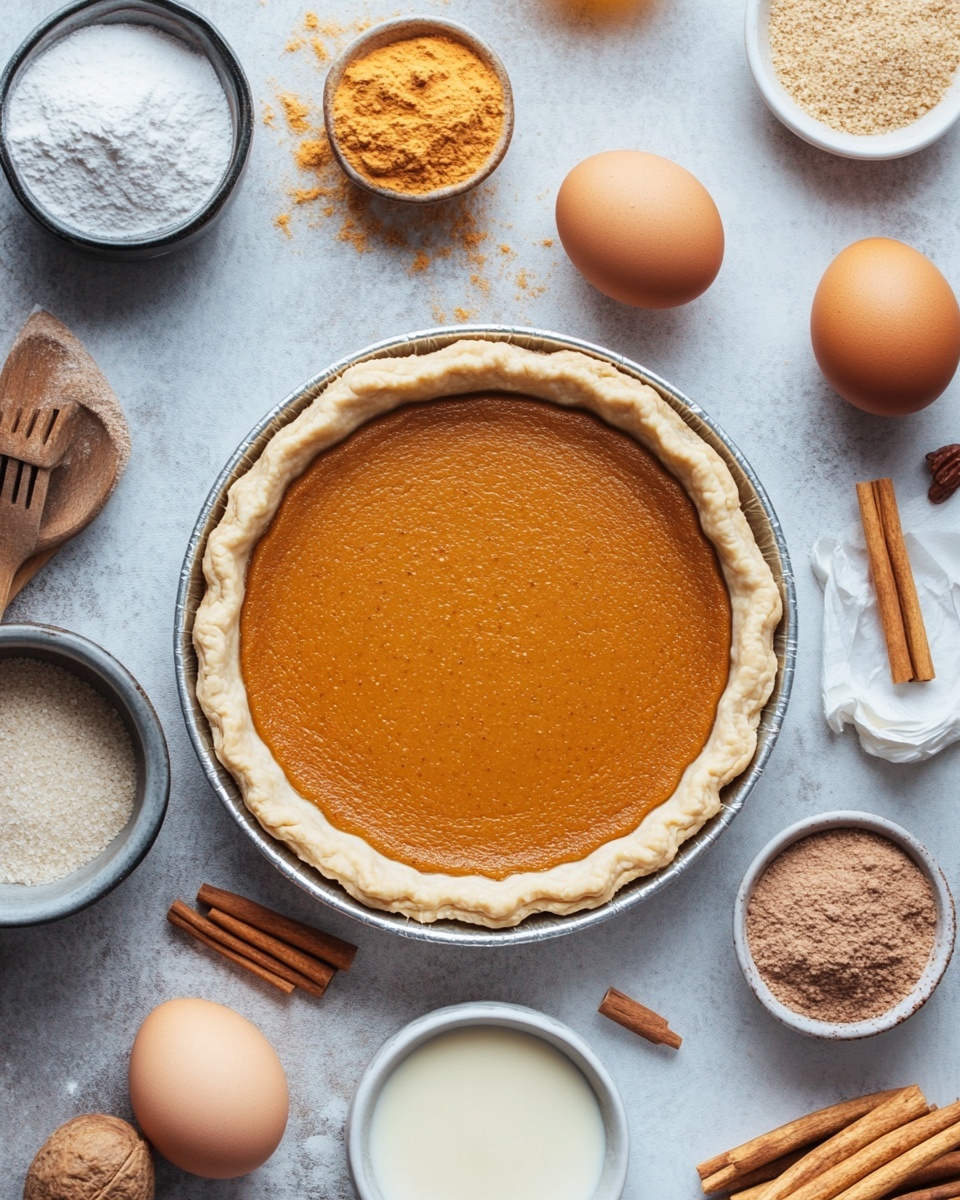
Ingredients You’ll Need
The beauty of this recipe is in its simplicity: each ingredient works together to capture the iconic pumpkin pie flavors while keeping things light and portion-friendly. Whether you grab store-bought pie crust or roll out your own, these ingredients are easy to find and flexible for tweaks.
- Pie crust: I usually use store-bought for convenience, but homemade crust adds a tender, flaky texture if you have the time.
- Pumpkin puree: Use pure pumpkin—not pumpkin pie filling—to control the sweetness and spices yourself.
- Egg and egg yolk: These bind the filling and give the pies that custardy, set texture we all love.
- Light brown sugar: Adds that subtle molasses flavor that deepens the pumpkin’s sweetness.
- Granulated sugar: Balances the brown sugar and pumpkin’s earthiness.
- Pumpkin pie spice: This magic blend of cinnamon, nutmeg, ginger, and cloves brings authentic warmth.
- Cinnamon: I add a pinch extra for that cozy spice aroma.
- Salt: Just a little to brighten the flavors.
- Vanilla extract: Enhances all the spices and adds roundness to the filling.
- Evaporated milk: Creates that smooth, creamy custard texture without watering down flavor.
- Heavy whipping cream: To whip up fresh, fluffy whipped cream that’s the perfect topping.
- Granulated sugar (for whipped cream): Just the right amount to sweeten without overpowering.
Variations
I like to switch things up depending on the occasion or what’s in my pantry. This recipe is super forgiving, so feel free to get creative and make it your own.
- Variation: I’ve swapped evaporated milk for half-and-half for a lighter filling and it still turns out lovely. It’s a nice tweak if you want something a little less rich.
- Gluten-free crust: When I have guests with gluten sensitivities, I use a pre-made gluten-free pie crust and it works beautifully.
- Spice it up: Throw in a dash of ground ginger or allspice if you want to deepen the spice profile. I occasionally add a splash of bourbon for a grown-up twist.
- Vegan option: I haven’t tried it yet, but you could experiment with a plant-based crust and coconut cream whipped topping for a vegan mini pie.
How to Make Mini Pumpkin Pies with Whipped Cream Recipe
Step 1: Roll Out Your Crust and Prep the Mini Pies
Start by rolling your pie crust dough out on a lightly floured surface until it’s about 1/8 inch thick—a thin crust is key for these small pies to bake evenly. Use a 3 1/2 inch round cookie cutter (or a jar lid) to cut out 12 circles. I keep any scraps and gently reroll to get my full dozen.
Next, lightly grease a 12-count muffin pan. Press each dough round into the muffin cups, molding it up the sides carefully. This helps give the pies their cute, fluted edge and keeps the filling contained.
Step 2: Whisk Together the Perfect Pumpkin Filling
In a large bowl, whisk together the pumpkin puree, whole egg, egg yolk, sugars, pumpkin pie spice, cinnamon, salt, and vanilla extract until smooth. Gradually whisk in the evaporated milk until everything is fully combined into a luscious custard. I find that slowly adding the milk helps avoid lumps and keeps the mix silky.
Step 3: Fill and Bake Your Mini Pies
Divide the filling evenly among the muffin cups—each should be nearly full but not overflowing. Bake them in your preheated 350˚F oven for 30-40 minutes. If you use store-bought crust, closer to 30 minutes should suffice; homemade crust might take up to 40 minutes. Look for golden crust edges and a slightly firm but still jiggly filling center—the hallmark of perfect pumpkin pie doneness.
Step 4: Cool and Prepare the Whipped Cream
Let the pies cool in the pan for about 10 minutes, then gently run a knife along the edges to loosen before transferring them to a wire rack. While the pies cool to room temperature, whip your cream. Using a stand or hand mixer, beat the heavy whipping cream on medium speed until soft peaks form, about 1 minute.
Then add sugar and vanilla, beating for another 2 minutes until the cream thickens enough to pipe but isn’t overwhipped. The secret is to stop just when it holds a nice shape without turning grainy or buttery.
How to Serve Mini Pumpkin Pies with Whipped Cream Recipe
Garnishes
My favorite garnish is a simple dusting of ground cinnamon or a pinch of nutmeg on top of the whipped cream—it gives that warm, inviting look and aroma. Sometimes I add a single toasted pecan on top or a small drizzle of maple syrup for an extra special touch that everyone loves.
Side Dishes
These mini pies pair wonderfully with a cup of hot coffee or spiced tea, especially on crisp fall afternoons. For a fuller dessert spread, I like serving alongside a scoop of vanilla ice cream or some candied pecans to contrast textures.
Creative Ways to Present
Once, for a holiday party, I arranged the pies on a rustic wooden board surrounded by autumn leaves and small pumpkins—such a simple setup that made these little pies the centerpiece. You can also pipe the whipped cream into pretty swirls with a star tip for a more elegant look or add edible gold dust for a festive sparkle.
Make Ahead and Storage
Storing Leftovers
I usually keep leftover mini pies in an airtight container in the refrigerator for up to 3 days. To prevent the crust from getting soggy, it’s best to add the whipped cream just before serving. If you already dolloped the cream, leftovers are still tasty but should be eaten within a day.
Freezing
If you want to make these ahead for a crowd, you can freeze the baked pies (without whipped cream) in a single layer on a baking sheet, then transfer to a freezer-safe bag. They freeze well for up to 2 months. Thaw overnight in the fridge before serving and pipe fresh whipped cream on top.
Reheating
To reheat, warm mini pies at 300˚F for 8-10 minutes, just enough to heat through without drying out the crust. Let them cool a bit before adding the whipped cream so it doesn’t melt away. This way, you get that freshly baked warmth with creamy toppings every time.
FAQs
-
Can I use canned pumpkin pie filling instead of pumpkin puree?
I wouldn’t recommend canned pumpkin pie filling because it already contains sugar and spices which will throw off the balance of this recipe. Using pure pumpkin puree lets you control the sweetness and spice levels for the best results.
-
How do I know when the mini pumpkin pies are done baking?
Look for golden brown crust edges and a filling that’s mostly set but still slightly jiggly in the center—it will firm up as it cools. If you press gently on the filling and it springs back, it’s done.
-
Can I make the pie crust from scratch?
Absolutely! Homemade crust adds a wonderful flaky texture. Just roll it out thin and be patient when pressing into the muffin tin to avoid tearing. Remember homemade crust may take a bit longer to bake fully.
-
What’s the best way to whip cream for the topping?
Start with cold heavy cream and a chilled bowl if possible. Beat until soft peaks form, then add sugar and vanilla and keep beating just until it’s stiff enough to pipe. Be careful not to overbeat or it will turn grainy and start becoming butter.
-
How far ahead can I make these mini pumpkin pies?
You can bake the pies up to 2 days ahead, store them in the fridge without whipped cream, and add fresh whipped cream just before serving. For longer storage, freeze them as described above.
Final Thoughts
I’ve made these Mini Pumpkin Pies with Whipped Cream Recipe multiple times now, especially during the holidays, and every time they spark joy around the table. There’s something magical about tiny pies—you get all the delicious flavors of pumpkin pie but in these perfectly portioned, charming little treats. I really hope you enjoy making and sharing them as much as I do. Give it a try next time you want that classic fall flavor in a fun, foolproof format. You’re going to love how easy and rewarding these mini delights are!
Print
Mini Pumpkin Pies with Whipped Cream Recipe
- Prep Time: 25 minutes
- Cook Time: 35 minutes
- Total Time: 1 hour
- Yield: 12 mini pumpkin pies 1x
- Category: Dessert
- Method: Baking
- Cuisine: American
Description
These Mini Pumpkin Pies are a delightful bite-sized twist on the classic fall dessert. Made with a flaky homemade or store-bought pie crust and filled with a creamy, spiced pumpkin filling, they are perfect for gatherings or whenever you crave a sweet seasonal treat. Topped with freshly whipped cream and a sprinkle of cinnamon, these pies are both charming and delicious.
Ingredients
Mini Pumpkin Pie Ingredients
- 1 homemade pie crust disk, or 2 store-bought pie crust rolls
- 15 oz pumpkin puree
- 1 large egg
- 1 large egg yolk
- 1/2 cup packed light brown sugar
- 1/4 cup granulated sugar
- 1 tsp pumpkin pie spice
- 1/2 tsp cinnamon
- 1/4 tsp salt
- 1 tsp vanilla extract
- 3/4 cup evaporated milk (6 oz)
Whipped Cream Ingredients
- 1 cup heavy whipping cream
- 3 Tbsp granulated sugar
- 1/2 tsp vanilla extract
Instructions
- Prepare the Pie Crusts: Unroll your pie crusts or roll out your homemade pie dough to about 1/8 inch thick on a floured surface. Use a 3 1/2 inch cookie cutter or the lid from a wide-mouth jar to cut out 12 circles of dough. If using homemade dough, re-roll scraps to make enough rounds.
- Line Muffin Pan: Lightly grease a 12-count non-stick muffin pan with cooking spray. Place each dough round into the muffin cups, pressing them against the sides to form little crust shells.
- Make Pumpkin Filling: In a large mixing bowl, whisk together pumpkin puree, 1 whole egg, 1 egg yolk, brown sugar, granulated sugar, pumpkin pie spice, cinnamon, salt, and vanilla extract. Gradually whisk in evaporated milk until the mixture is smooth and well combined.
- Fill the Crusts: Evenly divide the pumpkin filling among all 12 dough-lined muffin cups, filling each to the top.
- Bake: Place the muffin pan in a preheated oven at 350°F (175°C). Bake for 30-40 minutes until the crusts turn golden brown. Homemade crusts typically require about 40 minutes, while store-bought crusts bake closer to 30 minutes.
- Cool the Pies: Let the mini pies cool in the pan for 10 minutes. Then, carefully run a knife or cake release tool around each edge to loosen and transfer them to a wire rack to cool completely to room temperature.
- Prepare Whipped Cream: In a cold bowl, beat the heavy whipping cream on medium-high speed for 1 minute until soft peaks form. Add granulated sugar and vanilla extract, then continue beating for 2 more minutes until the cream is thick enough to pipe but not overwhipped.
- Garnish and Serve: Once the pies have fully cooled, pipe or dollop whipped cream on top of each mini pumpkin pie. Dust lightly with cinnamon for a finishing touch and serve.
Notes
- Use either homemade or store-bought pie crust according to your preference. Homemade crust may require a slightly longer baking time.
- Pumpkin pie spice is a blend of cinnamon, nutmeg, ginger, and cloves—use store-bought or make your own.
- Ensure the pumpkin puree is plain; avoid pumpkin pie filling which contains added spices and sugar.
- Watch the pies closely near the end of baking to prevent over-browning.
- Whipped cream should be beaten just enough to hold shape for piping but not so much it becomes stiff or buttery.
Keywords: mini pumpkin pies, pumpkin pie, fall dessert, bite-sized pies, pumpkin recipe, holiday dessert