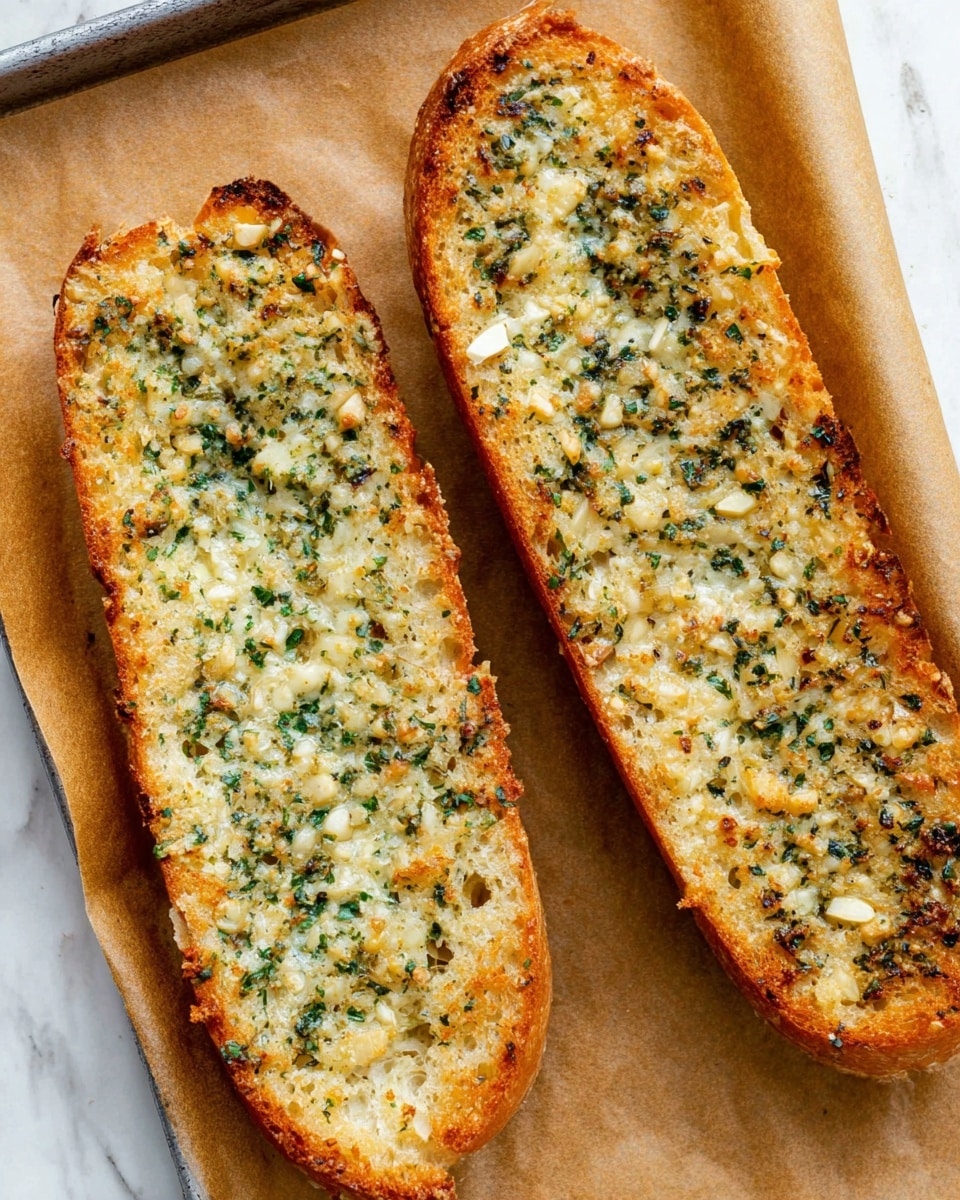
Homemade Garlic Bread Recipe
Oh, there’s just something unbelievably comforting about warm, buttery homemade garlic bread that turns any meal into a celebration. This Homemade Garlic Bread Recipe is exactly the kind of kitchen magic I love—simple ingredients that come together in a snap, yet deliver those rich, flavorful bites we all crave. Whether you’re pairing it with pasta, soup, or just munching on it solo, this recipe never disappoints.
I remember the first time I tried making my own garlic bread from scratch—it was a game changer. No more bland store-bought loaves or soggy frozen versions sitting on my counter. This recipe has that perfect crispiness on the outside, soft and garlicky goodness on the inside, and you can tweak it easily based on what you have. Trust me, once you try this Homemade Garlic Bread Recipe, you’ll want it in your regular rotation too.
Ingredients You’ll Need
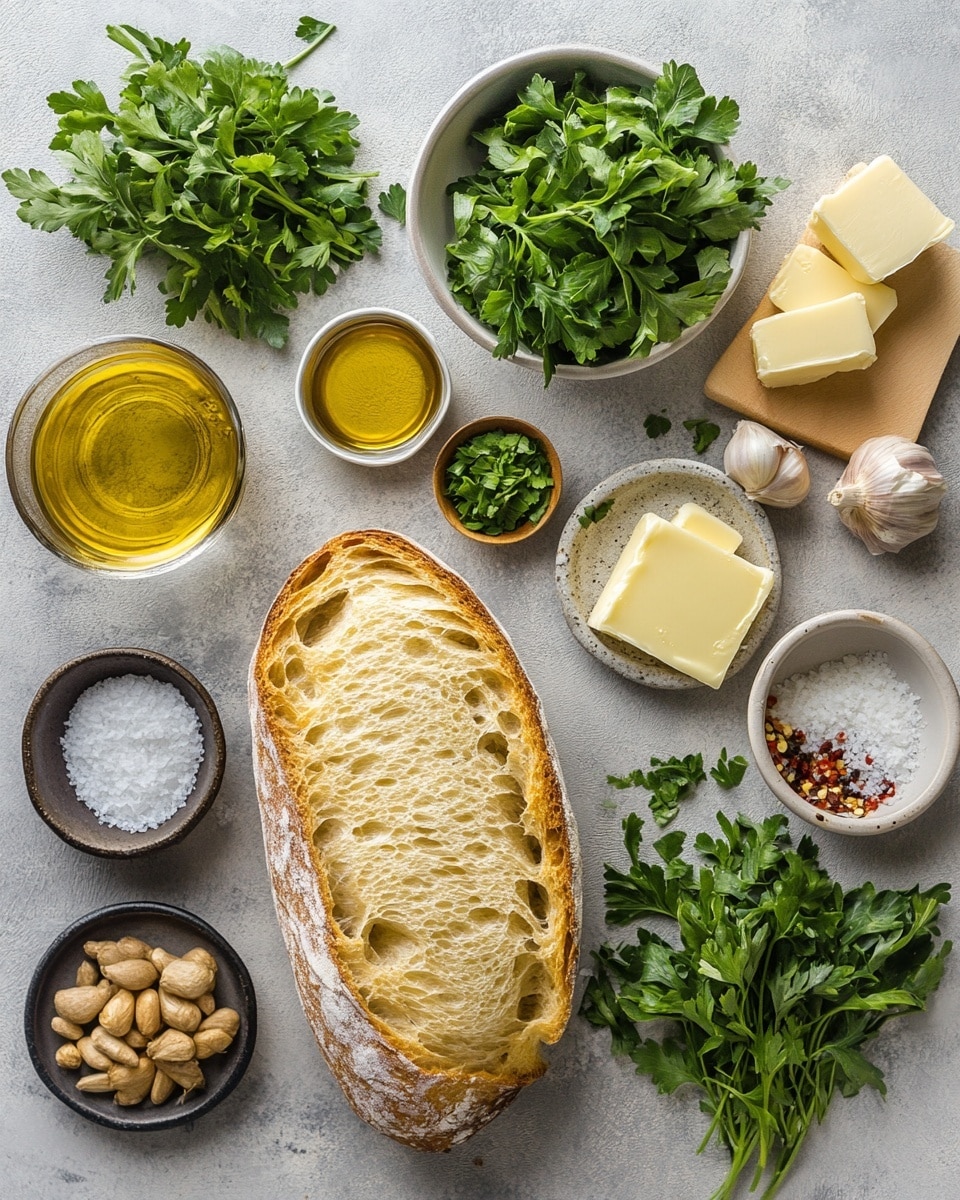
Each ingredient plays its part in making this garlic bread shine, and I’ve found that using fresh items wherever possible makes the biggest difference. Here’s a quick rundown to help you shop smart and make your Homemade Garlic Bread Recipe a winner.
- Crusty bread: I like a good artisan loaf, something with a sturdy crust that can hold up to all that buttery goodness without getting soggy.
- Unsalted butter: Softened butter is key because it spreads easily and helps blend in those fragrant garlic and herbs perfectly.
- Fresh parsley: It adds such a lovely fresh note and color — don’t substitute dried unless you have to, fresh is worth the little extra effort.
- Fresh garlic: Mince those cloves finely for that punch of flavor we all love. Fresh garlic beats jarred by miles here.
- Sea salt: A sprinkle of flaky sea salt adds the right balance, but you can adjust based on your saltiness preference.
- Parmesan cheese (optional): This is my secret weapon for a touch of savory richness and a slightly nutty flavor.
- Crushed red pepper flakes (optional): For a little kick if you like things spicy — it’s a nice finishing touch when sprinkled right before serving.
Variations
I love how versatile this Homemade Garlic Bread Recipe can be—you can really make it your own. Sometimes I switch up the herbs or add a little cheese to keep things interesting, and you absolutely can too!
- Cheesy garlic bread: Adding mozzarella or cheddar along with the parmesan turns it into a melty, gooey treat. I tried this variation at a family dinner once, and it vanished faster than you can say “pass the bread!”
- Herb mix-up: Swap parsley for fresh basil or rosemary to match the vibe of your main dish—perhaps basil with a tomato pasta night!
- Vegan version: Use a plant-based butter and skip the parmesan or replace it with a vegan cheese alternative. I’ve done this for a friend’s gathering and it was just as delicious.
- Spicy twist: Mix in some chopped jalapeños or sprinkle extra red pepper flakes for a zesty pop that’s perfect with chili or stew.
How to Make Homemade Garlic Bread Recipe
Step 1: Prep your bread and oven
Start by preheating your oven to 400°F (204°C). Line a baking sheet with parchment paper or a silicone mat to keep things neat and help with easy cleanup. Slice your loaf horizontally, laying both halves cut side up on the sheet—this setup ensures that golden, crispy crust we’re aiming for while the butter soaks in just right.
Step 2: Mix the garlic butter
Now, the magic mix! Beat together your softened butter, fresh parsley, minced garlic, sea salt, and if you’re adding parmesan, toss that in here too. I usually use a stand mixer with a paddle attachment because it’s fast and smooths everything perfectly, but if your butter is soft enough, a fork and a bit of elbow grease work just fine.
Step 3: Spread it on generously
Don’t be shy here—slather that garlic butter mix evenly all over the cut surfaces of your bread halves. The flavor needs to get into every nook and cranny for that incredible garlicky punch. If you want extra crispness, make sure you get a decent layer near the edges.
Step 4: Bake until golden perfection
Pop your bread into the oven and bake for about 16 to 18 minutes. Keep an eye on the edges—they should turn golden and crispy without burning. If you prefer it extra crunchy, let it go a couple of minutes longer, but don’t walk away! That waiting game can sneak up fast.
Step 5: Add finishing touches and slice
When it’s done, let the bread cool on the baking sheet a few minutes. This subtle cooling helps the butter set just right so it doesn’t slide off when you slice. If you’re using crushed red pepper flakes for a little heat, now’s the time to sprinkle them on. Then, slice with a serrated knife and serve warm—there’s nothing like that fresh-out-of-the-oven aroma!
How to Serve Homemade Garlic Bread Recipe
Garnishes
I often finish this garlic bread with a sprinkle of extra parsley or a small dusting of parmesan for a fresh look and added flavor. When I’m feeling adventurous, I throw on red pepper flakes or even a drizzle of good olive oil. It just perks up the flavors without much effort.
Side Dishes
This garlic bread pairs beautifully with Italian dishes like spaghetti Bolognese or creamy tomato pasta. Sometimes, I serve it alongside a hearty bowl of soup—tomato basil or minestrone, especially. It also works great with salads when you want a bit of indulgence without making the meal too heavy.
Creative Ways to Present
For get-togethers, I love slicing the garlic bread into smaller, bite-sized pieces and arranging them on a pretty platter with a little bowl of marinara sauce or herbed olive oil for dipping. It turns this humble bread into a shareable appetizer that always wows guests. You could also brush on pesto instead of butter for a colorful, aromatic twist.
Make Ahead and Storage
Storing Leftovers
I usually wrap any leftover garlic bread tightly in foil or plastic wrap and keep it at room temperature if I plan to eat it the next day. It stays surprisingly fresh for up to 3 days that way, though it’s best enjoyed warm and crispy, so reheating is key.
Freezing
If I know I won’t eat it all quickly, I slice the bread after baking and freeze it in an airtight container or freezer bag. That way, I can grab a slice or two whenever a garlic bread craving hits, without worrying about it going stale.
Reheating
To reheat, I pop slices in a toaster oven or under the broiler for just a couple of minutes until warm and crispy again. You want to avoid microwaving if possible because it can make the bread chewy and limp, which defeats the whole point of garlic bread!
FAQs
-
Can I use any type of bread for Homemade Garlic Bread Recipe?
Absolutely! While a crusty artisan loaf works best to provide that satisfying crunch and chewy interior, you can experiment with French bread, ciabatta, or even a baguette. Just avoid overly soft sandwich bread, as it might turn too soggy during baking.
-
How do I make the garlic butter extra flavorful?
Using fresh garlic and fresh herbs is key. Letting the garlic butter sit for 10-15 minutes before spreading lets the flavors meld. You can also add a small pinch of smoked paprika or some grated Parmesan to boost depth and richness.
-
Can I prepare the garlic butter ahead of time?
Yes! Homemade garlic butter can be made a day or two in advance and stored in the refrigerator. Just take it out to soften before spreading on your bread for the best texture and easier application.
-
Is this recipe suitable for making vegan garlic bread?
Totally. Simply swap out the butter for a high-quality vegan butter or margarine and omit the Parmesan or replace it with a vegan cheese alternative. You’ll still get that buttery, garlicky goodness without any dairy.
-
How do I achieve the crispiest garlic bread?
Bake the bread cut side up and don’t overcrowd the pan to allow heat circulation. If you like it extra crispy, extending the bake time by a couple of minutes works great. Just watch closely to avoid burning. Using a sturdy bread with a thick crust also helps tremendously.
Final Thoughts
Making this Homemade Garlic Bread Recipe is one of those simple pleasures that feels like a little luxury in your own kitchen. I still get excited every time I pull that golden bread out of the oven, knowing how perfectly it pairs with so many meals or stands on its own as a snack. Give it a try—you’ll find it’s also surprisingly easy to nail, and once you do, there’s no going back to store-bought. Believe me, your family and friends will thank you for it!
Print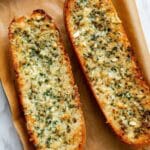
Homemade Garlic Bread Recipe
- Prep Time: 10 minutes
- Cook Time: 18 minutes
- Total Time: 28 minutes
- Yield: 1 loaf (about 8–10 servings) 1x
- Category: Side Dish
- Method: Baking
- Cuisine: Italian-American
Description
This Homemade Garlic Bread recipe is a simple and delicious side that transforms a crusty loaf of bread with a flavorful garlic herb butter spread. Softened butter, fresh garlic, and parsley come together to create a savory topping that’s baked until golden and crispy. Optional parmesan cheese adds an extra layer of richness, making this garlic bread perfect for pairing with pasta, salads, or enjoying on its own.
Ingredients
Bread
- 12-ounce (340g) loaf of crusty bread, sliced in half horizontally
Garlic Butter Spread
- 1/2 cup (8 Tbsp; 113g) unsalted butter, softened
- 1 Tablespoon finely chopped fresh parsley
- 4 teaspoons finely minced fresh garlic (about 3 cloves)
- 1/4 teaspoon flaky sea salt (or 1/8 teaspoon fine salt)
- optional: 1/3 cup (27g) freshly grated parmesan cheese
Garnish (Optional)
- pinch of crushed red pepper flakes
Instructions
- Preheat and Prepare Baking Sheet: Preheat your oven to 400°F (204°C). Line a baking sheet with parchment paper or a silicone baking mat. Place both halves of the bread, cut side up, on the lined baking sheet to prepare for spreading the garlic butter.
- Make Garlic Butter: Using a handheld or stand mixer with a paddle attachment, beat the softened butter, parsley, minced garlic, salt, and parmesan cheese (if using) on medium-high speed until fully combined and smooth. Alternatively, if the butter is soft enough, you can mash everything together thoroughly with a fork.
- Spread the Butter: Evenly spread the prepared garlic butter mixture over the cut sides of the bread halves, ensuring complete coverage for maximum flavor.
- Bake the Bread: Bake the garlic buttered bread in the preheated oven for 16–18 minutes, or until the edges are crispy and golden brown. For a crunchier texture, you can bake a couple of minutes longer as desired.
- Cool and Slice: Let the bread cool on the baking sheet for a few minutes so it firms up a little and is easier to handle. Transfer to a cutting board, sprinkle with crushed red pepper flakes if using, then slice the bread with a serrated bread knife. Serve warm.
- Store Leftovers: Cover any leftover garlic bread tightly and store it at room temperature or refrigerate for up to 3 days to maintain freshness.
Notes
- You can customize the garlic bread by adding or omitting parmesan cheese according to taste.
- For a spicier kick, crushed red pepper flakes are a great optional garnish.
- Ensure the butter is softened for easy mixing and spreading.
- Use a serrated knife to slice the bread without crushing it.
- Leftover garlic bread is best reheated in the oven to restore crispiness.
Keywords: garlic bread, homemade garlic bread, easy garlic bread recipe, baked garlic bread, garlic herb butter, side dish, Italian bread