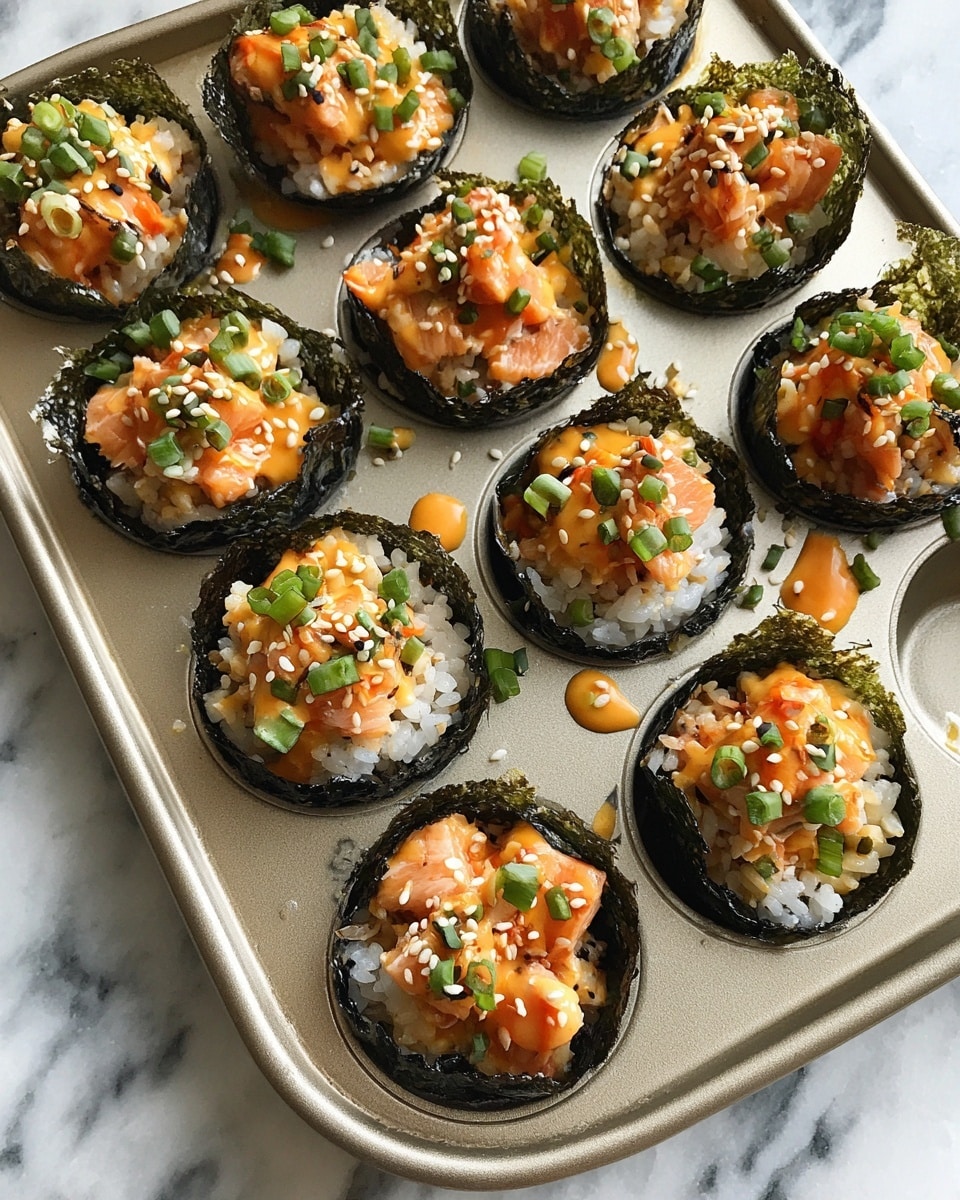
Easy Baked Salmon Sushi Cups (Viral Recipe) Recipe
If you’ve ever found yourself craving sushi but don’t want to fuss with rolling mats and perfect slices of fish, this Easy Baked Salmon Sushi Cups (Viral Recipe) Recipe is an absolute game-changer. It’s sushi, but in a bite-sized, fuss-free form that’s perfect for parties, weeknight dinners, or when you just want a fun new twist on your favorite flavors. The combination of tender baked salmon mixed with that addictive creamy-spicy sauce and perfectly seasoned rice in crispy nori cups? Trust me, it’s a crowd-pleaser.
What makes this recipe so worth trying is just how simple it is to whip up without sacrificing any of that sushi magic. I first made these when a bunch of friends dropped by unexpectedly, and they vanished in minutes. Whether you’re a sushi pro or a curious newbie, the Easy Baked Salmon Sushi Cups (Viral Recipe) Recipe takes the pressure off rolling and slicing while still fulfilling all those crave-worthy cravings.
Ingredients You’ll Need
You’ll want to have a good mix of fresh and pantry staples for this recipe because each ingredient plays a role in creating the perfect sushi bite. From the flakiness of the salmon to that signature tangy rice seasoning, these flavors just sing when combined.
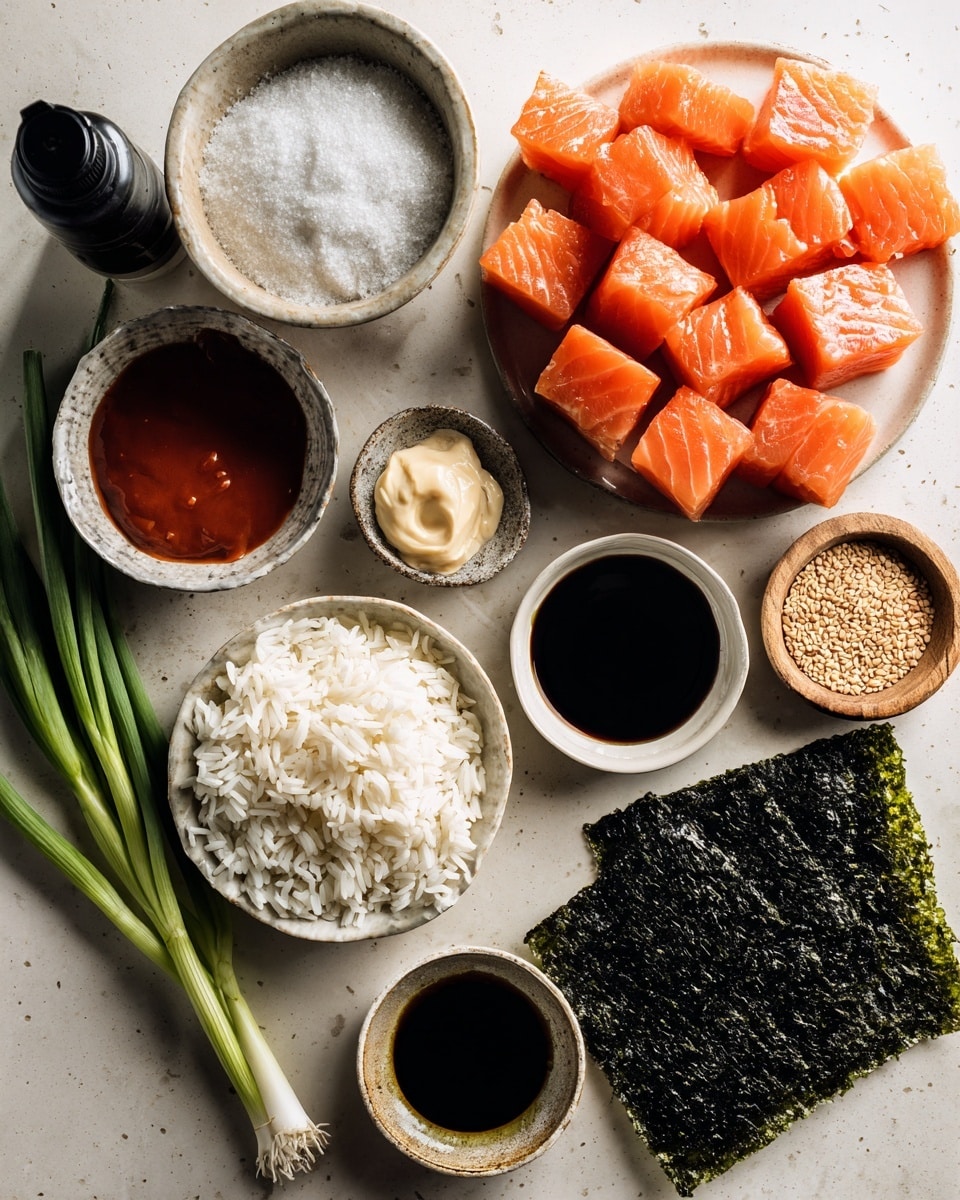
- Salmon: Fresh is best here, cubed into bite-sized chunks to ensure even cooking and easy layering in the cups.
- Light Soy Sauce: Adds that essential umami depth without overpowering the salmon’s delicate flavor.
- Kewpie Mayo: This Japanese mayo is creamier and sweeter than regular mayo, giving the salmon a luscious texture.
- Sriracha: Just the right amount of heat to balance the creamy mayo and tender fish.
- Sesame Oil: A little drizzle goes a long way in adding a nutty aroma and richness.
- Sushi Rice: Essential for that sticky, slightly sweet base that holds everything together beautifully.
- Rice Vinegar: Gives the sushi rice its signature tang; mixing with sugar helps mellow it out.
- White Sugar: Balances the acidity of the vinegar for a well-rounded rice flavor.
- Nori Sheets: Cut into squares, these seaweed sheets are the sturdy vessel for your sushi cups.
- Furikake: A sprinkle of this Japanese seasoning blend on top adds a burst of flavor and crunch.
- Green Onion: Fresh sliced green onions bring a pop of color and a mild sharpness.
- Cooking Spray: To keep those muffin tins non-stick and make removing your sushi cups a breeze.
Variations
I love how flexible the Easy Baked Salmon Sushi Cups (Viral Recipe) Recipe is. It invites you to tweak it however you like to match your taste or dietary preferences. Here are a few ways I’ve jazzed it up or made it my own:
- Variation: Substituting salmon with cooked shrimp or crab meat works wonderfully if you want a different protein or to mix it up. I once tried crab with a touch of lemon zest—delicious and refreshing!
- Variation: For a veggie-packed version, add diced cucumber and avocado inside the cup after baking for some cool contrast and extra texture.
- Variation: If you want to keep it mild, just skip the sriracha or swap it with a drizzle of unagi sauce for a sweet-savory kick.
- Variation: Gluten-free option: opt for tamari instead of light soy sauce — it tastes just as good without the gluten.
- Variation: To make it plant-based, replace salmon with smoked tofu cubes marinated in the mayo-sriracha mix. It changes the game altogether.
How to Make Easy Baked Salmon Sushi Cups (Viral Recipe) Recipe
Step 1: Cook and Season the Sushi Rice
Start by cooking your sushi rice according to the package instructions. While it’s hot, mix rice vinegar with sugar in a microwave-safe bowl and warm it just until the sugar dissolves. Pour this mixture over the cooked rice and gently fold it in to coat evenly. This step is crucial because it gives your sushi rice that classic tangy-sweet flavor. Set the rice aside to cool just a bit while you prep the salmon.
Step 2: Prepare the Salmon Mixture
Cube the salmon into small pieces, then combine it in a bowl with light soy sauce, Kewpie mayo, sriracha, and sesame oil. Mix everything until the salmon chunks are coated well in the creamy, spicy sauce mix. This marinade not only adds great flavor but keeps the salmon moist while baking. Pro tip: don’t overcrowd the bowl to ensure an even coating on every piece.
Step 3: Assemble the Sushi Cups
Preheat your oven to 400℉, and prepare a muffin tin by lightly spraying each cup with cooking spray. Cut the nori sheets into quarter-sized rectangles—this size fits perfectly in each muffin cup. Press a spoonful of seasoned rice into each nori square inside the tin, making sure to press gently but firmly so it holds its shape. Top the rice layer with a spoonful of the salmon mixture. Fill all the cups this way, taking care not to spill too much over the edges or the nori might tear during baking.
Step 4: Bake Until Perfection
Slide the muffin tin into the oven and bake for about 15 minutes. You’re looking for the salmon to cook through and the tops to get a slight golden-brown hue. Don’t overbake, or the salmon can dry out; it should be tender with a slightly crispy top. Once done, let the sushi cups cool in the tin for a few minutes to firm up before removing them.
How to Serve Easy Baked Salmon Sushi Cups (Viral Recipe) Recipe
Garnishes
My favorite finishing touches are a drizzle of extra sriracha or some spicy mayo to kick up the heat, then a generous sprinkle of furikake for that umami crunch. Chopped green onions add brightness and a little fresh bite—these simple garnishes take the presentation and flavor to the next level. You’ll find that adding the garnishes right before serving keeps everything fresh and crisp.
Side Dishes
To round out the meal, I usually serve these salmon sushi cups with a light cucumber salad dressed in rice vinegar and sesame oil or a bowl of miso soup. A side of pickled ginger also complements the flavors beautifully and helps cleanse the palate between bites.
Creative Ways to Present
For a party or special occasion, I like to arrange the sushi cups on a large platter with edible flowers, shiso leaves, and thin lemon slices around the edges for pops of color and elegance. Serving with small dipping bowls of soy sauce or wasabi mayo lets guests customize their experience, making it feel extra festive without any extra fuss in the kitchen.
Make Ahead and Storage
Storing Leftovers
Leftover sushi cups can be stored in an airtight container in the fridge for up to 2 days. I recommend placing a piece of parchment paper between layers if stacking to keep the nori from getting soggy. Just keep in mind that the nori will soften a bit over time, so they’re best eaten sooner rather than later.
Freezing
I haven’t had great luck freezing these sushi cups because the texture of both the rice and salmon tends to change, becoming a bit mushy after thawing. For best results, enjoy them fresh or refrigerated rather than frozen.
Reheating
When reheating, I gently warm the cups in a low oven (about 300℉) for 5-7 minutes to avoid drying out the salmon or making the rice rubbery. Microwaving works in a pinch but tends to make the nori tough, so oven heating is my go-to for preserving flavor and texture.
FAQs
-
Can I use other types of fish for the Easy Baked Salmon Sushi Cups (Viral Recipe) Recipe?
Absolutely! While salmon is popular for its rich flavor and texture, you can substitute with cooked shrimp, crab, or even cooked white fish like cod. Just ensure your fish is properly cooked or safe to eat if raw, and adjust cooking times as needed.
-
Is it necessary to bake the sushi cups?
Baking helps cook the salmon through and slightly crisps the top layer for a wonderful texture contrast. If you prefer, you could serve the salmon mixture raw (using sushi-grade fish) without baking, but the cups won’t have the same baked finish or warmth.
-
How do I prevent the nori from getting soggy?
Lightly spraying the muffin tin with cooking spray helps prevent sticking but doesn’t completely eliminate moisture contact. To keep nori crisp longer, assemble the cups just before serving and avoid storing leftovers for more than a day. Also, keeping the cups cool but not refrigerated immediately after baking helps.
-
Can I make the sushi rice ahead of time?
Yes, you can prepare sushi rice a few hours ahead. Just cover and let it come to room temperature before assembling the cups. Avoid refrigerating rice overnight because it will lose that signature sticky texture crucial for making sushi cups.
-
What can I use if I don’t have Kewpie Mayo?
Regular Japanese-style mayo (like Best Foods or Hellmann’s with added a pinch of sugar and a dash of rice vinegar) can work as a substitute. The key is to have a mayo that’s creamy and slightly sweet to complement the salmon and sriracha well.
Final Thoughts
This Easy Baked Salmon Sushi Cups (Viral Recipe) Recipe really holds a special place in my kitchen because it combines the best of homemade sushi without the stress. Every time I make it, I’m reminded that cooking doesn’t need to be complicated to be delicious and impressive. If you’re looking for a fun, flavorful recipe that feels a little fancy but is super approachable, I highly recommend giving these sushi cups a try—you might just find a new favorite way to enjoy sushi at home.
Print
Easy Baked Salmon Sushi Cups (Viral Recipe) Recipe
- Prep Time: 15 minutes
- Cook Time: 15 minutes
- Total Time: 30 minutes
- Yield: 12 sushi cups 1x
- Category: Appetizer
- Method: Baking
- Cuisine: Japanese
Description
These Easy Baked Salmon Sushi Cups are a fun and flavorful twist on traditional sushi, perfect for a quick and impressive appetizer or snack. Featuring tender cubed salmon marinated in a spicy mayo sauce, nestled atop seasoned sushi rice inside crispy nori cups, this recipe is baked to perfection for a deliciously easy-to-make finger food that’s sure to become a viral favorite.
Ingredients
Salmon Mixture
- 1 lb salmon, cubed
- 1 tbsp light soy sauce
- 1 tbsp Kewpie Mayo
- 1 tbsp Sriracha
- 1 tsp sesame oil
Sushi Rice
- 1 ½ cup uncooked sushi rice
- 1 tbsp rice vinegar
- 2 tsp white sugar
Assembly & Garnish
- 3 large nori sheets
- furikake, for garnish
- 1 green onion, chopped, for garnish
- cooking spray
Instructions
- Cook Sushi Rice: Rinse the sushi rice until the water runs clear, then cook it according to the package instructions. This typically involves simmering the rice in water until tender and fluffy.
- Season Rice: In a microwave-safe bowl, combine the rice vinegar and sugar. Microwave for about 30 seconds or until the sugar is fully dissolved. Pour this mixture over the cooked rice and gently fold it in to evenly season the rice. Set aside to cool slightly.
- Preheat Oven: Set your oven to 400℉ (200℃) to get it ready for baking the sushi cups.
- Prepare Salmon Mixture: In a bowl, mix cubed salmon with light soy sauce, Kewpie mayo, Sriracha, and sesame oil until well combined and evenly coated. Set aside to marinate briefly.
- Prepare Nori Sheets: Cut each large nori sheet into 4 rectangles or squares that will fit inside the wells of a muffin tin.
- Assemble Sushi Cups: Lightly spray the muffin tin with cooking spray. Place each nori square into a muffin cup well. Spoon a portion of seasoned sushi rice onto the center of each nori square, pressing down lightly to form a base layer. Then, top each rice base with a generous layer of the salmon mixture.
- Bake: Place the muffin tin in the preheated oven and bake the sushi cups for 15 minutes or until the salmon is cooked through and the tops have slightly golden edges.
- Garnish & Serve: Remove the sushi cups from the oven and allow them to cool for a few minutes. Drizzle extra Sriracha or spicy mayo over the top if desired. Garnish with furikake seasoning and chopped green onions. Serve immediately and enjoy your delicious baked salmon sushi cups!
Notes
- You can adjust the spiciness by varying the amount of Sriracha and spicy mayo added.
- If you don’t have Kewpie mayo, use a high-quality Japanese-style mayo or regular mayo as a substitute.
- Cook sushi rice using a rice cooker or stovetop method for best texture.
- For a gluten-free option, use gluten-free soy sauce.
- Ensure not to overfill the muffin tins to prevent spilling during baking.
Keywords: baked sushi cups, salmon sushi cups, easy sushi recipe, baked salmon sushi, appetizer sushi, spicy salmon sushi cup, viral sushi recipe