Crispy Beef Tacos with Cheddar and Fresh Salsa Recipe
There’s just something magical about Crispy Beef Tacos with Cheddar and Fresh Salsa Recipe that instantly brightens up any meal. I remember the first time I made these tacos—they were crispy on the outside, wonderfully cheesy, and packed with a savory, slightly spicy ground beef filling that made everyone ask for seconds. If you’re looking for a recipe that hits all those comfort-food notes but still feels fresh and vibrant, this one’s it.
What I love most is how perfectly these Crispy Beef Tacos with Cheddar and Fresh Salsa Recipe works for busy weeknights or casual gatherings. They’re quick to pull together, come loaded with flavor, and the fresh salsa adds that zesty brightness that balances all the richness. Plus, you get to enjoy that satisfying crunch from frying the tortillas—it’s just so, so good.
Ingredients You’ll Need
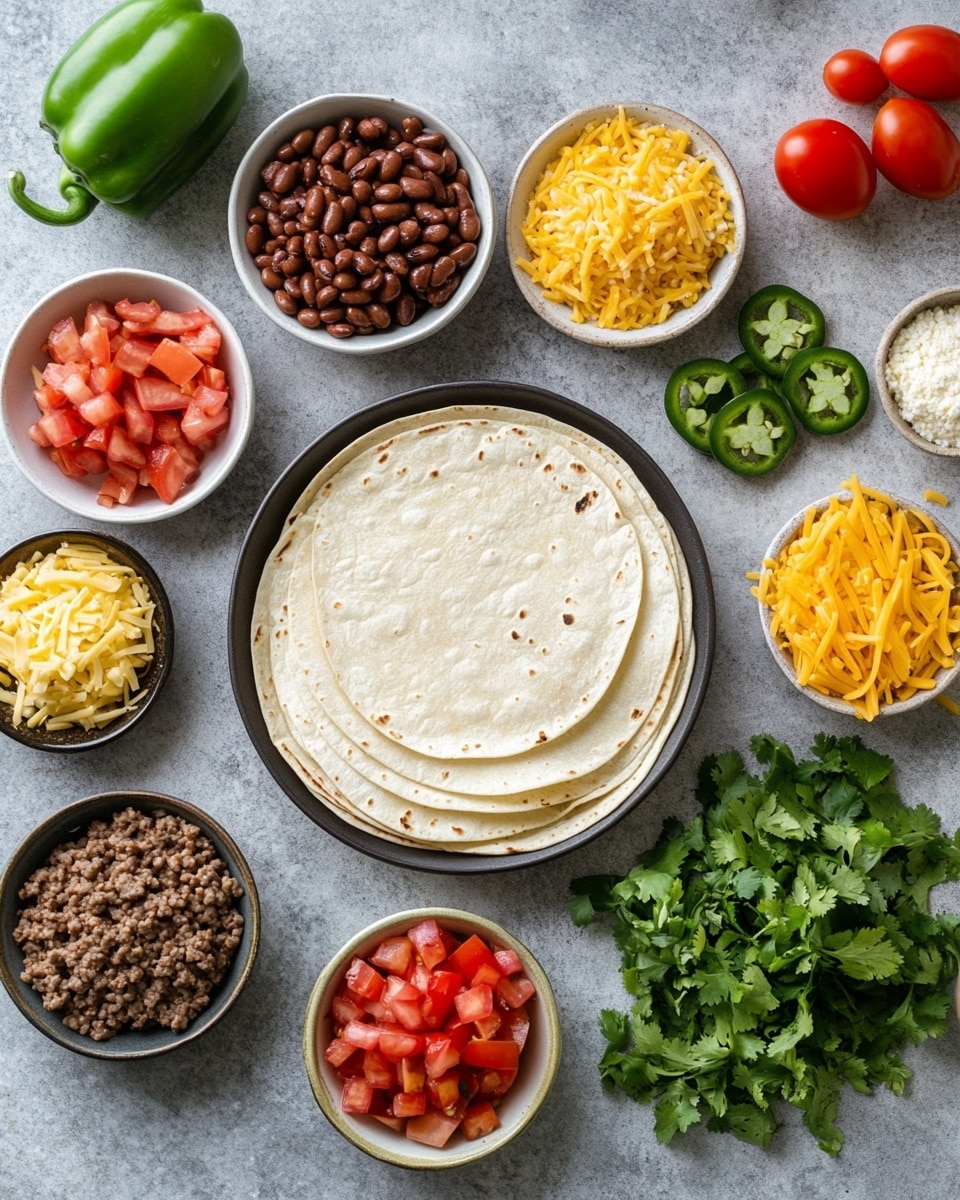
All the ingredients for this Crispy Beef Tacos with Cheddar and Fresh Salsa Recipe come together beautifully to create layers of flavor and texture. Whenever I shop for taco nights, I make sure to pick ripe, fresh produce and good-quality cheese to really bring the dish to life.
- Ground beef: Choose lean ground beef for juicy filling without too much grease.
- Onion: Diced finely so it blends into the beef and adds sweetness.
- Taco seasoning: A mix of spices that makes your filling pop—homemade or store-bought works.
- Jalapeño pepper: Adds a gentle kick; remember to remove seeds if you want less heat.
- Pinto beans: Rinsed and drained to avoid added saltiness, these add heartiness and creaminess.
- Flour: Helps thicken the filling so it’s not runny when wrapped.
- Petite diced tomatoes: Undrained for juiciness, they keep the filling moist and tangy.
- Beef stock or water: Adds depth of flavor and ensures the mixture simmers nicely without drying out.
- Grated Cheddar cheese: Sharp and melty cheese is key for gooey, cheesy goodness.
- Flour tortillas: The base that crisps up beautifully in the pan.
- Vegetable oil: For frying, use a neutral oil with a high smoke point to get perfect crust.
- Avocado crema, Sour cream, Salsa Fresca: These toppings brighten and cool the spicy, cheesy filling.
Variations
I like to keep things flexible with this Crispy Beef Tacos with Cheddar and Fresh Salsa Recipe, making tweaks depending on mood and what’s in the fridge. Don’t be shy to switch things up and make it your own—that’s part of the fun!
- Variation: For a lighter option, swap ground beef with ground turkey or chicken—still tasty and cooks quickly.
- Vegetarian twist: Omit the beef and double up on pinto beans and veggies like bell peppers and corn for a hearty filling.
- Cheese choice: Try pepper jack instead of cheddar if you want a bit more spice and creaminess combined.
- Spice level: Add more jalapeño or a dash of chipotle powder if you like your tacos with a smoky punch.
- Gluten-free: Use corn tortillas and substitute flour with a gluten-free thickener like cornstarch.
How to Make Crispy Beef Tacos with Cheddar and Fresh Salsa Recipe
Step 1: Sizzle the Beef and Onion Just Right
Start by heating your skillet over medium-high heat and toss in the ground beef with diced onion. Cook until the beef loses all pink and the onions turn soft and translucent—don’t rush this step, it lets the flavors marry. Make sure to drain any excessive grease so your filling isn’t too oily, which could make the tortillas soggy later.
Step 2: Spice It Up and Let It Simmer
Add your taco seasoning and minced jalapeño, stirring for a couple minutes so those spices bloom and fill your kitchen with that irresistible taco aroma. Then, stir in the pinto beans, sprinkle the flour, and cook briefly to get rid of any raw flour taste. Pour in the canned diced tomatoes with their juices and the beef stock, and let everything simmer gently for about 15 minutes. This slow simmer builds a thick, richly flavored filling that won’t spill out when frying.
Step 3: Fill, Fold, and Get Ready to Fry
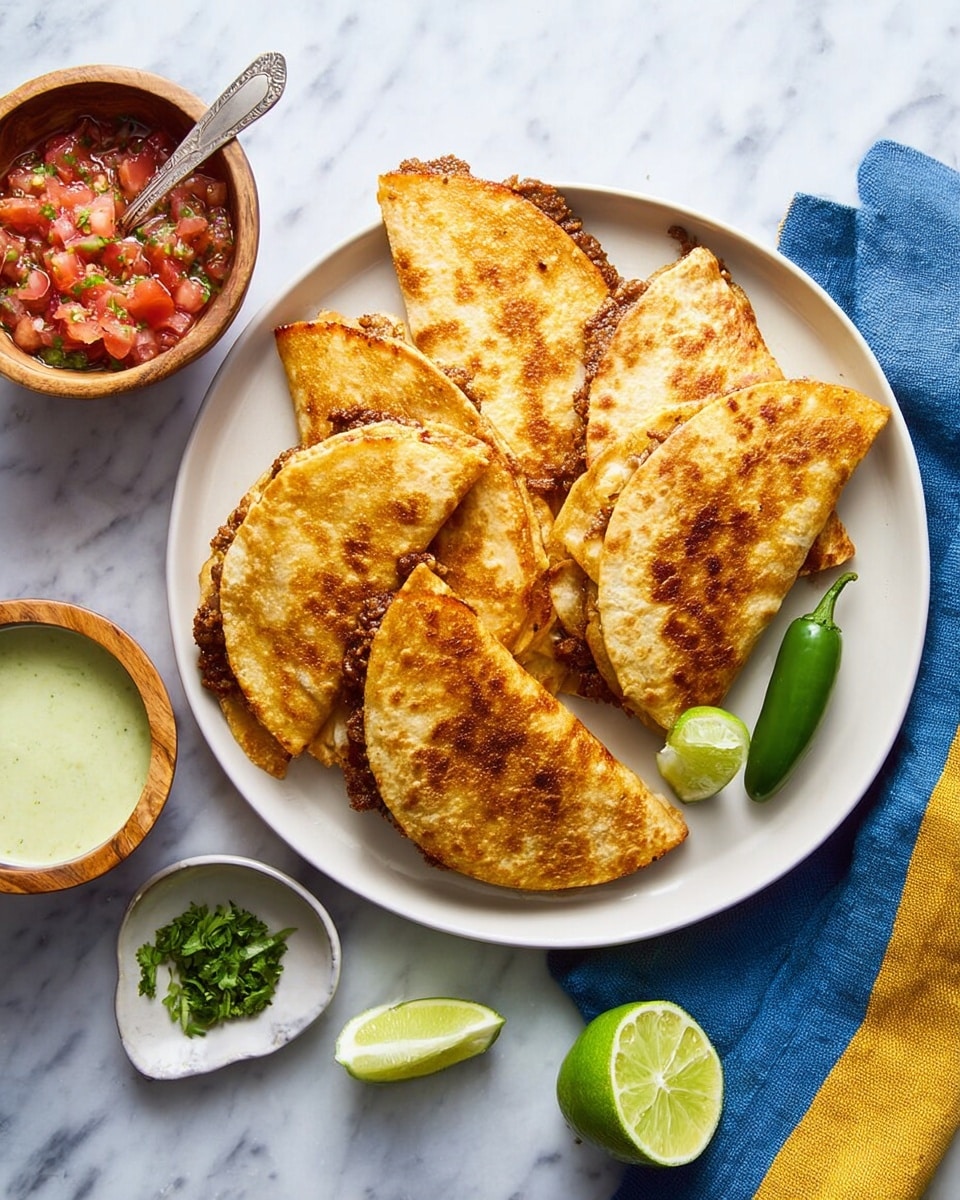
Next, lay out your tortillas and sprinkle a layer of grated cheddar on half of each one—that cheese layer acts like a tasty glue. Spoon the beef mixture on top of the cheese, then add more cheddar before folding them over. These folded tacos are ready for their final crispy transformation.
Step 4: Fry to Golden, Crispy Perfection
Wipe out your skillet, add a splash of vegetable oil, and heat over medium. Carefully place the folded tacos in the pan and fry for about 2 minutes per side until golden brown and delightfully crispy. Timing matters here—too quick and the cheese won’t melt; too slow and the tortillas get greasy. I like to keep a close eye and turn once I see that perfect golden crust forming.
How to Serve Crispy Beef Tacos with Cheddar and Fresh Salsa Recipe
Garnishes
I personally love topping these tacos with a dollop of cool sour cream or creamy avocado crema to balance the heat. Fresh salsa fresca adds zing and brightness—I often make mine with tomatoes, onions, cilantro, and a squeeze of lime. A little extra shredded cheddar or chopped cilantro on top never hurts either.
Side Dishes
To round out the meal, I usually pair these tacos with a simple side of Mexican rice or a crisp, chopped cabbage slaw. If you want to keep things light, a fresh green salad with citrus dressing works beautifully too.
Creative Ways to Present
For gatherings, I’ve arranged these tacos standing upright in a taco holder—makes serving easy and keeps them crispy longer. Another fun idea I tried was layering the filling and toppings in a mini cast iron skillet for each guest, letting folks customize their own toppings at the table.
Make Ahead and Storage
Storing Leftovers
Leftover filling stores beautifully in an airtight container in the fridge for up to 3 days. Just reheat it gently on the stove or microwave, stirring occasionally. I usually keep the tortillas separate so they don’t get too soggy overnight.
Freezing
I’ve frozen the cooked beef filling successfully for up to 2 months. Thaw overnight in the fridge, then reheat slowly to maintain all that great flavor and texture. I don’t recommend freezing the assembled tacos since the tortillas won’t crisp up as well after thawing.
Reheating
When reheating leftover assembled tacos, I pop them on a skillet over medium heat to crisp up the tortillas again. Microwaving tends to make them soggy, so the stovetop method is my go-to for keeping that crunch intact.
FAQs
-
Can I make Crispy Beef Tacos with Cheddar and Fresh Salsa Recipe ahead of time?
Absolutely! You can prepare the beef filling a day or two in advance and store it in the refrigerator. When ready to eat, just reheat the filling and then assemble and fry the tacos fresh for the best crispiness.
-
What can I use if I don’t have flour tortillas?
Corn tortillas are a great gluten-free alternative. Just be gentle when folding as they can be more fragile. Also, warming them briefly before filling helps prevent breakage.
-
How do I adjust the spice level in this recipe?
Either reduce or remove the jalapeño seeds to lower heat or add extra jalapeños or chili powder if you want more kick. You can also serve with cool toppings like sour cream or avocado crema to balance spiciness.
-
Can I make this recipe vegetarian?
Yes! Simply omit the ground beef and increase the pinto beans or add hearty veggies like mushrooms or zucchini for fillling. The flavorful spices and fresh salsa keep it deliciously satisfying.
Final Thoughts
I honestly can’t recommend this Crispy Beef Tacos with Cheddar and Fresh Salsa Recipe enough—it’s become a go-to comfort meal in my kitchen that never disappoints. With that crisp shell, melty cheese, and flavorful beef, plus the fresh zing from salsa, it’s a crowd-pleaser every time. Give it a try for yourself—you’ll love how easy and delicious taco night can be!
Print
Crispy Beef Tacos with Cheddar and Fresh Salsa Recipe
- Prep Time: 15 minutes
- Cook Time: 30 minutes
- Total Time: 45 minutes
- Yield: 10 tacos 1x
- Category: Main Dish
- Method: Frying
- Cuisine: Mexican
Description
These Crispy Beef Tacos are a delicious and satisfying stovetop recipe featuring seasoned ground beef simmered with beans and tomatoes, layered with melted Cheddar cheese inside warm flour tortillas, and pan-fried until golden and crispy. Perfect for a flavorful Mexican-inspired meal served with salsa, sour cream, or avocado crema.
Ingredients
Beef Mixture
- 1½ pounds ground beef
- ½ onion, diced
- 2 tablespoons taco seasoning
- 1 jalapeño pepper, seeded and minced
- 1 15-ounce can pinto beans, rinsed and drained
- 2 tablespoons flour
- 1 15-ounce can petite diced tomatoes, undrained
- ½ cup beef stock or water
Tacos
- 2 cups grated Cheddar cheese (12 ounces)
- 10 8-inch flour tortillas
- Vegetable oil, for frying
Toppings
- Avocado crema
- Sour cream
- Salsa fresca
Instructions
- Cook the Beef and Onions: Heat a large skillet over medium-high heat. Add the ground beef and diced onion. Cook, stirring occasionally, until the beef is fully cooked and no longer pink. Drain off excess grease and return the beef mixture to the skillet.
- Add Seasonings and Beans: Stir in the taco seasoning and minced jalapeño pepper. Sauté for 2 minutes until the seasoning becomes fragrant. Add the rinsed pinto beans and sprinkle the flour evenly over the mixture. Cook, stirring to distribute the flour, for another 1–2 minutes to help thicken.
- Simmer with Tomatoes and Stock: Pour in the undrained diced tomatoes and beef stock (or water). Reduce heat to low and simmer gently for 15 minutes, allowing the flavors to meld and the mixture to thicken.
- Assemble the Tacos: Lay the flour tortillas flat on your work surface. Sprinkle about half of the grated Cheddar cheese on half of each tortilla. Spoon an even amount of the beef mixture over the cheese, then top with the remaining cheese. Fold each tortilla in half to enclose the filling.
- Fry the Tacos: Wipe out the skillet and heat it again over medium heat. Add a generous glug of vegetable oil. Place the folded tacos in the skillet, cooking for 2–3 minutes per side until the tortillas are browned and crispy and the cheese inside is melted. Remove the tacos and place them on a plate lined with paper towels to drain excess oil.
- Serve and Garnish: Serve the crispy beef tacos warm. Top with your choice of salsa fresca, sour cream, and avocado crema to add freshness and creaminess.
Notes
- If you prefer a spicier taco, leave some seeds in the jalapeño or add more pepper.
- Using flour tortillas ensures they crisp nicely when fried, but corn tortillas can be used for a gluten-free option.
- Be careful not to overcrowd the skillet when frying tacos; cook in batches if needed.
- Drain the cooked tacos on paper towel to remove excess oil for a less greasy finish.
- You can prepare the beef mixture in advance and refrigerate for up to 2 days before assembling and frying.
Keywords: crispy beef tacos, stovetop tacos, fried tacos, ground beef tacos, Mexican tacos, cheddar cheese tacos