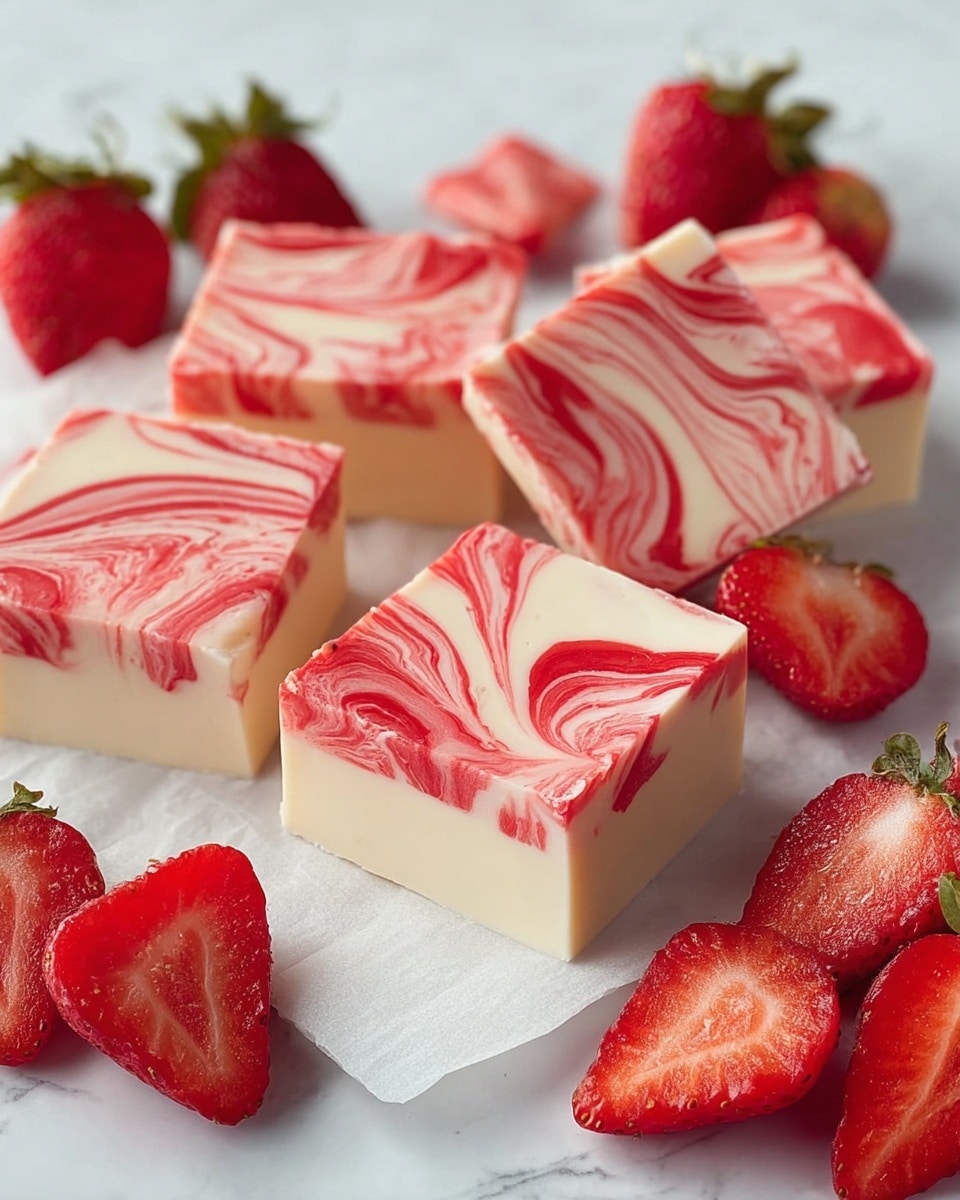
Strawberry Swirl Fudge Recipe
If you’ve ever craved a sweet treat that’s both nostalgic and a little bit fancy, this Strawberry Swirl Fudge Recipe is exactly what you need. It takes classic creamy fudge and adds a beautiful, fruity twist with a vibrant pink swirl that looks as delightful as it tastes. I love making it for holidays or whenever I want to impress friends with something homemade but still approachable.
The best part? This Strawberry Swirl Fudge Recipe manages to balance rich, buttery sweetness with just the right touch of strawberry flavor, so every bite feels fresh and satisfying. Plus, the marbled swirl always wows guests, and honestly, it’s easier to pull off than it looks. I’m excited to share all my tips with you so your batch turns out perfect every time!
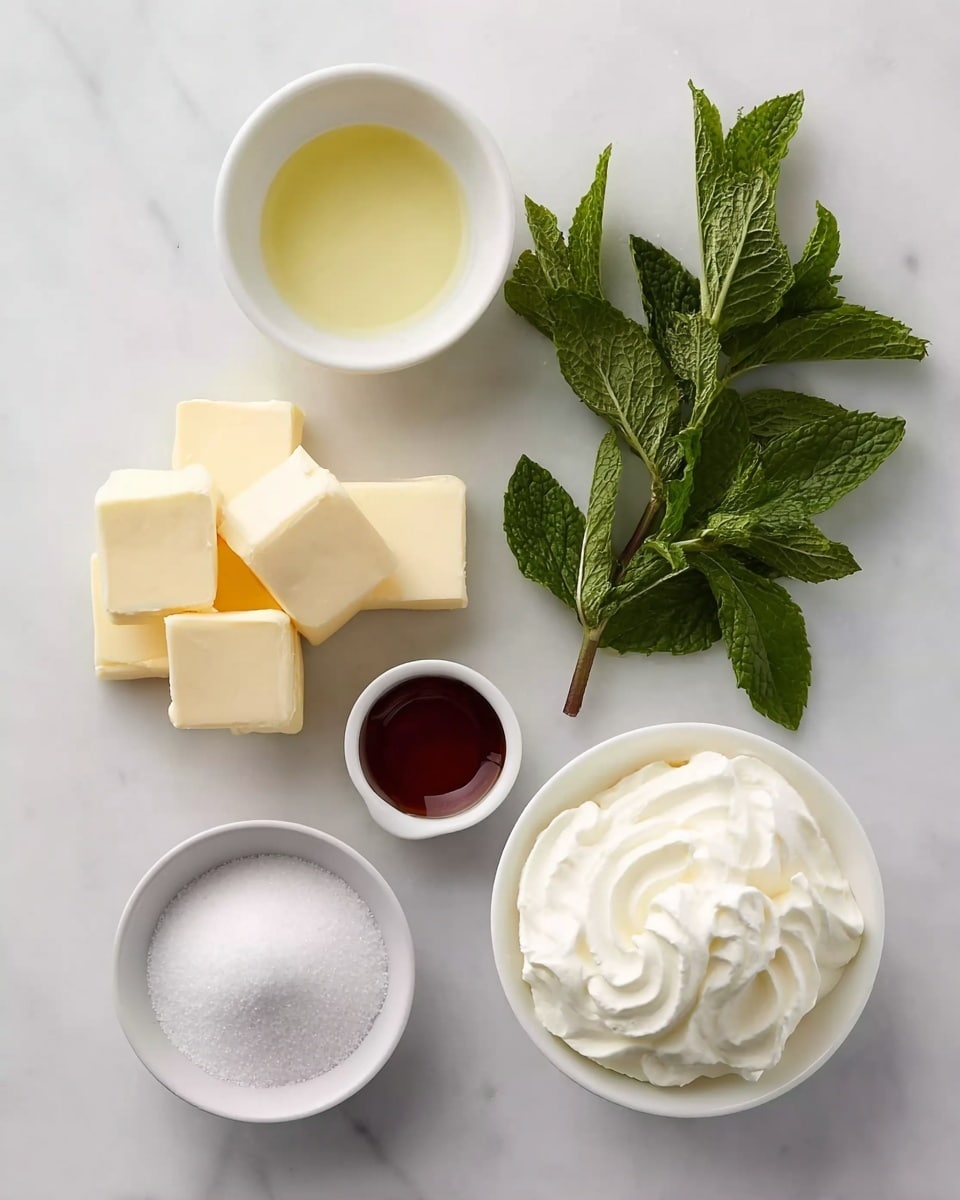
Ingredients You’ll Need
This recipe uses simple but well-chosen ingredients that come together beautifully—each has a role in creating that silky texture and fresh strawberry punch. A quick note on shopping: I always recommend using quality white baking chips and real strawberry extract, not just artificial flavor, to get the best taste and smooth melt.
- Strawberry extract: Choose a pure or high-quality extract like Watkins for authentic flavor without bitterness.
- Red food color gel: Use gel instead of liquid for vibrant color without thinning your fudge.
- Salted sweet cream butter: Adds richness and depth—room temperature butter melts best.
- Half and half: Contributes creaminess; don’t substitute with milk to maintain fudge texture.
- Heavy cream: Essential for smoothness and that melt-in-your-mouth feel.
- Clear vanilla flavoring: Enhances all the other flavors without darkening the fudge.
- Marshmallow fluff: Key for the fudge’s classic creamy, soft texture. Make sure it’s fresh!
- Granulated sugar: Provides sweetness and structure; stir carefully to avoid crystallization.
- White baking chips: I recommend Ghirardelli for their superior melting quality and flavor.
Variations
I love playing around with this Strawberry Swirl Fudge Recipe to suit different occasions, and I encourage you to experiment too! Whether you’re adjusting flavors or looking for dietary swaps, it’s surprisingly versatile.
- Berry Mix: Sometimes, I add a splash of raspberry extract to the swirl for a tangier berry combo that guests adore.
- Vegan Alternative: Swap butter and dairy for plant-based versions and use vegan marshmallow fluff, but note the texture will be a little different.
- Chocolate Twist: Fold in some finely chopped white or milk chocolate chunks for an extra indulgent texture.
- Nutty Surprise: Toasted almonds or pistachios sprinkled on top give a lovely crunch that contrasts the smooth fudge.
How to Make Strawberry Swirl Fudge Recipe
Step 1: Prep Your Pan and Color Mixture
Start by lining a 9×9-inch baking dish with parchment paper. Be sure to let the parchment hang over the edges—that makes lifting the fudge out so much easier later on. Next, in a small bowl, mix your strawberry extract with the red food color gel. Stir them together really well to get an even pink color without streaks or clumps, which will help create those beautiful swirls in your fudge.
Step 2: Melt Butter and Cream
In a heavy-bottomed saucepan over medium heat, melt the butter together with half and half, heavy cream, and the clear vanilla flavoring. Keep stirring gently until everything has melted and combined into a smooth mix—no rush here, but watch that it doesn’t boil over.
Step 3: Sweeten and Simmer
Add the sugar and slowly bring the mixture to a gentle simmer. Stir constantly for about 6-7 minutes to dissolve the sugar fully and prevent scorching. Then, let it simmer for a few more minutes, stirring all the while. This stage is key to getting the right fudge texture, so don’t skip the stirring or rush the simmer.
Step 4: Melt White Chips and Marshmallow Fluff
Remove the pan from heat, add your white baking chips, and cover the pan. Let it sit for 3-4 minutes to allow the chips to melt without stirring too soon. After resting, stir vigorously until smooth. Then fold in the marshmallow fluff until your mixture is silky and glossy—this is what makes the fudge irresistibly creamy.
Step 5: Assemble the Swirl
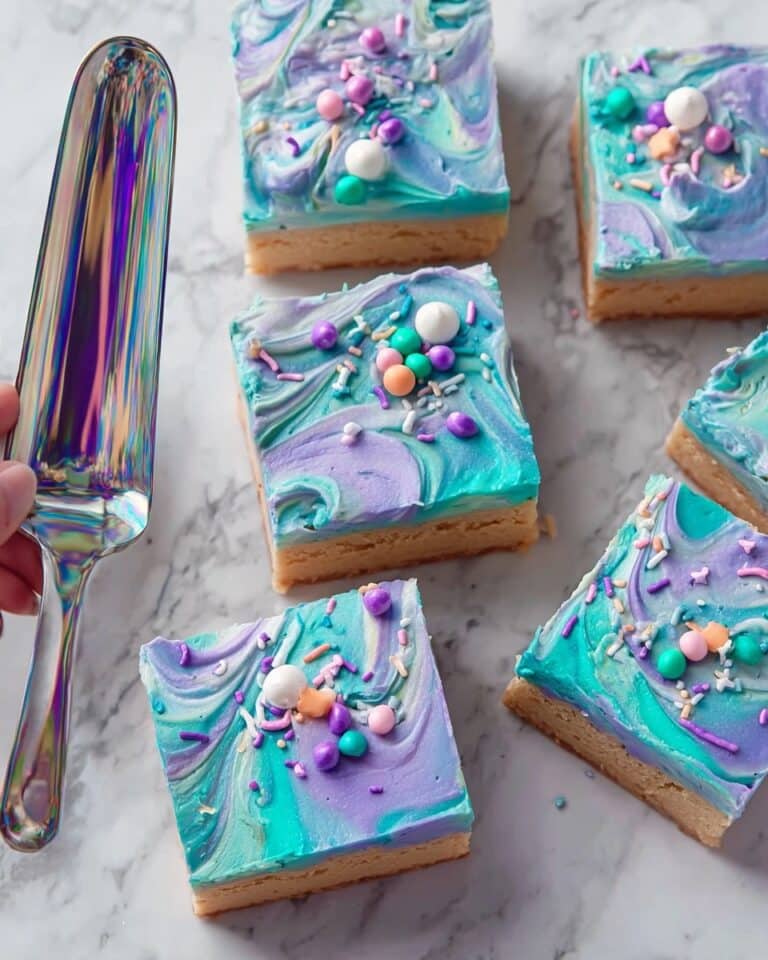
Pour about three-quarters of your fudge into the prepared pan, smoothing it out gently. Then stir the strawberry and red color mix into the remaining fudge in your pot until perfectly blended pink. Drop spoonfuls of this vibrant fudge on top of the base layer, then take a butter knife and swirl gently for that gorgeous marbled effect. Don’t over-swirl or the colors might blend too much.
Step 6: Set and Slice
Let your fudge sit at room temperature for half an hour, then pop it in the fridge to chill for at least 4 hours until firm. When it’s ready, use the parchment sling to lift it out and cut into 25 perfect squares. A sharp knife helps make clean cuts—warm the blade in hot water between slices to prevent sticking.
How to Serve Strawberry Swirl Fudge Recipe
Garnishes
I often top mine with a light dusting of freeze-dried strawberry powder or a few whole freeze-dried berries for an extra pop of color and texture. Crushed nuts on the edges can add a nice crunch. Simple is best here, since the fudge itself is already the star.
Side Dishes
Pair this fudge with a hot cup of tea or coffee for a perfect afternoon pick-me-up. It also complements a cheese or charcuterie board beautifully, adding a sweet contrast to savory bites—trust me, your guests will be surprised in the best way!
Creative Ways to Present
I’ve wrapped individual fudge squares in pretty parchment or cellophane tied with a ribbon for party favors. During holidays, I arrange the fudge pieces on a festive platter with fresh strawberries and edible flowers—makes for an unforgettable dessert table centerpiece.
Make Ahead and Storage
Storing Leftovers
Keep your Strawberry Swirl Fudge Recipe leftovers in an airtight container in the refrigerator. I find it stays fresh and creamy for up to two weeks, though if you’re like me, it rarely lasts that long!
Freezing
If you want to freeze your fudge, wrap each piece tightly in plastic wrap and place them in a sealed freezer bag. I’ve had good luck freezing them for up to 3 months without losing texture or flavor—just thaw in the fridge overnight before serving.
Reheating
This fudge is best enjoyed chilled, so reheating isn’t necessary. If you prefer it slightly softer, let the fudge sit at room temperature for 15-20 minutes. Avoid microwaving as that can make it grainy.
FAQs
-
Can I use fresh strawberries instead of extract in the Strawberry Swirl Fudge Recipe?
Fresh strawberries have a high water content, which can cause the fudge to seize or not set properly. The extract gives a concentrated flavor without altering texture, so it’s best to stick with extract for this recipe. However, you can add a small amount of freeze-dried strawberry powder for some natural berry flavor and slight texture.
-
Why is the red food color gel important in this recipe?
Gel food color provides vibrant color without adding moisture that liquid coloring can introduce, which might affect your fudge’s consistency. It helps achieve that striking strawberry pink swirl that makes this fudge so visually appealing.
-
How do I avoid grainy fudge when making the Strawberry Swirl Fudge Recipe?
Constant stirring and maintaining a gentle simmer helps the sugar dissolve fully without crystallizing. Also, don’t skip the resting time for the white chips to melt fully before stirring. Using marshmallow fluff adds smoothness which reduces graininess too.
-
Can I make this fudge without marshmallow fluff?
Marshmallow fluff contributes to the signature smooth and creamy texture of this fudge. If you omit it, the fudge may be denser and less creamy. For best results, stick with the fluff or try a recipe specifically designed without it.
-
How long does Strawberry Swirl Fudge last?
Stored airtight in the fridge, this fudge stays fresh and delicious for about two weeks. If you want to keep it longer, freezing is a great option as mentioned earlier.
Final Thoughts
This Strawberry Swirl Fudge Recipe brings a touch of joy and elegance to any dessert table, and I’ve found it’s one of those sweets that instantly brightens a gathering. I always come back to making this fudge because it’s simple enough to whip up anytime, yet impresses every time. So seriously, give it a try—you’ll love how easy it is to turn ordinary fudge into a stunning, tasty treat your family and friends will keep asking for.
Print
Strawberry Swirl Fudge Recipe
- Prep Time: 5 minutes
- Cook Time: 15 minutes
- Total Time: 4 hours 50 minutes
- Yield: 25 pieces 1x
- Category: Dessert
- Method: Stovetop
- Cuisine: American
Description
This Strawberry Fudge recipe is a creamy, delicious treat featuring a smooth white chocolate base with a vibrant strawberry swirl. Enhanced with vanilla and marshmallow fluff, it offers a perfect balance of sweetness and rich texture, ideal for a special dessert or gift.
Ingredients
Flavorings and Color
- 2 teaspoons strawberry extract (Watkins recommended)
- ½ teaspoon red food color gel
- 1 teaspoon clear vanilla flavoring
Dairy and Creams
- ¾ cup salted sweet cream butter
- ½ cup half and half
- ⅓ cup heavy cream
- 7 ounces marshmallow fluff (1 container)
Sweets and Chips
- 3 cups + 2 tablespoons granulated sugar
- 1¾ cups good quality white baking chips (Ghirardelli recommended)
Instructions
- Prepare the baking dish: Line a 9×9-inch baking dish with parchment paper extending up all four sides for easy removal later, and set it aside.
- Mix strawberry flavor and color: In a small glass bowl, combine the strawberry extract and red food color gel, stirring thoroughly to blend and avoid staining.
- Melt butter and combine dairy: In a heavy-bottomed 3 to 4-quart saucepan over medium heat, combine butter, half and half, heavy cream, and clear vanilla flavoring. Stir continuously until the butter fully melts.
- Add sugar and simmer: Stir the granulated sugar into the dairy mixture, keeping it stirred constantly as it heats to a simmer over about 6-7 minutes. Let it simmer gently for an additional 3 minutes, then remove from heat.
- Melt white baking chips: Add the white baking chips to the hot mixture, cover the pan, and let it rest for 3-4 minutes. Stir thoroughly until chips are completely melted and mixture is smooth.
- Incorporate marshmallow fluff: Stir in the marshmallow fluff until the fudge mixture is smooth and well combined.
- Pour base fudge: Pour about three-quarters of the fudge mixture into the prepared baking dish.
- Color remaining fudge: Stir the strawberry extract and red food color gel mixture into the remaining fudge in the saucepan until the color is evenly blended.
- Create marbled effect: Spoon dollops of the red-colored fudge over the base fudge in the baking dish. Use a kitchen knife to gently swirl the red fudge, creating an attractive marbled pattern. Let the fudge sit at room temperature for 30 minutes.
- Chill the fudge: Transfer the fudge to the refrigerator and chill for at least 4 hours until fully set.
- Cut and serve: Once set, lift the fudge from the dish using the parchment paper. Cut into 5 by 5 slices, yielding 25 pieces. Keep refrigerated until ready to serve.
Notes
- Be sure to stir constantly during heating phases to prevent burning.
- Use good quality white baking chips like Ghirardelli for best flavor.
- Allow fudge to set completely in the refrigerator for easy slicing.
- The marbled swirl adds an elegant touch but can be adjusted for more or less color.
- Store fudge in an airtight container refrigerated for up to two weeks.
Keywords: strawberry fudge, white chocolate fudge, marbled fudge, easy fudge recipe, creamy fudge, holiday dessert