Spring Marble Chocolate Chip Cookies Recipe
I’ve got to tell you about this delightful Spring Marble Chocolate Chip Cookies Recipe that’s become an absolute favorite in my kitchen every spring. These cookies aren’t just your typical chocolate chip treat; they come alive with pretty pastel swirls that scream springtime — perfect for brightening up any afternoon tea or family gathering. Trust me, they’re as fun to make as they are to eat, and the marbled colors really bring a joyful flair to your cookie tray.
What I love most is how easily this recipe blends classic cookie comfort with a pop of color — it turns a simple baking session into a creative moment. Plus, these cookies are soft, chewy, and packed with chocolate chips in every bite. Whether you’re baking with kids or just want a sweet pick-me-up to celebrate the season, this Spring Marble Chocolate Chip Cookies Recipe will make you smile.
Ingredients You’ll Need
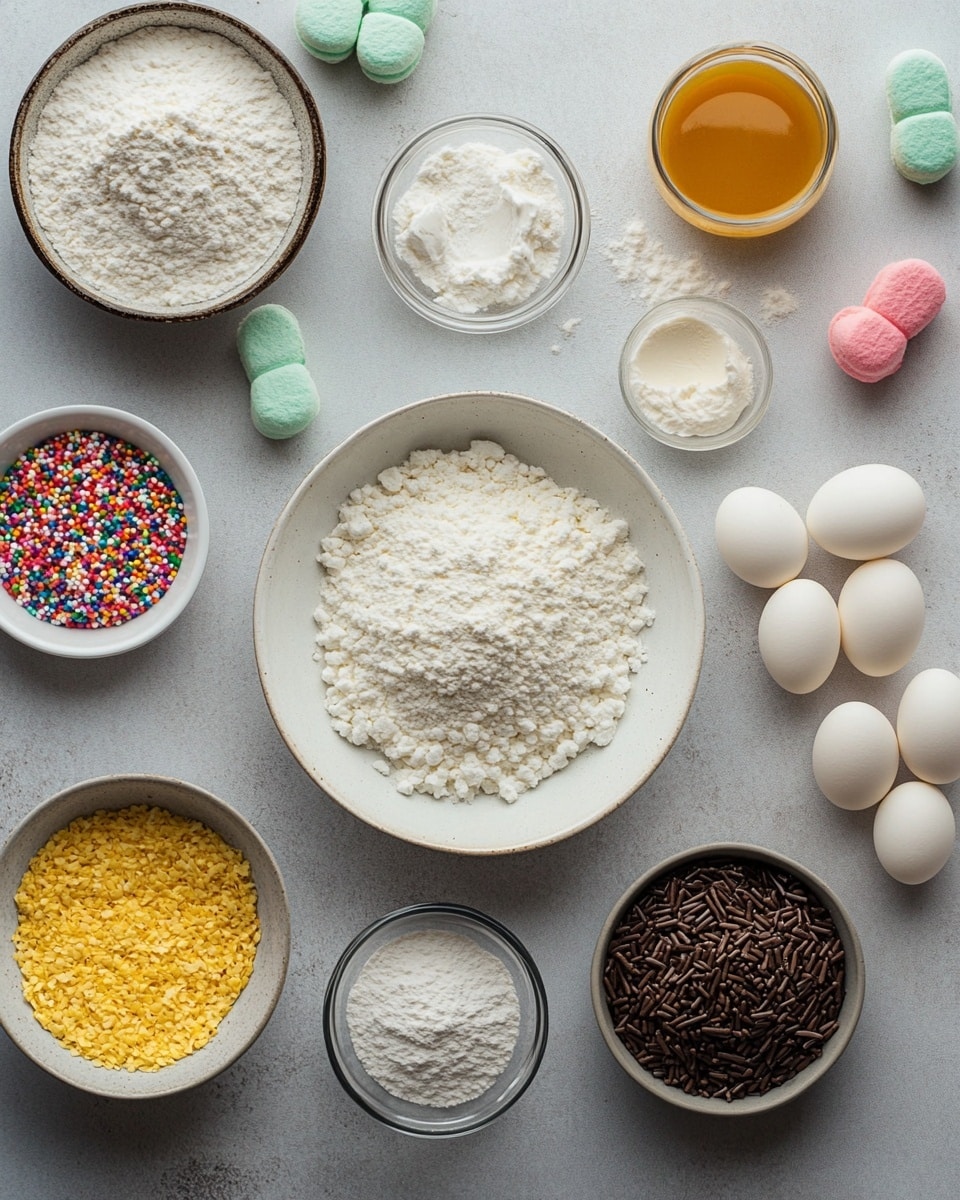
The magic behind these cookies lies in the way the simple ingredients come together with a dash of food coloring to create something visually stunning and delicious. Here’s what I use to get those perfect springtime swirls and classic chocolate chip goodness:
- Softened Butter (Sweet Cream, Salted): I always let my butter soften at room temperature to make creaming it with sugars smoother and easier.
- Granulated Sugar: For sweetness and that essential crisp edge on the cookies.
- Brown Sugar (packed): Adds moisture and a bit of chewiness thanks to its molasses content.
- Eggs: These help bind the dough while keeping it tender and moist.
- Vanilla Extract: I never skip pure vanilla; it enhances every flavor in the cookie.
- Baking Soda: Helps the cookies rise slightly and spread perfectly.
- Salt: Balances the sweetness and intensifies the chocolate flavor.
- All-Purpose Flour: The base that gives the cookies their structure.
- Nestle Toll House Chocolate Chips: You can’t go wrong with these – they melt just right and pack every bite with classic chocolate crunch.
- Wilton Color Right Food Coloring: I use gel-based colors because they’re vibrant and don’t thin the dough.
Variations
I love tweaking this recipe to make it my own, and I encourage you to do the same. Playing around with colors, flavors, or even chocolate types can completely transform these cookies while keeping the basics intact.
- Color Variations: Once, I swapped out the usual spring pastels for jewel tones like deep purple and turquoise — it gave the cookies a stunning, unexpected look that wowed my guests.
- Chocolate Types: Trying white chocolate chips or a mix of milk and dark chocolate adds a new layer of flavor sophistication.
- Dietary Adjustments: For a gluten-free version, I’ve had success substituting the flour with a 1:1 gluten-free blend, though I recommend chilling the dough a bit longer for easier handling.
- Flavor Boost: Adding a teaspoon of almond extract alongside the vanilla once really made the cookies sing with nutty aroma.
How to Make Spring Marble Chocolate Chip Cookies Recipe
Step 1: Cream Together Butter and Sugars
Start by creaming the softened butter with both the granulated and brown sugars in your mixer. It’s crucial to get a light, fluffy texture here — usually about 2-3 minutes on medium speed does the trick. This step builds the cookie’s foundation, so don’t rush. You’ll notice the mixture lighten in color, which is a great sign that you’re on the right track.
Step 2: Add Eggs and Vanilla
Next, beat in the eggs one at a time with the vanilla extract until everything feels airy and combined. This blending keeps your dough soft and fluffy, which translates to tender cookies. If your eggs are cold, it might slow down the mixing slightly — I usually pull mine out ahead of time to avoid this.
Step 3: Mix in Baking Soda, Salt, and Flour
Sprinkle in the baking soda and salt, stirring gently for just a moment to distribute them evenly. Then, add the all-purpose flour gradually — I do this in three parts — mixing after each addition to avoid overworking the dough. The dough is ready when it pulls away slightly from the bowl and feels soft but not sticky.
Step 4: Divide and Color the Dough
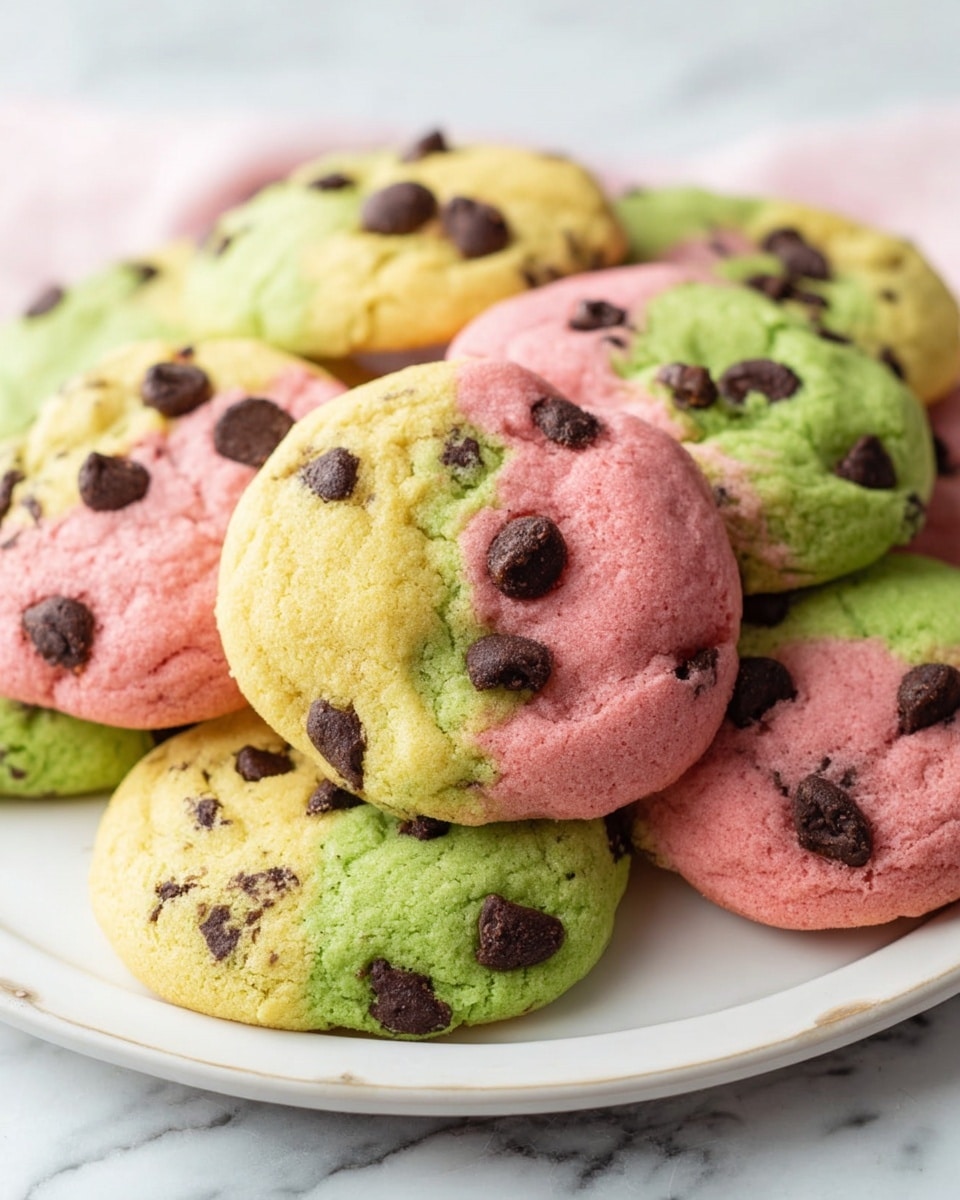
This part is where the fun really starts! I split the dough evenly into three portions. Using gel food coloring, I tint one batch yellow, another pink, and the last green for that signature spring marble effect. Mixing the colors in well but not too long keeps a vibrant look.
Step 5: Add Chocolate Chips and Form Cookies
Fold chocolate chips into each colored dough portion generously — don’t be shy; the chocolate really makes the cookie irresistible. Then, scoop roughly 2-ounce balls using one portion of each color, squeezing them together gently without blending completely. Flatten them slightly on your baking sheet for even baking and that marble swirl effect.
Step 6: Bake to Perfection
Bake the cookies in a preheated 350°F oven for 8-9 minutes until you see a golden edge forming. Be careful not to overbake; the centers should remain soft and chewy. When done, let the cookies rest a couple of minutes on the sheet before transferring to a cooling rack. This gives you the best texture and prevents breakage.
How to Serve Spring Marble Chocolate Chip Cookies Recipe
Garnishes
I often dust these cookies with a delicate sprinkle of powdered sugar — it adds a light sweetness and makes the colors pop even more. Sometimes, a tiny drizzle of white chocolate over the top feels like a fancy treat without much effort.
Side Dishes
Pair these cookies with a simple glass of cold milk, a hot cup of chamomile tea, or even a refreshing lemonade for a perfect springtime snack combo. I’ve also enjoyed them with fruit salad for a lovely balance of fresh and sweet.
Creative Ways to Present
For Easter or spring parties, I like serving these cookies stacked in clear mason jars, tied with pastel ribbons. Another trick is arranging single cookies on colorful plates with fresh edible flowers around the edges — it’s such a beautiful, Instagram-worthy presentation that guests really appreciate.
Make Ahead and Storage
Storing Leftovers
When I have extras, I keep these cookies in an airtight container at room temperature for up to 4 days. They stay soft and flavorful, and I find that separating layers with parchment paper helps keep them from sticking together.
Freezing
I freeze leftover cookie dough balls on a baking sheet first, then transfer them to a sealed freezer bag. That way, when I want fresh cookies, I pop them straight onto a baking sheet and bake from frozen — baking time just goes up by a minute or two. This trick has saved me on busy days and always gives great results.
Reheating
If I want to bring cookies back to that just-baked warmth, I briefly microwave them for about 10 seconds or warm them in a low oven for 3-4 minutes. Be careful not to overdo it or they might dry out. Adding a slice of bread in the container overnight can help keep them moist too.
FAQs
-
Can I use natural food coloring for the Spring Marble Chocolate Chip Cookies Recipe?
Absolutely! While gel-based colors like Wilton’s are great for vibrant hues without changing dough consistency, natural food colorings work fine too. Just expect slightly softer shades, and add them gradually to avoid overhydrating the dough.
-
What’s the best way to avoid the colors blending too much?
The key is to carefully combine the colored dough portions without fully mixing them. Gently pressing the three colors together into a ball lets them marble beautifully while keeping the distinct colors intact after baking.
-
Can I make these cookies vegan or dairy-free?
With a few swaps, yes! Use vegan butter and egg replacers, plus dairy-free chocolate chips. The texture might be slightly different but still delicious. Make sure to check that your food coloring is also vegan-friendly.
-
How do I keep the cookies soft and chewy?
Don’t overbake! Remove cookies from the oven as soon as the edges turn golden and the centers look just set. Also, using a mix of brown sugar helps retain moisture and chewiness in the cookies.
Final Thoughts
This Spring Marble Chocolate Chip Cookies Recipe holds a special place in my heart because it combines simple home baking with a joyful twist of color and fun. Every time I make these, I’m reminded how easy it is to bring a little extra sunshine into the kitchen — and on the plate. I hope you’ll try these cookies for yourself; they’re bound to become a seasonal favorite you look forward to sharing with family and friends.
Print
Spring Marble Chocolate Chip Cookies Recipe
- Prep Time: 10 minutes
- Cook Time: 10 minutes
- Total Time: 20 minutes
- Yield: 18 cookies 1x
- Category: Dessert
- Method: Baking
- Cuisine: American
Description
These Spring Marble Chocolate Chip Cookies are a delightful twist on the classic chocolate chip cookie, featuring vibrant pastel colors and rich chocolate chips. Perfect for celebrating the spring season, these cookies combine a buttery, soft texture with festive pink, yellow, and green hues that make them as visually appealing as they are tasty.
Ingredients
Cookie Dough
- 1 cup Softened Butter (Sweet Cream, Salted)
- 1 cup Granulated Sugar
- 1/2 cup Brown Sugar (packed)
- 2 Eggs
- 2 teaspoons Vanilla Extract
- 1 teaspoon Baking Soda
- 1/2 teaspoon Salt
- 2 3/4 cups All-Purpose Flour
- 1 Bag Nestle Toll House Chocolate Chips
Food Coloring
- Wilton Color Right Food Coloring (Yellow, Pink, Green)
Instructions
- Cream Butter and Sugars: In a mixing bowl, cream together the softened butter, brown sugar, and granulated sugar using a mixer until the mixture is smooth and fluffy.
- Add Eggs and Vanilla: Add the eggs one at a time along with the vanilla extract, mixing continuously until the batter becomes light and fluffy.
- Mix Dry Leavening and Salt: Stir in the baking soda and salt, ensuring they are evenly distributed throughout the batter.
- Incorporate Flour: Gradually add the all-purpose flour a little at a time, mixing thoroughly after each addition until the dough is fully combined and soft.
- Divide Dough: Separate the dough into three equal portions for coloring.
- Color Dough: Use Wilton Color Right food coloring to tint each portion yellow, pink, and green, kneading until the color is fully blended with the dough.
- Add Chocolate Chips: Mix chocolate chips evenly into each colored dough portion.
- Shape Cookies: Form 2-ounce balls by combining small amounts from each colored dough portion to create a marbled effect, then place them slightly apart on a cookie sheet.
- Flatten Cookies: Gently press down on each cookie ball slightly to flatten before baking.
- Bake Cookies: Preheat your oven to 350°F (175°C) and bake the cookies for 8-9 minutes or until golden brown around the edges. Remove from the oven and allow to cool slightly on the baking sheet before transferring to a wire rack.
Notes
- For a more pronounced marble effect, avoid fully blending the colors together when mixing the dough portions.
- If you prefer a chewier cookie, slightly underbake by reducing baking time by 1 minute.
- Use room temperature butter and eggs for best mixing results.
- For a dairy-free version, substitute butter with a plant-based margarine and ensure chocolate chips are dairy-free.
- Store cookies in an airtight container at room temperature for up to 5 days.
Keywords: spring cookies, marble cookies, chocolate chip cookies, colorful cookies, festive cookies, easy cookie recipe