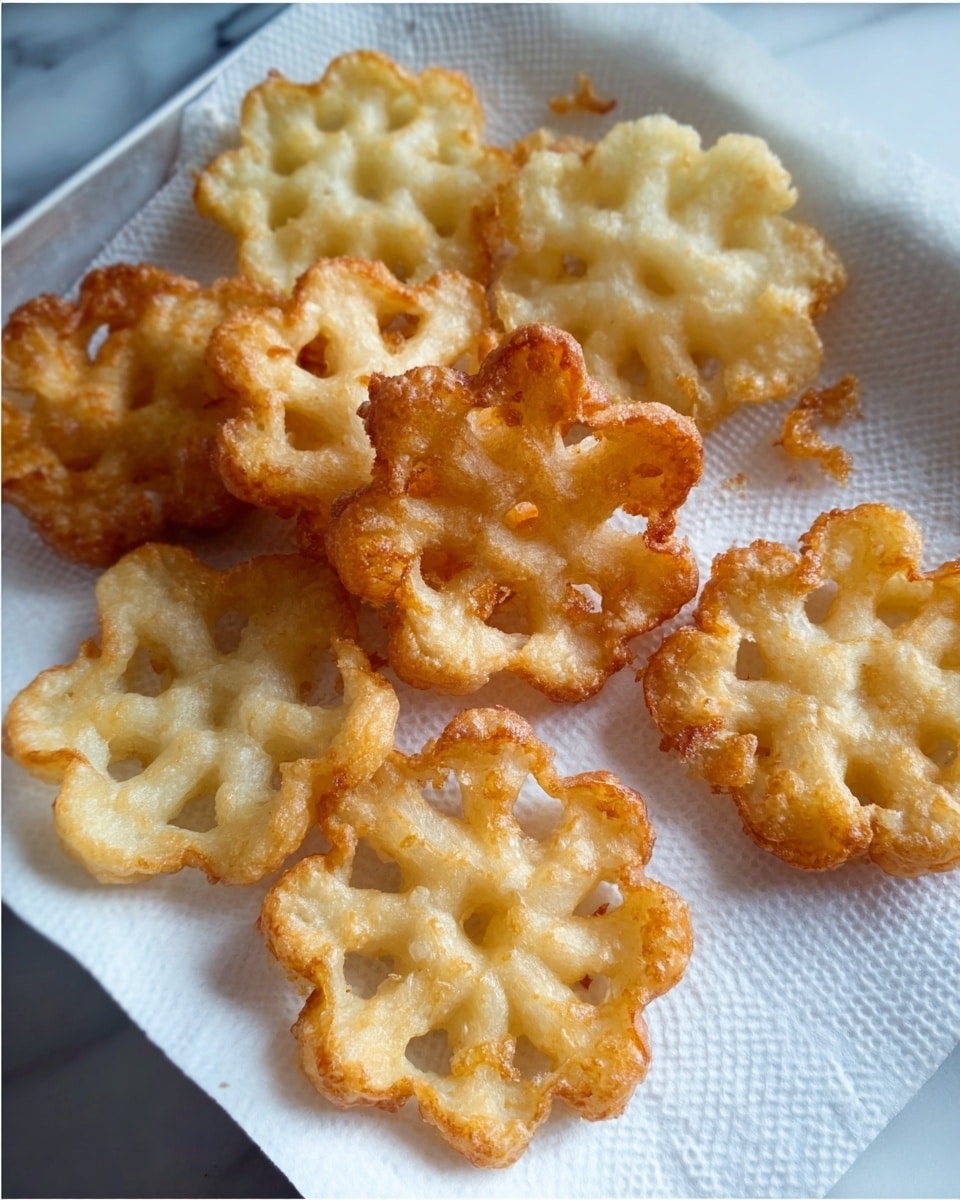
Scandinavian Rosettes Recipe
Let me tell you, there’s something truly magical about Scandinavian rosettes. These delicate, crispy, and beautifully shaped treats are like little edible works of art that have been a favorite at holiday gatherings and cozy afternoons for generations. What makes this Scandinavian Rosettes Recipe so special is how light and crisp they turn out—almost like a sweet, flavorful lace cookie you can’t help but admire before taking that first delightful bite.
I love making these when I want to impress guests without spending hours in the kitchen. The recipe is straightforward enough for anyone to try, even if you aren’t typically a deep-fryer. Plus, they’re incredible with a dusting of powdered sugar or drizzled with a little honey. You’ll truly enjoy how this Scandinavian Rosettes Recipe brings a little Scandinavian tradition right into your home kitchen.
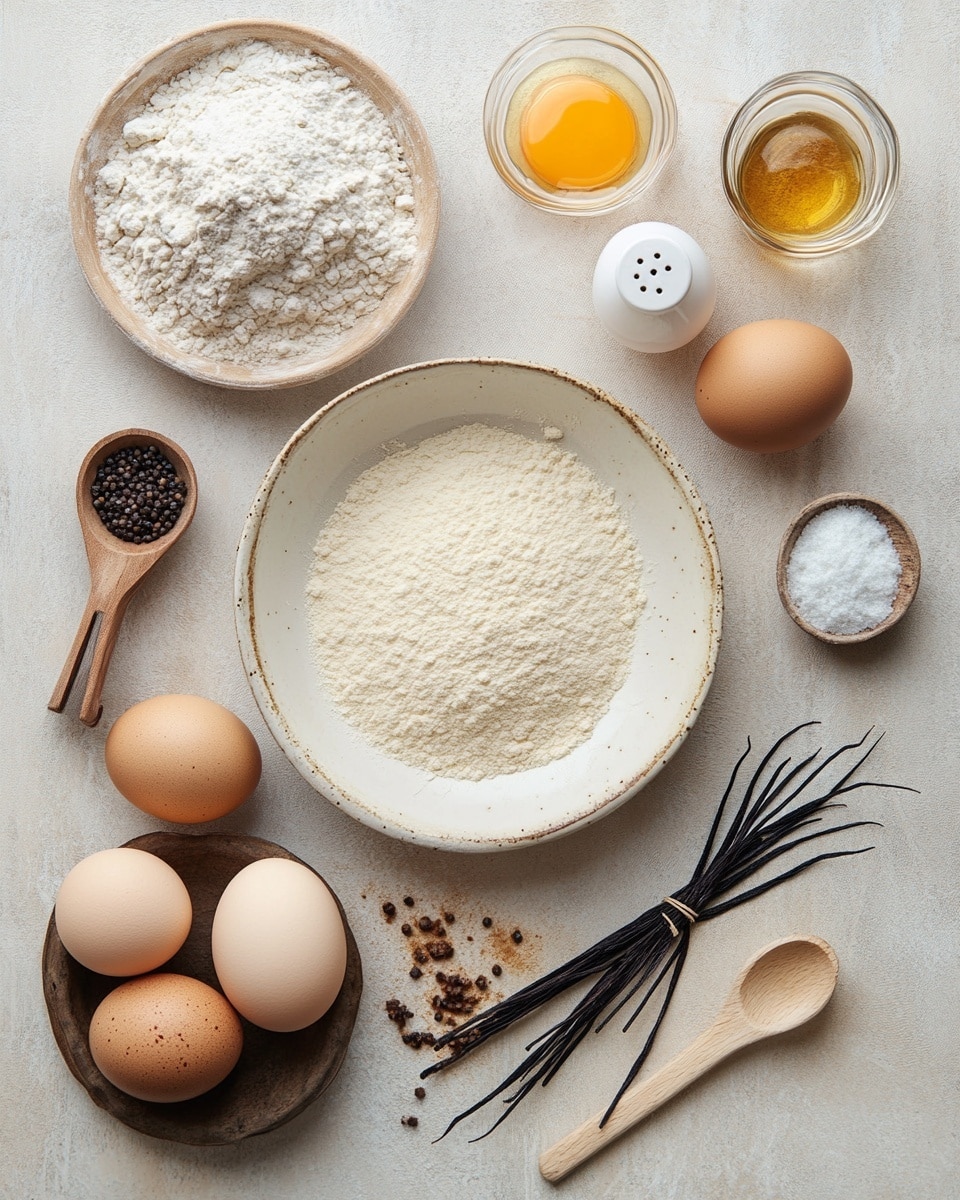
Ingredients You’ll Need
This recipe uses simple pantry staples you likely have on hand, and each ingredient plays a perfect role in creating that crispy, golden finish. I recommend using whole milk for richness and fresh eggs for the best texture.
- Eggs: Fresh eggs give the batter structure and richness—don’t substitute with powdered eggs here.
- Granulated sugar: Adds just a touch of sweetness without overpowering the delicate flavor.
- Salt: A small pinch balances the sweetness and enhances the overall taste.
- All-purpose flour: The base of the batter; make sure it’s well sifted to avoid lumps.
- Whole milk: Adds creaminess and helps create that smooth batter consistency.
- Vanilla (optional): I always add a teaspoon for subtle warmth, but feel free to leave it out if you want a more traditional flavor.
- Oil for frying: Choose a neutral oil with a high smoke point like vegetable or canola oil for crisp, non-greasy rosettes.
Variations
I love making this Scandinavian Rosettes Recipe my own by tweaking little things. Don’t be afraid to experiment—you might find your new favorite twist!
- Gluten-free: I’ve tried swapping regular flour for a cup-for-cup gluten-free blend, and it works great if you want to avoid gluten; just watch the frying time as they can crisp up faster.
- Flavored batters: Adding a bit of orange zest or cardamom can give these classic treats an exciting twist perfect for festive occasions.
- Savory version: Skip the sugar and vanilla, add a pinch of herbs and cheese to the batter for a unique snack version—it’s surprisingly delicious!
How to Make Scandinavian Rosettes Recipe
Step 1: Whisk the Eggs and Sugar
Start by cracking the eggs into a bowl and whisking them briskly with the granulated sugar until the mixture is smooth and pale. This step is key because it helps create a light texture in the batter. I like to whisk for about 2 minutes by hand or use a mixer on low speed. It’ll feel a bit airy when ready.
Step 2: Add Milk and Vanilla
Next, pour in the milk and vanilla extract (if using) and give it another good stir. This liquid addition makes the batter thinner and easier to coat that special rosette iron you’ll be using. Trust me, the vanilla really brings a lovely depth of flavor.
Step 3: Incorporate the Dry Ingredients
Now sift the flour and salt together into the wet mixture. Gently fold it in until there are no lumps, but be careful not to overmix—you want the batter smooth but not tough. A batter with the right consistency will stick nicely to your iron and crisp beautifully.
Step 4: Heat the Oil and Prepare the Rosette Iron
Heat your oil in a deep pan to about 350°F (175°C). It’s crucial to get the temperature right, or your rosettes will either absorb too much oil or burn quickly. While the oil is heating, place your rosette iron in the oil to warm it up—this helps the batter release easily later.
Step 5: Fry the Rosettes
Dip the warm iron into the batter (not too deep—just enough to cover the front), then immediately submerge it back into the hot oil. The batter will start to crisp around the edges in seconds. Fry until golden brown, about 30-60 seconds, then gently loosen the edges with a fork and remove carefully. It might take a couple tries to get the timing perfect, but don’t sweat it—you’ll get there!
How to Serve Scandinavian Rosettes Recipe
Garnishes
I love sprinkling powdered sugar over the hot rosettes—it’s classic and adds just the right amount of sweetness. Sometimes I drizzle a bit of honey or melted chocolate, especially when serving as a dessert treat. Fresh berries or a dollop of whipped cream can also add a lovely contrast.
Side Dishes
These rosettes make a wonderful accompaniment to a cup of coffee or hot tea, perfect for afternoon fika. They also pair beautifully with Scandinavian lingonberry jam if you want to get traditional. I’ve even served them alongside fresh fruit salad for a light brunch vibe.
Creative Ways to Present
For special occasions, I arrange rosettes in a pretty basket lined with parchment paper and tie a ribbon around them—such a charming gift idea! You could also stack them layered with cream and berries for an impressive dessert tower. I’ve found that using colorful plates or vintage-inspired dishes really makes the treats pop visually.
Make Ahead and Storage
Storing Leftovers
If you have leftovers—lucky you! Store them in an airtight container at room temperature to keep that crispness intact. I usually put a paper towel at the bottom of the container to absorb any moisture, which helps them stay fresh for up to two days.
Freezing
I don’t recommend freezing the rosettes because they tend to lose their crisp texture once thawed. Instead, I make them fresh whenever I want that perfect crunch. But if you want to save time, you can freeze the batter in a sealed container and fry fresh rosettes as needed.
Reheating
To reheat, I gently warm rosettes in a 300°F oven for about 5 minutes on a baking sheet to revive crispness without drying them out. Avoid microwaving because it makes them chewy and sad.
FAQs
-
What is a Scandinavian rosette?
A Scandinavian rosette is a thin, crispy, deep-fried pastry made using a special rosette iron that creates intricate snowflake-like patterns. They’re traditionally enjoyed around holidays and are lightly sweetened, making a perfect tea-time treat.
-
Do I need a special rosette iron for this recipe?
Yes! A rosette iron is essential to form the unique delicate shape. They come in various designs and can be found online or at specialty kitchen stores. Using a warm iron dipped in batter and hot oil creates those beautiful crispy patterns.
-
Can I make Scandinavian rosettes without vanilla?
Absolutely! Vanilla is optional and adds a gentle aromatic note, but the classic recipe doesn’t require it. Your rosettes will still be light, crispy, and delicious without it.
-
How do I know when the oil is the right temperature?
You can use a kitchen thermometer to reach about 350°F, which is ideal. If you don’t have one, drop a small bit of batter in—the oil should bubble up gently and the batter should brown within 30 seconds without burning.
-
Why are my rosettes greasy?
Typically, greasy rosettes mean the oil temperature is too low, causing the batter to soak up oil instead of crisping up quickly. Make sure your oil is hot enough and maintain consistent heat during frying.
Final Thoughts
There’s something deeply satisfying about mastering this Scandinavian Rosettes Recipe—it feels like carrying on a little piece of tradition while creating something wonderfully delicate and delicious. Every time I serve these, I’m reminded how a few simple ingredients can turn into something so beautifully complex. I really hope you’ll give this recipe a try. With a little practice and love, you’ll have crispy, golden rosettes that are sure to bring joy and maybe even a few oohs and aahs from friends and family.
Print
Scandinavian Rosettes Recipe
- Prep Time: 10 minutes
- Cook Time: 20 minutes
- Total Time: 30 minutes
- Yield: Approximately 12–15 rosettes depending on size 1x
- Category: Dessert
- Method: Frying
- Cuisine: Scandinavian
Description
This Scandinavian Rosettes recipe offers a delightful crisp and light fried cookie, perfect for festive occasions or a special treat. Made with a simple batter of eggs, sugar, flour, and milk, these delicate lace-like cookies are deep-fried in oil until golden and crispy, then traditionally dusted with powdered sugar for a sweet finish.
Ingredients
Batter Ingredients
- 2 eggs
- 1 tablespoon granulated sugar
- 1/4 teaspoon salt
- 1 cup all-purpose flour
- 1 cup whole milk
- 1 teaspoon vanilla extract (optional)
For Frying
- Oil for frying (vegetable or canola oil recommended)
Instructions
- Prepare the batter: In a mixing bowl, whisk together the eggs, sugar, and salt until well combined. Gradually add the flour and milk alternately, mixing to form a smooth, thin batter. Stir in the vanilla extract if using.
- Heat the oil: Pour enough oil into a deep pan or fryer to submerge the rosette iron. Heat the oil to approximately 375°F (190°C). Use a thermometer to monitor the temperature accurately.
- Heat the rosette iron: Attach the rosette iron to a handle and immerse it in the hot oil to heat it thoroughly to prevent the batter from sticking.
- Fry the rosettes: Once the iron is hot, dip it into the batter, covering it well but not overfilling. Immediately submerge the batter-coated iron into the hot oil. The batter will start to crisp and separate from the iron within about 30 seconds. Fry until golden brown and crisp on both sides, turning the iron or rosette gently in the oil if necessary.
- Remove and drain: Carefully remove the rosette from the iron using a fork or spatula, and place it on paper towels to drain excess oil.
- Repeat: Reheat the iron as needed before each dip into the batter to ensure proper frying. Repeat the process until all batter is used.
- Serve: Allow the rosettes to cool slightly, then dust generously with powdered sugar before serving.
Notes
- Maintain consistent oil temperature to ensure crispy and non-greasy rosettes.
- If you don’t have a rosette iron, a small decorative cookie cutter with a handle can be used, but results may vary.
- Store rosettes in an airtight container at room temperature; they are best enjoyed within 1-2 days for optimal crispness.
- Adjust sugar quantity slightly based on your sweetness preference.
Keywords: rosettes, Scandinavian cookies, fried cookies, holiday treats, crispy cookies, traditional Scandinavian dessert