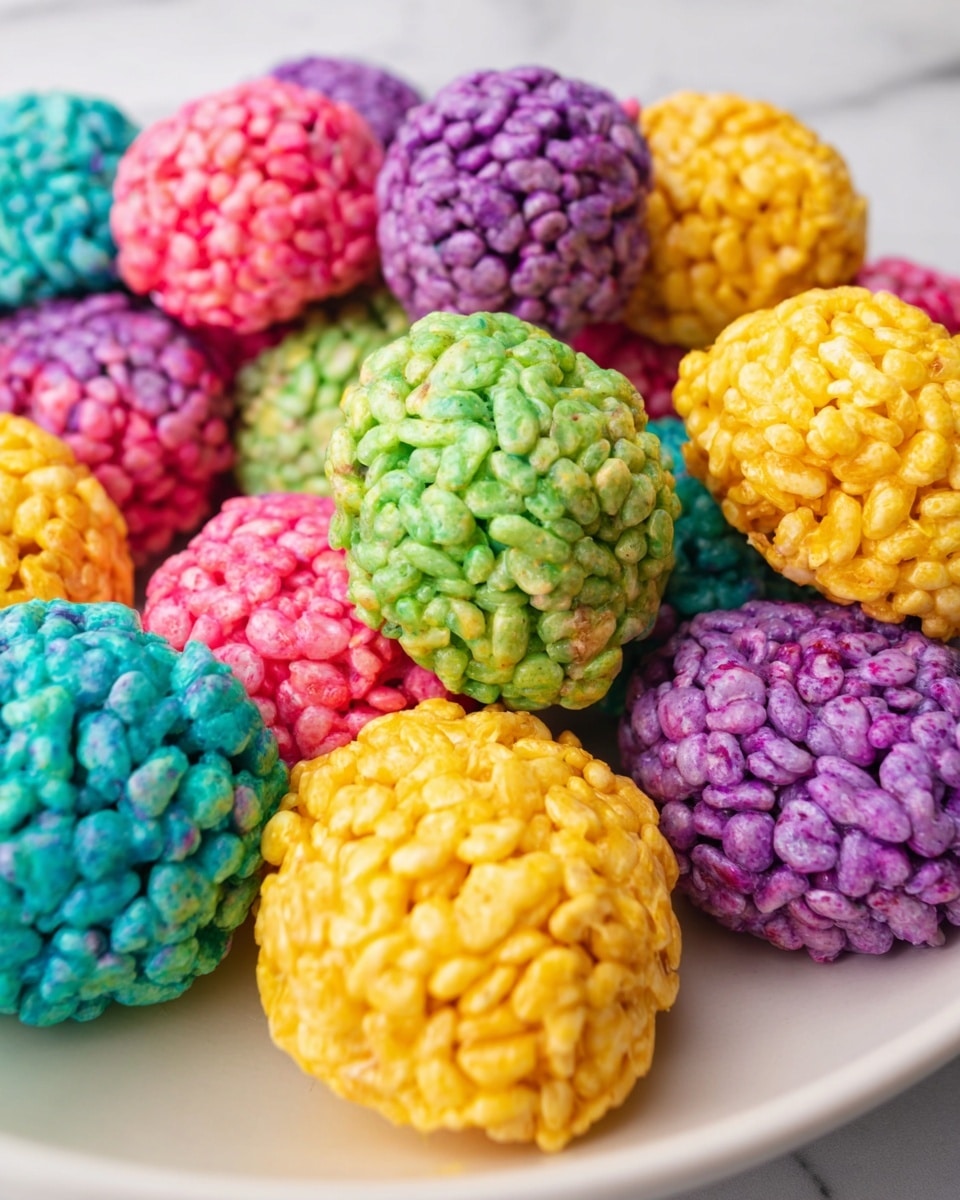
Rice Krispie Easter Eggs Recipe
If you’re looking for a fun, colorful treat to brighten up your Easter festivities, this Rice Krispie Easter Eggs Recipe is an absolute must-try! These little delights are perfect for sharing with family or as a festive activity with kids. What I love most is how easy they’re to make and how customizable they can be—you get that classic crispy, gooey texture with a playful Easter twist.
I remember making these last year with my niece, and it wasn’t just about the yummy end result; it was the whole process of mixing colors, shaping the eggs, and seeing her excitement that made it special. Whether you’re prepping for an Easter party or just want a sweet treat to enjoy during spring, this Rice Krispie Easter Eggs Recipe hits all the right notes every time.
Ingredients You’ll Need
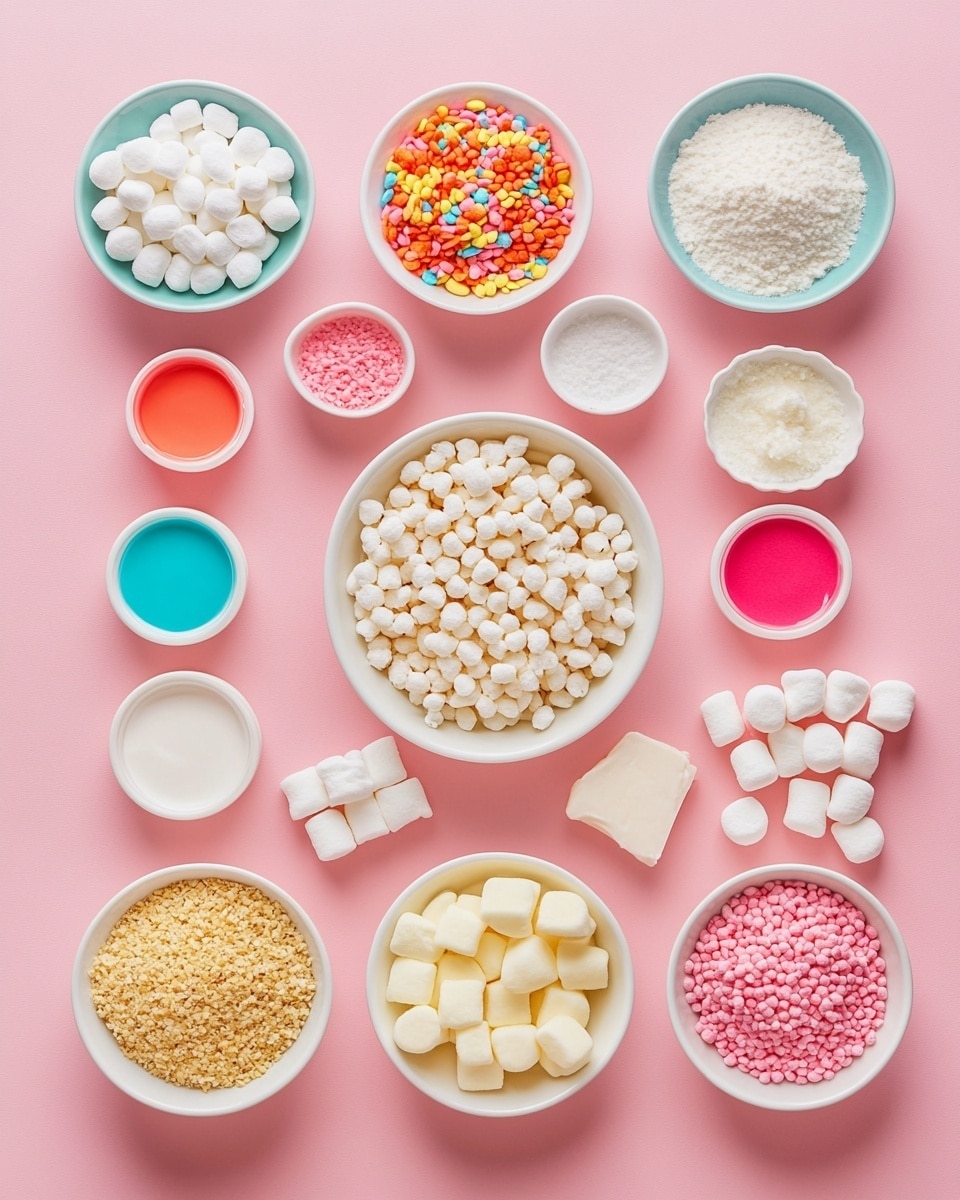
The ingredients for this recipe come together beautifully to create that irresistible Rice Krispie texture layered with sweet marshmallow goodness. You’ll want to pick the freshest mini marshmallows and a good quality butter because these really elevate the flavor and consistency.
- Kellogg’s Rice Krispies Cereal: The classic choice for that light crunch and perfect egg shape binding.
- Salted Sweet Cream Butter: Adds richness and helps melt the marshmallows smoothly; salted butter balances sweetness nicely.
- Mini Marshmallows: They melt fast and give you that perfect sticky texture that holds everything together.
- Wilton Color Right Food Coloring: I love using this brand because it fades less and lets you create vibrant Easter colors easily.
Variations
I like to switch things up by experimenting with different colors and sometimes adding a few mix-ins. The great thing about this Rice Krispie Easter Eggs Recipe is how easy it is to personalize—you can make it as simple or as fancy as you want.
- Chocolate Drizzle: I sometimes melt a bit of chocolate to drizzle over the eggs for an extra touch of indulgence.
- Peanut Butter Twist: Adding a spoonful of peanut butter to the melted marshmallow mix creates a nice, nutty flavor I couldn’t resist sharing with friends.
- Gluten-Free Version: Double-check your Rice Krispies ingredients since some might contain malt flavoring; you can opt for certified gluten-free crispy rice cereal instead.
- Sprinkles and Edible Glitter: Perfect for making the eggs extra festive, especially if you’re kids involved in the creation process.
How to Make Rice Krispie Easter Eggs Recipe
Step 1: Melt Butter and Marshmallows Gently
Start by melting 3 tablespoons of butter in a medium pan over low heat. Once melted, add 3 cups of mini marshmallows and stir slowly until they completely melt. Be patient here—melting marshmallows gradually prevents burning and keeps that shiny, smooth finish you want.
Step 2: Add Color and Mix in Cereal
Remove the pan from heat and add a few drops of your chosen food coloring—this is where you get creative! Stir well to get the color evenly distributed. Then, fold in 3 cups of Rice Krispies cereal, mixing until every flake is coated with the marshmallow mixture. The combination warms the cereal just enough for easy shaping.
Step 3: Shape Your Easter Eggs
Let the mixture cool slightly, so it’s easier to handle but still warm. Grab handfuls and use your hands to gently form egg shapes—don’t press too hard or the treats might turn dense. It’s a fun, hands-on step especially if you’ve got little helpers. Place your shaped eggs on parchment paper to cool completely.
Step 4: Repeat and Enjoy Your Colorful Batch
Repeat the melting, coloring, mixing, and shaping process for each of the five colors. Having multiple colors makes the eggs festive and visually exciting. In about 30 minutes, you’ll have a vibrant, delicious batch ready to share—or sneak a few bites yourself!
How to Serve Rice Krispie Easter Eggs Recipe
Garnishes
I love topping these Easter eggs with a drizzle of melted white or dark chocolate and a sprinkle of edible glitter or pastel nonpareils. It adds just the right festive sparkle and a touch of extra sweetness without overpowering the crispy marshmallow goodness.
Side Dishes
Pairing these with fresh fruit like strawberries or a light lemon yogurt dip can balance the sweet treat nicely, especially for an Easter brunch. They also go incredibly well with a cup of hot cocoa or springtime herbal tea for a cozy finish.
Creative Ways to Present
One fun idea I tried was arranging the Rice Krispie Easter Eggs in a basket lined with colored shred paper—just like a little Easter nest. Another time, I wrapped individual eggs in clear cellophane with pastel ribbons for cute party favors. Simple touches like this make them even more special to share with friends and family.
Make Ahead and Storage
Storing Leftovers
I store leftover Rice Krispie Easter Eggs in an airtight container at room temperature. They usually keep well for up to a week, though they’re so tasty I rarely have leftovers! Just make sure the container is sealed tightly to keep them from getting stale or sticky from humidity.
Freezing
Freezing these treats is a good option if you want to make them ahead in bulk. I wrap each egg individually in plastic wrap and then place them in a freezer-safe container. When you’re ready to enjoy, thaw them at room temperature for a few hours—this method keeps them fresh without losing their chewy texture.
Reheating
If your Rice Krispie Easter Eggs feel a bit firm after storage, warming them in the microwave for about 10 seconds can soften them back to that perfect chewy consistency. Just don’t overdo it, or they might get too sticky or mushy.
FAQs
-
Can I use regular marshmallows instead of mini marshmallows for this Rice Krispie Easter Eggs Recipe?
Absolutely! You can use regular marshmallows, but they might take a bit longer to melt. Just keep the heat low and stir continuously to avoid burning. Mini marshmallows melt faster and more evenly, which makes shaping the Easter eggs easier.
-
How do I prevent the Rice Krispie Easter Eggs from sticking to my hands?
I like to lightly butter or spray my hands with cooking spray before shaping each batch. This simple step helps keep the marshmallow mixture from sticking and makes forming those perfect egg shapes much more manageable.
-
Can I make this recipe without food coloring?
Yes! If you prefer a more natural look or want to avoid food coloring, you can skip it altogether. You’ll still get delicious Rice Krispie treats shaped like eggs, just without the bright colors. You can also try natural coloring options like beet juice or spinach powder for a subtle tint.
-
Is it possible to make vegan Rice Krispie Easter Eggs?
Definitely possible but requires a few ingredient swaps. Use vegan butter or coconut oil and replace marshmallows with vegan-friendly alternatives. Make sure your cereal is vegan as well. The texture might vary slightly, but it’s a great option for those avoiding animal products.
-
How long do Rice Krispie Easter Eggs stay fresh?
Stored properly in an airtight container at room temperature, these treats stay fresh for about 5 to 7 days. Keep them out of direct sunlight and humidity for best results. If you freeze them, they’ll last up to a month.
Final Thoughts
This Rice Krispie Easter Eggs Recipe has become a little tradition in my kitchen because it’s not only quick and fun but also brings such a warm, festive vibe to the table. I love how it brings out my playful side and lets me create colorful, delicious bites that kids and adults both adore. Give this recipe a try—you might end up making it your go-to Easter treat like I did!
Print
Rice Krispie Easter Eggs Recipe
- Prep Time: 10 minutes
- Cook Time: 20 minutes
- Total Time: 30 minutes
- Yield: 25 Easter eggs 1x
- Category: Dessert
- Method: Stovetop
- Cuisine: American
Description
This fun and colorful Rice Krispie Easter Eggs recipe transforms classic Rice Krispie Treats into festive, handheld Easter egg shapes perfect for spring celebrations. Using simple ingredients like Rice Krispies cereal, butter, mini marshmallows, and vibrant food coloring, these no-bake treats come together quickly with minimal effort. Each egg is infused with a different color, making them eye-catching at any party or family gathering, while delivering that beloved crispy, sweet marshmallow flavor everyone loves.
Ingredients
Base Ingredients
- 15 cups Kellogg’s Rice Krispies Cereal
- 15 tablespoons Butter (Salted, Sweet Cream Butter preferred)
- 15 cups Mini Marshmallows
Additional
- Wilton Color Right Food Coloring (various colors for Easter eggs)
Instructions
- Melt Butter: Melt 3 tablespoons of butter in a medium pan over medium heat until fully liquid.
- Combine Marshmallows: Add 3 cups of mini marshmallows to the melted butter, stirring continuously until the marshmallows are completely melted and smooth.
- Remove from Heat: Take the pan off the heat to prevent the marshmallow mixture from burning and allow it to cool slightly.
- Add Food Coloring: Stir in a few drops of Wilton Color Right Food Coloring until the marshmallow mixture takes on a bright, even color.
- Mix in Rice Krispies: Add 3 cups of Kellogg’s Rice Krispies Cereal to the colored marshmallow mixture, stirring to coat all the cereal evenly.
- Cool Slightly: Allow the mixture to cool just enough to handle safely without burning your hands.
- Shape Easter Eggs: Grab handfuls of the mixture and use your hands to shape them into oval Easter egg forms. Press firmly to ensure they hold together well.
- Set to Cool: Place the shaped eggs on a parchment-lined tray or plate to cool completely and set.
- Repeat: Repeat steps 1 through 8 for each of the other four colors until you have five different colored batches of Easter eggs.
Notes
- Use butter with salt for added flavor, but unsalted butter can be substituted if preferred.
- If mixture is too sticky to handle, lightly wet your hands with water when shaping.
- To make cleanup easier, line your workspace with parchment paper or a silicone mat.
- These treats are best consumed within 2 days for optimal freshness.
- Store in an airtight container to maintain softness.
Keywords: Rice Krispies Treats, Easter Eggs, no-bake dessert, marshmallow treats, colorful snacks, kids dessert