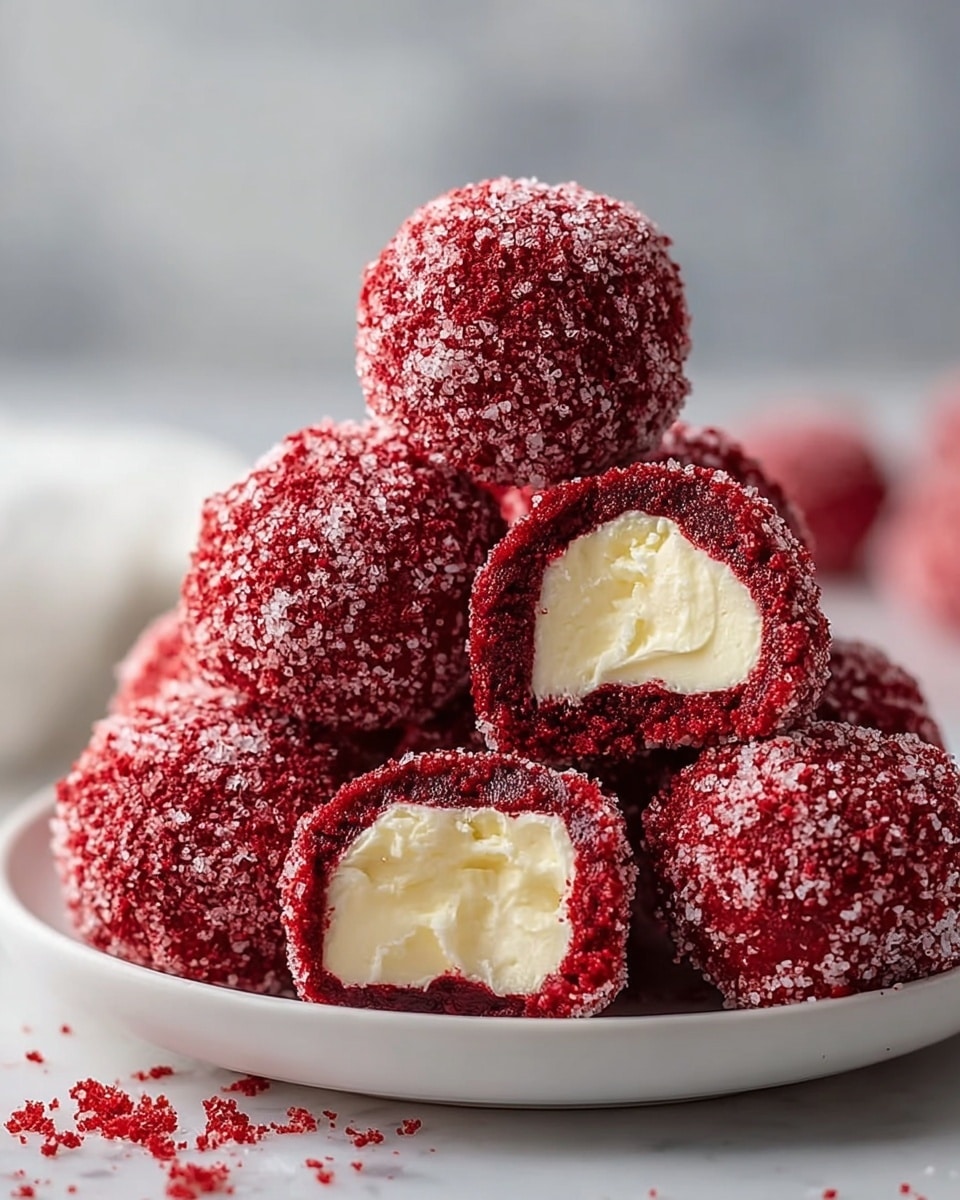
Red Velvet Snowballs Recipe
Oh, if you’re a fan of cozy, melt-in-your-mouth treats, you’re going to love this Red Velvet Snowballs Recipe! These little gems are perfectly soft and fudgy with that classic red velvet chocolate flavor, dusted generously in powdered sugar so they look like tiny snow-covered delights. I remember making them for the first time during a chilly winter evening, and the whole kitchen smelled like a chocolate dream wrapped in velvety sweetness—trust me, they’re worth baking whenever you want something special and comforting.
What makes this Red Velvet Snowballs Recipe really stand out is how simple it is to whip up yet feels so festive and luxe. Whether it’s for holiday gatherings, a sweet surprise snack, or just because you deserve a little treat, these snowballs hit all the right notes. Plus, the contrast of the rich red dough and snow-white coating makes them super Insta-worthy—I always get questions about them whenever I bring these to a party!
Ingredients You’ll Need
These ingredients come together to create that perfect balance of tender crumb and subtle chocolate flavor, with the rich red color and a powdered sugar coat that seals in the softness. I always recommend grabbing high-quality cocoa powder and fresh baking powder for the best results—you’ll really taste the difference.
- All-purpose flour: This is your base and structure, so spoon it gently into your measuring cup to avoid packing.
- Cocoa powder: Unsweetened cocoa powder adds the subtle chocolate note; don’t skip it!
- Baking powder: Helps the cookies rise just right—check it’s fresh to keep those snowballs fluffy.
- Salt: A pinch to balance sweetness and enhance the chocolate flavor.
- Unsalted butter: Make sure it’s softened for easy mixing; it brings richness and tenderness.
- Granulated sugar: Sweetens and adds a little crunch inside the dough.
- Large egg: Acts as a binder and adds moisture; room temperature works best.
- Vanilla extract: Gives warm, aromatic depth that complements the cocoa.
- Red food coloring: I use gel for vibrant color without altering consistency.
- Powdered sugar: For coating—this is what creates that magical snowy appearance right after baking.
Variations
I love playing around with this Red Velvet Snowballs Recipe depending on the season or my mood. Feel free to get creative—you can tweak textures, flavors, or even dietary options without losing what makes these cookies special.
- Vegan version: I once swapped out the butter for coconut oil and used a flax egg; they came out just as cozy and rich—perfect if you’re avoiding dairy or eggs!
- Spiced: Adding a pinch of cinnamon or allspice gives these snowballs a warm holiday vibe, especially nice in colder months.
- Mini snowballs: You can make smaller versions to serve bite-sized treats at parties; they bake faster and disappear even faster too!
- No food coloring: If you want a natural twist, you can skip the red coloring and enjoy a classic cocoa snowball instead.
How to Make Red Velvet Snowballs Recipe
Step 1: Combine Dry Ingredients
Start by whisking together the flour, cocoa powder, baking powder, and salt in a medium bowl. This ensures the leavening is evenly distributed and the cocoa doesn’t clump up, setting a smooth foundation for your snowballs.
Step 2: Cream Butter and Sugar
In a separate large bowl, beat your softened unsalted butter with granulated sugar until the mixture looks fluffy and pale, about 3-4 minutes. This is key for tender cookies, so don’t rush it. If your butter is too cold, the texture won’t be right, so give yourself time for that softening stage.
Step 3: Add Egg, Vanilla, and Food Coloring
Beat in the egg, vanilla extract, and red food coloring until you have a smooth, vibrant mixture. The red color should be bold—if not, a little extra food dye won’t hurt but be careful not to add too much liquid coloring.
Step 4: Incorporate Dry Ingredients
Slowly add your dry ingredients to the wet mixture, mixing until just combined. Overmixing can make the cookies tough, so stop when you see no streaks of flour. The dough will be soft but manageable—perfect for shaping.
Step 5: Shape and Bake
Preheat your oven to 350°F (175°C). Roll tablespoons of dough into balls and place them about 2 inches apart on a parchment-lined baking sheet. Bake for 10-12 minutes until the cookies puff slightly but aren’t browned. It’s tempting to leave them longer, but remember, softer is better here.
Step 6: Coat with Powdered Sugar
While still warm (but cool enough to handle), gently roll each cookie in powdered sugar. This step is so satisfying and it cools the cookie while adding that magical snowball finish. I usually do this twice for an extra snowy look!
How to Serve Red Velvet Snowballs Recipe

Garnishes
I love keeping it simple with just powdered sugar, but sometimes I add a tiny sprinkle of mini white chocolate chips or crushed candy canes on top for festive flair. It’s those little touches that make people smile when they bite into these little beauties.
Side Dishes
These snowballs pair perfectly with a hot cup of coffee, a rich espresso, or a frothy cup of milk. For holiday parties, I like to serve them alongside a tangy cream cheese dip or a small glass of mulled wine to balance the sweetness.
Creative Ways to Present
For special occasions, I’ve arranged Red Velvet Snowballs Recipe on tiered dessert trays dusted with edible glitter or cocoa for a snowy woodland look. Wrapping a few in cellophane tied with red ribbon also makes lovely homemade gifts that friends adore.
Make Ahead and Storage
Storing Leftovers
Once completely cooled, store your red velvet snowballs in an airtight container at room temperature. They stay surprisingly soft for up to 4 days—just resist the urge to eat them all at once!
Freezing
I’ve frozen these cookies successfully by coating them in powdered sugar first, then placing them in a single layer on a baking sheet to freeze before transferring to a freezer bag. This way, they don’t stick together and keep their freshness for up to 3 months.
Reheating
To warm frozen snowballs, just pop them in a 300°F (150°C) oven for about 5-7 minutes. This softens them back up beautifully without drying them out. If you want to refresh the powdered sugar coating, toss them lightly in a little more once warm.
FAQs
-
Can I make Red Velvet Snowballs Recipe without food coloring?
Yes! The food coloring gives the traditional red velvet look, but if you prefer to avoid artificial colors, you can skip it or use a natural substitute like beet juice. Your snowballs will taste just as delicious, though the color will be less vibrant.
-
How do I prevent the cookies from spreading too much?
Make sure your butter is softened, not melted, and don’t overmix once you add the flour. Chilling the dough for 15-30 minutes before baking can also help cookies hold their shape better.
-
Can I substitute cocoa powder for another ingredient?
Cocoa powder is essential for the red velvet flavor profile, but if you must substitute, very mild hot chocolate mix can work in a pinch, though it will add sweetness and change the texture slightly.
-
How do I make these cookies extra moist?
One trick I’ve learned is to ensure you don’t overbake—the cookies should be soft and just set. Also, adding a tiny splash of buttermilk to the wet ingredients can amp up moisture without affecting dough consistency.
-
Is it possible to make Red Velvet Snowballs Recipe gluten-free?
Absolutely! Using a 1:1 gluten-free flour blend works well. Just keep an eye on texture as gluten-free doughs can be a bit more delicate; sometimes adding a little xanthan gum helps with binding.
Final Thoughts
This Red Velvet Snowballs Recipe is one of those delightful treats that feels like a warm hug on a cold day. I honestly whip up batches whenever I crave a simple yet indulgent sweet, and it never disappoints. You’ll enjoy how approachable the ingredients and steps are, and how these snowballs bring a splash of joy wrapped in snowy sugar every time. So go ahead, give this recipe a try—I’m pretty sure it’ll become a favorite in your kitchen just like it did in mine!
Print
Red Velvet Snowballs Recipe
- Prep Time: 15 minutes
- Cook Time: 12 minutes
- Total Time: 57 minutes
- Yield: 24 cookies 1x
- Category: Dessert
- Method: Baking
- Cuisine: American
- Diet: Vegetarian
Description
These Red Velvet Snowballs are soft, moist, and irresistibly festive cookies coated in powdered sugar, perfect for holiday celebrations or any special occasion where a colorful, chocolatey treat is desired.
Ingredients
Dry Ingredients
- 1 1/2 cups all-purpose flour
- 1/2 cup cocoa powder
- 1 teaspoon baking powder
- 1/4 teaspoon salt
Wet Ingredients
- 1/2 cup unsalted butter, softened
- 1 cup granulated sugar
- 1 large egg
- 1 teaspoon vanilla extract
- 1 tablespoon red food coloring
For Coating
- 1 cup powdered sugar
Instructions
- Prepare Dry Ingredients: In a medium bowl, whisk together the all-purpose flour, cocoa powder, baking powder, and salt until well combined. Set this mixture aside.
- Cream Butter and Sugar: In a large mixing bowl, beat the softened unsalted butter and granulated sugar together until the mixture is light and fluffy. This helps create a tender texture in the cookies.
- Add Wet Ingredients: Beat in the egg, vanilla extract, and red food coloring to the butter and sugar mixture until fully incorporated and smooth.
- Combine Dry and Wet Mixtures: Gradually mix the dry ingredients into the wet ingredients until a soft dough forms. Make sure not to overmix to keep the cookies tender.
- Chill the Dough: Cover the dough with plastic wrap and refrigerate for at least 30 minutes to firm it up, which makes shaping the cookies easier.
- Shape the Cookies: Preheat your oven to 350°F (175°C). Scoop rounded tablespoons of dough and roll each into balls. Place them on a baking sheet lined with parchment paper, spacing them about 2 inches apart.
- Bake the Cookies: Bake in the preheated oven for 10-12 minutes. The cookies should be set but still soft in the center.
- Coat with Powdered Sugar: While warm, gently roll each cookie in the powdered sugar until fully coated. This gives the classic snowball appearance and adds a sweet finish.
- Cool and Serve: Place the coated cookies on a wire rack to cool completely. Store in an airtight container once cooled to maintain freshness.
Notes
- Ensure the butter is soft but not melted for optimal creaming results.
- Red food coloring can be adjusted depending on desired intensity; gel food coloring can be used as a more vibrant alternative.
- For a deeper red color, you may add a teaspoon of vinegar or buttermilk to the wet ingredients.
- If the dough feels too sticky after chilling, lightly dust your hands with flour before rolling into balls.
- Cookies can be stored in an airtight container at room temperature for up to 5 days.
- Double coating with powdered sugar after cooling can increase sweetness and visual appeal.
Keywords: Red Velvet Cookies, Snowball Cookies, Holiday Cookies, Festive Dessert, Chocolate Cookies, Powdered Sugar Cookies