Peanut Butter Spider Cookies Recipe
If you’re on the hunt for a fun, festive cookie that’s both nostalgic and a little bit spooky, you’re in for a treat with this Peanut Butter Spider Cookies Recipe. I remember making these with my kids every Halloween, and the excitement when the “spiders” came to life was priceless. They’re perfectly soft with that classic peanut butter flavor, and the candy decorations really steal the show. These cookies aren’t just for Halloween, though—they’re a playful choice for any party or when you want to impress friends with a cute and unique dessert.
You’ll love how straightforward this Peanut Butter Spider Cookies Recipe is. With simple pantry staples and a few store-bought candies, you can whip up a batch of these critters in no time. Plus, they’re a wonderful conversation starter and a memorable way to get everyone into a festive mood. I’ve got some tips here that helped me every time I’ve made them, so you can skip the trial and error and dive right into the fun.
Ingredients You’ll Need
The magic of these cookies lies in their simple ingredients which combine for a soft, chewy texture and rich flavor. Having your candies chilled beforehand makes decorating much easier, so don’t skip that part!
- Shortening: Keeps the cookies tender and soft—great for that perfect chewiness.
- Peanut butter: Use creamy for smooth dough; it’s the flavor star here.
- Brown sugar: Adds moisture and a hint of caramel flavor.
- White sugar: Balances sweetness and helps with a slight crisp edge.
- Egg: Binds everything and adds richness.
- Milk: Keeps the dough moist and easy to work with.
- Vanilla extract: Boosts flavors subtly—don’t skip it!
- All-purpose flour: The base of the dough; scoop and level for accurate measurement.
- Baking soda: Helps the cookies rise a little.
- Salt: Enhances the peanut butter flavor and balances sweetness.
- Extra white sugar: For rolling the cookie dough, adding a touch of sparkle and texture.
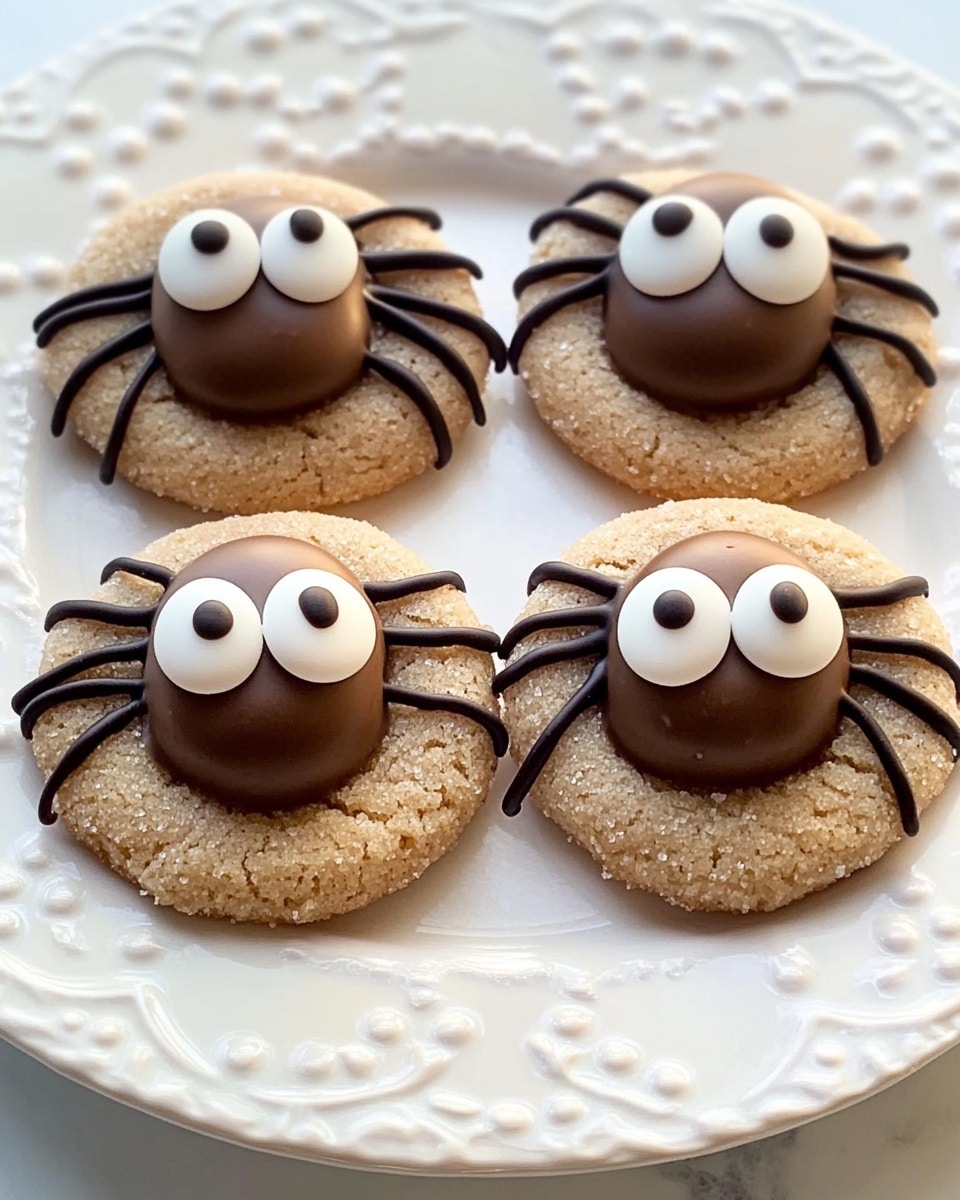
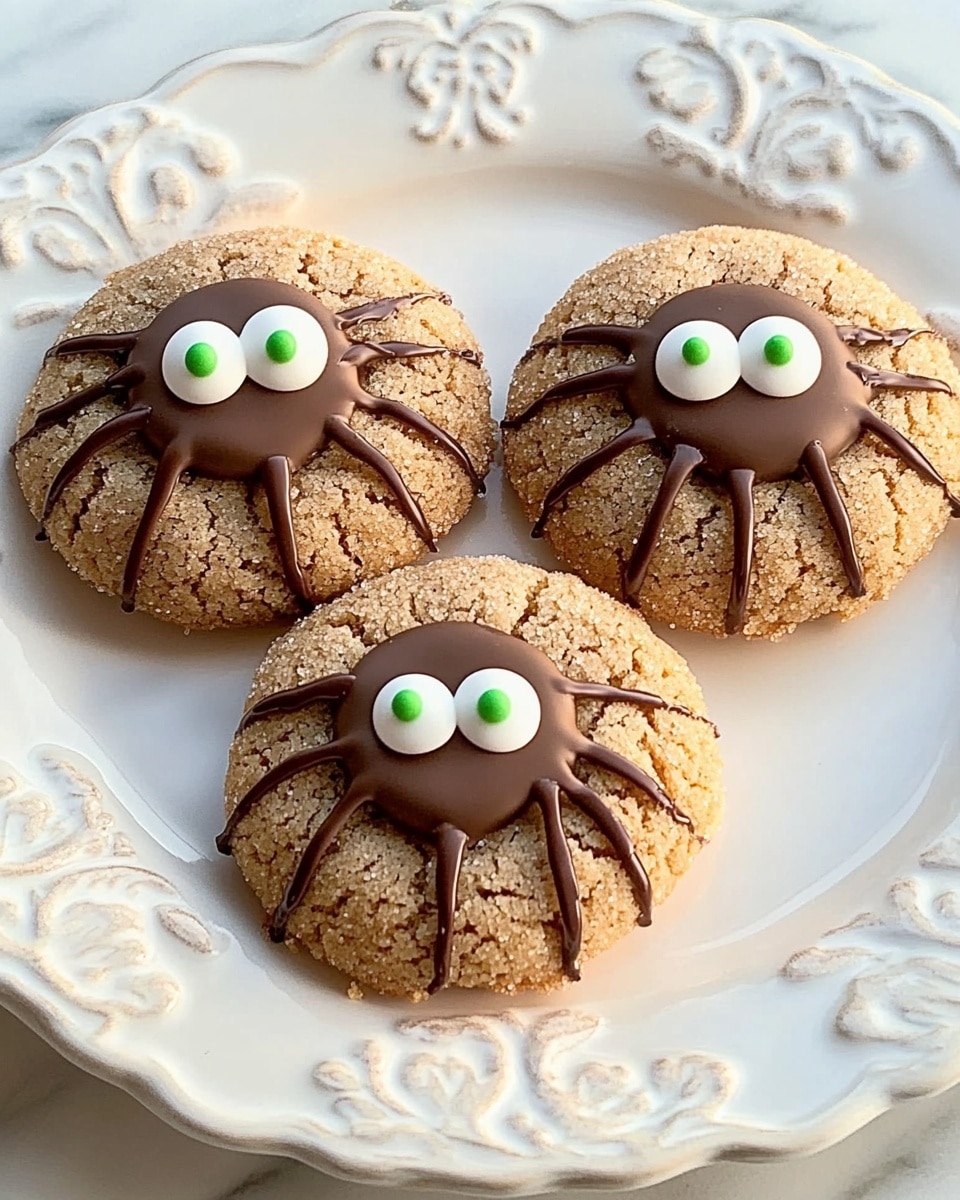
- Chocolate candy spheres (like Lindt Lindor Truffles): Chilled so they don’t melt right away when baked, these become your spider’s body.
- Decorative candy eyeballs: Bring the critters to life. You can find these in most baking aisles year-round.
- Prepared chocolate frosting: Acts as the “glue” for attaching eyes, making decorating a breeze.
Variations
I like to switch things up to suit the occasion or dietary needs, and you absolutely can, too! Don’t hesitate to put your own spin on this Peanut Butter Spider Cookies Recipe—after all, experimenting is half the fun in the kitchen.
- Using natural peanut butter: I tried using all-natural peanut butter once and noticed it changed the texture slightly—it’s less creamy but more wholesome, perfect if you want a more rustic cookie.
- Gluten-free option: Substituting with a gluten-free flour blend works well. Just make sure to check the baking soda and other ingredients for gluten-free certification.
- Different candy centers: Try using peanut butter cups, mini chocolate bars, or even caramel-filled chocolates for an exciting twist.
- Vegan adaptation: Using vegan butter and flax eggs can work, but I recommend testing small batches first as texture might be a little different.
How to Make Peanut Butter Spider Cookies Recipe
Step 1: Cream Together the Wet Ingredients
Start by beating the shortening, peanut butter, brown sugar, and white sugar together until you get a creamy consistency. I find a handheld mixer makes this super easy and smooth. Be sure everything is at room temperature for even mixing—if the shortening is too cold, it’ll be stubborn.
Step 2: Add Egg, Milk, and Vanilla
Once creamed, mix in your beaten egg, then add milk and vanilla extract. This adds moisture and rounds out the flavors beautifully. Don’t rush—combine these well but avoid overmixing at this stage.
Step 3: Combine Dry Ingredients and Mix Into Dough
In a separate bowl, whisk together the flour, baking soda, and salt. Gradually add this to your wet mixture, stirring just until combined. This part is important—overmixing can make your cookies tough, so a gentle fold is best.
Step 4: Shape and Roll the Dough
Use a tablespoon or small cookie scoop to form dough balls, then roll each one in the extra white sugar. This adds a bit of texture and a pretty finish once baked. I like to work on parchment paper or a silicone mat for easy clean-up.
Step 5: Bake and Add the Spider Body
Bake the cookies at 375°F (190°C) for about 7 minutes, just until they start to set but not fully hard. Then, quickly press a chilled chocolate candy sphere gently into the center of each warm cookie. The warmth helps the candy sink slightly without melting completely—timing here is key!
Step 6: Decorate with Eyes and Legs
Once cookies are cooled, use little dollops of chocolate frosting to attach candy eyeballs to the chocolate ball. For the spider legs, I like to drizzle more frosting or even pipe thin lines using melted chocolate. The decorating can be as simple or elaborate as you like—kids especially enjoy this part.
How to Serve Peanut Butter Spider Cookies Recipe
Garnishes
I usually keep it simple with just the candy eyes because they really pop, but for a little extra fun, try sprinkling edible glitter or using colored sugar for rolling. It makes the spiders look festive for parties. Fresh mint leaves on the side can also provide a nice visual contrast if you want something green and fresh nearby.
Side Dishes
These cookies pair charmingly with a cold glass of milk, hot cocoa, or even a bold coffee. For a Halloween gathering, I’ve served them alongside caramel apples and pumpkin spice cupcakes—so festive and tasty!
Creative Ways to Present
For Halloween or special occasions, arranging these cookies on a platter with some cobweb decorations is always a hit. I once placed them on a tiered stand with faux spiders and leaves for a spooky effect. You could also put each spider cookie inside clear treat bags tied with orange and black ribbon for party favors that are sure to delight.
Make Ahead and Storage
Storing Leftovers
I keep leftover Peanut Butter Spider Cookies in an airtight container at room temperature for up to 4 days. They stay soft and flavorful, especially if you separate layers with parchment paper to avoid sticking. The candy decorations hold up nicely, too, so no worries about them losing their charm.
Freezing
Freezing works wonderfully if you want to make these in advance. I freeze the unbaked dough balls rolled in sugar on a baking sheet until firm, then transfer them to a freezer bag. When ready, just place them on a sheet and bake straight from frozen, adding a minute or two to the bake time.
Reheating
If you find your cookies have lost a little freshness, a quick zap in the microwave for about 10 seconds revitalizes that soft, melty peanut butter moment. Or, warm them briefly in a 300°F oven wrapped loosely in foil for a few minutes. Just be careful not to overheat and melt the decorations.
FAQs
-
Can I use natural peanut butter in the Peanut Butter Spider Cookies Recipe?
Absolutely, but keep in mind natural peanut butter has more oil separation and less sweetness, so the dough may be looser and texture a bit different. You might want to chill the dough longer before shaping, and adjust sugar slightly if you prefer it sweeter.
-
What’s the best way to keep the chocolate candy from melting too much during baking?
Refrigerate your chocolate candies until just before you press them into the warm cookies. Adding them immediately when the cookies come out of the oven helps them soften without fully melting. Using higher-quality truffles like Lindt helps, as they melt evenly and taste great.
-
Can I make these cookies vegan?
Yes, with substitutions like vegan shortening, a flax egg in place of the regular egg, and dairy-free milk. Just note the texture might vary slightly. The decorating can remain the same if your candy decorations are vegan-friendly.
-
How do I store the Peanut Butter Spider Cookies to keep them fresh?
Store them in an airtight container at room temperature for up to 4 days. Use parchment paper between layers to avoid sticking and preserve the candy decorations.
-
Can I prepare the dough ahead of time?
Yes! The dough can be made ahead and refrigerated for up to 48 hours. Bring it back to room temperature before scooping and rolling in sugar.
Final Thoughts
This Peanut Butter Spider Cookies Recipe holds a special place in my kitchen for its mix of nostalgia, fun, and flavor. It’s the kind of treat that brings smiles and a little bit of whimsy to any gathering. Whether you’re baking with kids, hosting a Halloween party, or just craving a sweet snack, these cookies won’t disappoint. Give them a try—you might just find yourself making these loveable little spiders year after year!
Print
Peanut Butter Spider Cookies Recipe
- Prep Time: 20 minutes
- Cook Time: 10 minutes
- Total Time: 30 minutes
- Yield: 24 cookies 1x
- Category: Dessert
- Method: Baking
- Cuisine: American
Description
Peanut Butter Spider Cookies are a fun and festive treat perfect for Halloween or any spooky-themed occasion. These soft and chewy cookies combine rich peanut butter flavor with a sweet chocolate center, decorated with candy eyeballs to create a spooky spider effect. Easy to make and irresistibly cute, they’re a delightful addition to any dessert table.
Ingredients
Cookie Dough
- ½ cup shortening
- ½ cup peanut butter
- ½ cup packed brown sugar
- ½ cup white sugar
- 1 large egg, beaten
- 2 tablespoons milk
- 1 teaspoon vanilla extract
- 1 ¾ cups all-purpose flour
- 1 teaspoon baking soda
- ½ teaspoon salt
Coating and Decoration
- ¼ cup white sugar for rolling
- 24 chocolate candy spheres with smooth chocolate filling (such as Lindt Lindor Truffles), refrigerated until cold
- 48 decorative candy eyeballs
- ½ cup prepared chocolate frosting
Instructions
- Prepare the Dough: In a large bowl, cream together the shortening, peanut butter, brown sugar, and white sugar until smooth. Beat in the egg, then stir in the milk and vanilla. Combine the flour, baking soda, and salt; gradually add to the creamed mixture and mix well to form a soft dough.
- Preheat Oven and Prepare Cookies: Preheat your oven to 375°F (190°C). Shape dough by rounding heaping teaspoonfuls into balls and roll in the ¼ cup white sugar to coat. Place the cookies two inches apart on ungreased cookie sheets.
- Add Chocolate Center: Make an indentation in the center of each cookie with your thumb or the back of a spoon. Place one chilled chocolate candy sphere into the center of each indentation.
- Bake Cookies: Bake in the preheated oven for 8 to 10 minutes or until golden. Remove from oven and immediately press two candy eyeballs onto each chocolate center while still soft.
- Decorate with Frosting: Once the cookies have cooled completely, use prepared chocolate frosting to pipe spider legs radiating from the chocolate center to complete the spider look.
- Cool and Serve: Allow the frosting to set before serving. Store cookies in an airtight container at room temperature for up to a week.
Notes
- For the best results, ensure the chocolate candy spheres are well chilled so they hold shape during baking.
- If you prefer, you can substitute candy eyeballs with small white chocolate chips and a dot of melted chocolate for pupils.
- These cookies freeze well; freeze unbaked cookie dough balls on a tray, then transfer to a freezer bag for baking later.
- Be careful when pressing the chocolate candy spheres in the dough to avoid cracking the cookies.
- Chocolate frosting can be homemade or store-bought; a thick consistency works best for piping spider legs.
Keywords: Peanut Butter Cookies, Halloween Cookies, Spider Cookies, Chocolate Filled Cookies, Festive Cookie Recipe