
Oreo Truffles with Christmas Decorations Recipe
If you’re looking to bring a little magic and sweetness to your holiday table, this Oreo Truffles with Christmas Decorations Recipe is an absolute winner. I first stumbled upon this gem a few years back when I wanted something festive but fuss-free, and honestly, it’s become my go-to treat every Christmas. These truffles have that perfect creamy crunch combination thanks to crushed Oreos and cream cheese, and the holiday-themed coatings make them almost too cute to eat—almost!
What I love most about this Oreo Truffles with Christmas Decorations Recipe is how approachable it is. You don’t need fancy baking skills to wow a crowd. Plus, they’re absolutely crowd-pleasers – perfect for gift-giving, parties, or just cozy nights with family. Trust me, once you make them, you’ll be thinking up reasons to whip these up all winter long.
Ingredients You’ll Need
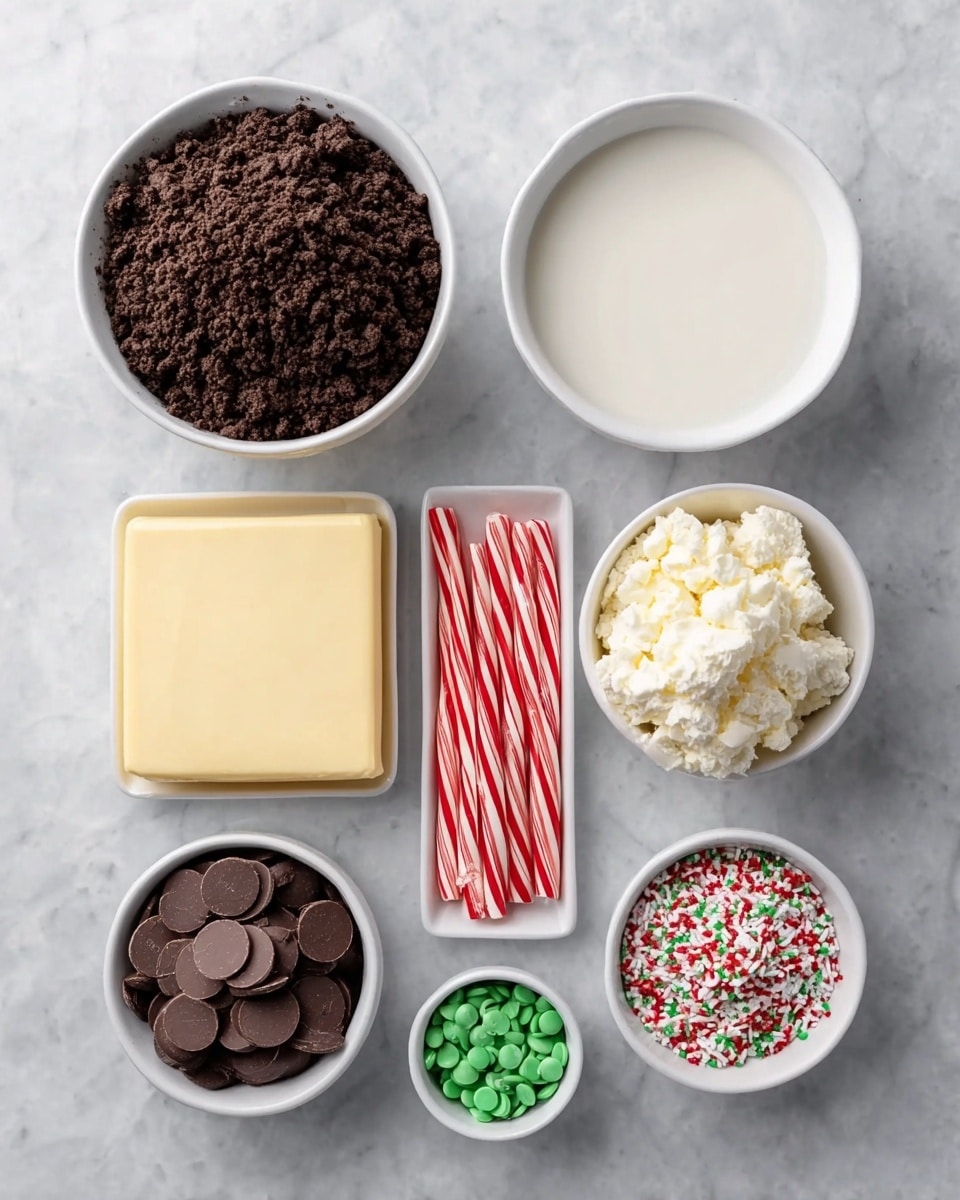
These ingredients come together beautifully to create that iconic Oreo truffle taste with a festive twist. When shopping, pick fresh cream cheese and good-quality melting wafers so the coating sets nicely – it really does make all the difference when decorating.
- Oreo cookies: The cookie base that brings rich chocolate flavor and crunch; finely crushing them helps your truffles have a smooth, even texture.
- Cream cheese: Softened to room temperature – this adds creaminess and binds the crumbs into perfect truffle balls.
- Vanilla extract: A splash balances the flavors and adds warmth, enhancing that classic Oreo taste.
- Green melting wafers: For coating and giving those beautifully festive green hues in your truffles.
- Red melting wafers: The perfect complement to the green wafers, making your truffles pop with Christmas cheer.
- Crisco: Helps thin the coatings slightly so they dip smoothly and set with a gorgeous gloss.
- Miniature Reese’s Cups: These little peanut butter cups add an indulgent surprise on top that guests love.
- Christmas sprinkles: Adds texture, color, and that whimsical holiday sparkle to each truffle.
- Licorice or red vine candy: Cut into small pieces to create a fun festive “stem” for some of the decorated truffles.
Variations
I’m all about making recipes your own, and with this Oreo Truffles with Christmas Decorations Recipe, there’s plenty of room to tweak and play around. Whether you want to jazz them up or simplify, I’ve tried a few fun versions that you might enjoy experimenting with too.
- Chocolate Coating Variation: I often swap out the red or green wafers for dark or white chocolate melts depending on my mood or what I have handy. It’s just as festive and offers great flavor contrast.
- Nut Allergy-Friendly: Instead of Reese’s Cups, try topping with crushed peppermint candies or a small piece of fruit leather. The truffles still look adorable and everyone can safely indulge.
- Adult Twist: Adding a splash of peppermint schnapps or Bailey’s to the cream cheese mixture creates a buttery, boozy surprise that friends and family rave about.
- Gluten-Free Option: There are now gluten-free Oreo cookies that work perfectly, so no one has to miss out.
How to Make Oreo Truffles with Christmas Decorations Recipe
Step 1: Crush the Oreos to a Fine Crumb
My favorite way is to toss the Oreos in a food processor until you have very fine crumbs. If you don’t have one, no worries! Just put them inside a ziploc bag and crush with a rolling pin. The finer the crumbs, the smoother your truffle batter will be, so take a little extra time here for best results.
Step 2: Mix in Cream Cheese and Vanilla
Dump the softened cream cheese and vanilla on top of the crumbs and mix by hand or with a sturdy spatula until fully blended. The mixture will be thick but pliable — if it feels dry, just give it another squeeze or two with your hands until it sticks together nicely.
Step 3: Form Truffle Balls
Using about a tablespoon of mixture per truffle, roll into smooth balls. I find using a small cookie scoop keeps them uniform in size, plus it saves your fingers from chocolate overload later! Place these on a parchment-lined tray and pop them in the fridge to firm up for 30 minutes.
Step 4: Prepare Your Coatings
While the truffles chill, melt the red and green wafers separately with 2 tablespoons of Crisco each (makes dippings go smoothly and gives a nice shine). Use a microwave-safe bowl in 30-second bursts, stirring gently between until completely melted and smooth.
Step 5: Dip and Decorate
Using a fork or dipping tool, dip each chilled truffle into the melted coating and gently tap off excess chocolate. Immediately add Christmas sprinkles or place a miniature Reese’s Cup on top before the coating sets. For a whimsical touch, stick small pieces of licorice into a few truffles to resemble miniature holiday stems.
Step 6: Chill to Set
After decorating, put the tray back in the fridge to let the coating harden completely — about 15–20 minutes usually does the trick. This step ensures that your truffles look as good as they taste!
How to Serve Oreo Truffles with Christmas Decorations Recipe
Garnishes
I’m obsessed with adding a little extra sparkle, so I often sprinkle crushed candy canes or edible gold dust on some truffles just before serving. It adds that magical holiday glisten and a hint of minty freshness that pairs amazingly well with the chocolate.
Side Dishes
These truffles are perfect on their own but I love pairing them with a simple hot chocolate bar or fresh peppermint tea to balance the richness. A fruit platter with oranges or cranberries also complements the flavors and adds a bit of freshness to the indulgence.
Creative Ways to Present
I once arranged these truffles on a festive platter shaped like a Christmas tree and used candy sticks to make “garlands” around it — it was a huge hit at my holiday party and super easy to do. Wrapping a few in mini cupcake liners or clear cellophane bags tied with ribbons also makes for charming homemade gifts that friends and family adore.
Make Ahead and Storage
Storing Leftovers
I keep any extra truffles in an airtight container in the fridge, and they stay fresh for up to two weeks. Just bring them to room temperature before serving for the best flavor and texture. This way, I can prepare them early and enjoy them throughout the season without worry.
Freezing
Freezing these truffles works like a charm! I place them in a single layer on a baking sheet to freeze for a few hours, then transfer them to a freezer-safe container. They hold up well for up to two months, making them a fantastic make-ahead holiday treat.
Reheating
Since these are no-bake treats, reheating isn’t necessary—and I actually recommend avoiding heat to keep the coating and texture intact. Just thaw frozen truffles in the fridge overnight and enjoy chilled, or bring to room temperature for a softer bite.
FAQs
-
Can I use other types of cookies instead of Oreos for this recipe?
Absolutely! While Oreos are classic because of their distinctive chocolate and cream filling, you can try sandwich cookies with different flavors or even crushed chocolate chip cookies. Just keep in mind that the filling helps the truffle’s creamy texture, so textures may vary slightly.
-
What’s the best way to crush Oreos if I don’t have a food processor?
No food processor? No problem! Place the Oreos into a sturdy ziploc bag, seal it well, and use a rolling pin or heavy pan to crush them evenly until fine crumbs form. This manual method works great and is super satisfying!
-
Can I make these Oreo truffles vegan?
Yes, you can! Look for vegan-certified Oreos (which are more common now), use vegan cream cheese alternatives, and choose dairy-free melting wafers. The texture and taste will be a little different, but just as tasty and festive.
-
How do I prevent the melting wafers from getting too thick?
Adding a small amount of Crisco or vegetable shortening thins the melting wafers, making dipping easier and giving your coatings a smooth, shiny finish. Melt them gently in the microwave and stir well for the best texture.
-
How far ahead can I make these Oreo truffles with Christmas decorations?
You can make them up to a week ahead and store them in the fridge, or freeze them for up to two months. Just keep them in airtight containers to maintain freshness, and decorate close to serving for the prettiest presentation.
Final Thoughts
This Oreo Truffles with Christmas Decorations Recipe has become one of those holiday treats I cherish sharing each year because it combines simplicity with festive fun so beautifully. It’s like a little gift you can make in your own kitchen that spreads joy and cozy vibes with every bite. I can’t wait for you to try it and hear how your friends and family react – these truffles have a way of making celebrations just a little sweeter.
Print
Oreo Truffles with Christmas Decorations Recipe
- Prep Time: 20 minutes
- Cook Time: 0 minutes
- Total Time: 1 hour 20 minutes
- Yield: 18–20 truffles 1x
- Category: Dessert
- Method: No-Cook
- Cuisine: American
Description
These festive Oreo Truffles are a delightful holiday treat combining crushed Oreo cookies and cream cheese, coated in colorful red and green melting wafers, and decorated with Christmas-themed sprinkles, miniature Reese’s Cups, and licorice pieces. Perfect for holiday parties or gifting, these no-bake truffles are easy to make and irresistibly delicious.
Ingredients
Truffle Base
- 3 cups Oreo cookies, finely crushed
- 8 oz block cream cheese, softened to room temperature
- 1 teaspoon vanilla extract
Coating and Decoration
- 1½ cups green melting wafers
- 1½ cups red melting wafers
- 2 tablespoons Crisco
- 18–20 miniature Reese’s Cups
- Christmas sprinkles
- 2–3 sticks licorice or red vine candy, cut into ½ inch pieces
Instructions
- Prepare the Oreo mixture: In a large mixing bowl, combine the finely crushed Oreo cookies, softened cream cheese, and vanilla extract. Mix until the ingredients are fully incorporated and form a smooth, dough-like consistency.
- Shape the truffles: Using your hands or a small cookie scoop, form the mixture into small 1-inch balls. Place the balls on a baking sheet lined with parchment paper and chill in the refrigerator for at least 1 hour to firm up;
- Melt the coating wafers: In two separate microwave-safe bowls, melt the green and red melting wafers each with 1 tablespoon of Crisco. Heat in 30-second intervals, stirring after each, until smooth and fully melted.
- Coat the truffles: Using a fork or dipping tool, dip each chilled truffle ball into the melted wafers, allowing excess coating to drip off. Place coated truffles back onto the parchment-lined sheet to set.
- Decorate: While the coating is still wet, decorate the truffles with Christmas sprinkles, miniature Reese’s Cups, and licorice or red vine candy pieces as desired.
- Set and serve: Let the truffles sit at room temperature or return to the refrigerator for 15-20 minutes until the coating is completely set. Serve chilled or at room temperature.
Notes
- To soften cream cheese quickly, leave it out at room temperature for about 30 minutes before mixing.
- Ensure Oreo cookies are finely crushed for a smooth truffle texture.
- Use a toothpick or dipping tool for easier coating without mess.
- Store truffles in an airtight container in the refrigerator for up to 1 week.
- Allow coated truffles to fully set before stacking or packaging to avoid smudging.
Keywords: Oreo truffles, Christmas dessert, holiday treats, no-bake truffles, Oreo cream cheese balls