No-Churn Cotton Candy Ice Cream Recipe
There’s something undeniably magical about cotton candy, right? That sweet, airy burst of flavor instantly whisks me back to carnival nights and childhood memories. So, imagine transforming that whimsy into a creamy, dreamy dessert that you can enjoy anytime at home. That’s exactly why I adore this No-Churn Cotton Candy Ice Cream Recipe—because you get all that nostalgia with a smooth, melt-in-your-mouth texture without the fuss of an ice cream machine.
If you’ve ever wished you could capture the carnival vibe and keep it in your freezer, this recipe is your new best friend. It’s incredibly simple, uses just a handful of ingredients, and requires no special equipment. Plus, it’s the perfect treat for warm spring afternoons, birthday parties, or whenever you want to impress friends with a fun, colorful homemade dessert. I can’t wait to share how easy it is to whip up this fluttery, pastel-hued delight!
Ingredients You’ll Need
This ice cream recipe keeps it straightforward with just a few accessible ingredients that come together beautifully. Each one plays a big role in providing the right texture and that unmistakable cotton candy flavor—plus, a bit of color if you want to make things visually playful.
- Heavy whipping cream: Make sure it’s very cold—it whips better and helps achieve that creamy, light texture.
- Sweetened condensed milk: Canned and cold, it lends natural sweetness and creaminess without needing extra sugar.
- Cotton candy flavoring: Essential for that carnival flavor punch—you can find it online or specialty baking stores.
- Food coloring (pink and blue) – optional: Adds fun pastel swirls that remind me of cotton candy cones; use sparingly for subtle tinting.
Variations
I love that this No-Churn Cotton Candy Ice Cream Recipe is a blank canvas—you can tweak it easily depending on your mood or what you have on hand. Play around with flavors or mix-ins to make it your own!
- Berry swirl: I once stirred in a bit of homemade strawberry puree before freezing—it adds a fresh, tangy twist that’s irresistible.
- Vegan version: Try swapping heavy cream with coconut cream and use a vegan sweetened condensed milk alternative for a plant-based treat.
- Sprinkle surprise: Add sprinkles or chopped cotton candy pieces for fun texture when serving kids.
- Extra dreamy: Fold in mini marshmallows or candy pieces for that carnival-style crunch and chew.
How to Make No-Churn Cotton Candy Ice Cream Recipe
Step 1: Whip the Cream to Soft Peaks
Start by pouring your very cold heavy whipping cream into a large mixing bowl—use chilled bowls if you can, it helps the cream whip faster. Using an electric mixer, whip on medium-high speed until soft peaks form. You want it to be fluffy but not over-whipped; if you go too far, it’s closer to butter than ice cream base. I often stop and check with the mixer off because the texture is key here!
Step 2: Fold in Sweetened Condensed Milk and Flavor
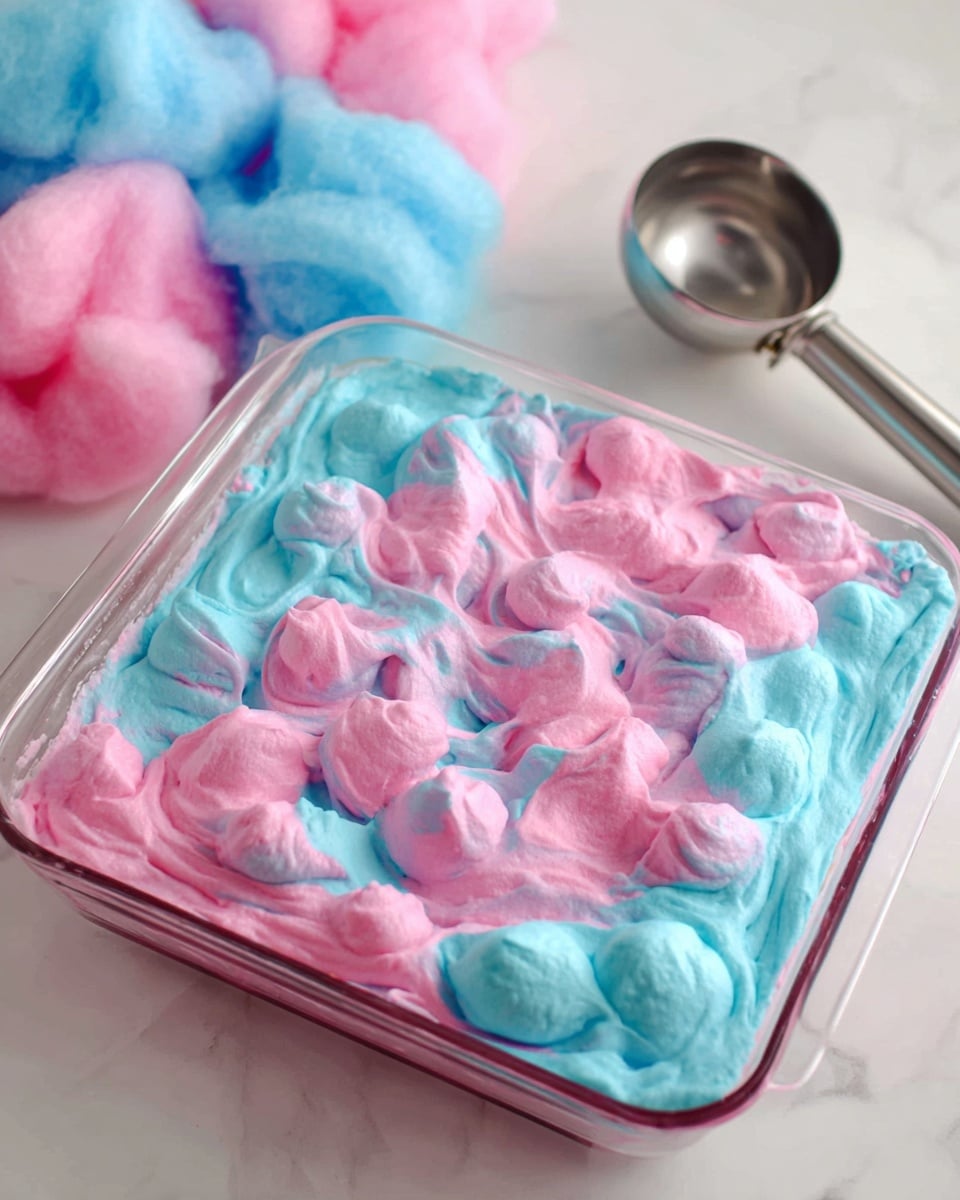
Now, gently fold in your cold sweetened condensed milk. This step is all about being gentle—fold rather than stir vigorously to keep that airy whipped cream texture. Next, add the cotton candy flavoring. I usually start with the suggested 2 teaspoons but sometimes add a little extra if I want a stronger flavor punch. If you’re using food coloring, now’s the time to split your mixture into two bowls and add pink to one, blue to the other before folding everything gently back together for those whimsical swirls.
Step 3: Freeze and Let the Magic Happen
Pour your mixture into a loaf pan or a freezer-safe container and smooth the top with a spatula. Cover tightly with plastic wrap or an airtight lid to avoid ice crystals forming. Pop it in the freezer for at least 6 hours, but honestly, overnight is best. I’ve learned from experience that the texture only improves the longer it sets, so patience pays off!
How to Serve No-Churn Cotton Candy Ice Cream Recipe

Garnishes
I love topping this ice cream with colorful sprinkles and extra cotton candy on the side for nostalgia overload. You can also add a drizzle of strawberry syrup or a few fresh berries to balance the sweetness. For a fun adult twist, a light splash of sparkling wine over the top creates a refreshing contrast!
Side Dishes
Pairing this No-Churn Cotton Candy Ice Cream with simple sides like buttery shortbread cookies or crispy waffle cones turns it into a festive dessert you can share. I’ve also served it alongside a fresh fruit salad to provide a refreshing counterpoint to the sweet, creamy ice cream.
Creative Ways to Present
For birthdays or special occasions, I like to serve this ice cream layered in clear cups with crushed candy and mini marshmallows, creating a colorful parfait effect. You can also swirl it onto cones with cotton candy “skirts” on top for an Insta-worthy carnival vibe—kids adore this presentation!
Make Ahead and Storage
Storing Leftovers
I always store leftovers in a tightly sealed container to keep out freezer odors. For an extra layer of protection, I press a piece of wax paper on the ice cream surface before sealing. This method keeps the texture smooth and flavors fresh when you’re ready for round two.
Freezing
This No-Churn Cotton Candy Ice Cream freezes exceptionally well—even after several days, it retains that creamy feel instead of turning icy. Just be sure your container seals tightly and your freezer maintains a consistent temperature for best results.
Reheating
While you don’t really “reheat” ice cream, I find it best to let it sit at room temperature for 5-10 minutes before scooping—this softens it just enough without melting. It’s the perfect trick to scoop easily and enjoy that luscious texture every time.
FAQs
-
Can I make this No-Churn Cotton Candy Ice Cream Recipe without heavy cream?
Heavy cream is key for that rich, creamy texture. If you don’t have it, you could try using coconut cream as a non-dairy substitute, but the texture and flavor will differ somewhat from the classic version.
-
Where can I find cotton candy flavoring?
You can find cotton candy flavoring in specialty baking stores or online retailers like Amazon. Just be sure it’s food-grade and designed for desserts to get the best results.
-
Why does my no-churn ice cream get icy sometimes?
Icy texture usually means the mixture wasn’t whipped enough or the container wasn’t sealed well. Folding ingredients gently and storing ice cream in airtight containers helps maintain a smooth, creamy consistency.
-
Can I add mix-ins like sprinkles or candy pieces? When should I do that?
Absolutely! Fold in sprinkles or chopped candy pieces after mixing in the flavoring, just before freezing. This keeps them evenly distributed without melting or causing graininess.
-
How long will this ice cream stay good in the freezer?
Typically, homemade no-churn ice cream is best enjoyed within 2 weeks for optimal flavor and texture, though it can safely last up to a month if properly stored.
Final Thoughts
This No-Churn Cotton Candy Ice Cream Recipe is truly one of my all-time favorites for bringing a little joy and color to any day. It’s effortless, fun, and delicious—perfect whether you’re making a spontaneous treat or planning a party dessert. I’m confident you’ll enjoy how this simple recipe delivers that carnival magic right from your freezer. Give it a go and watch it become a household hit just like it did at mine!
Print
No-Churn Cotton Candy Ice Cream Recipe
- Prep Time: 10 minutes
- Cook Time: 0 minutes
- Total Time: 6 hours 10 minutes
- Yield: 8 servings 1x
- Category: Dessert
- Method: No-Cook
- Cuisine: American
- Diet: Vegetarian
Description
This No-Churn Cotton Candy Ice Cream is a delightfully sweet and creamy frozen treat reminiscent of classic carnival cotton candy. Made without an ice cream maker, it combines very cold heavy whipping cream, sweetened condensed milk, and cotton candy flavoring to create a fluffy, pastel-colored dessert perfect for summer or any occasion craving nostalgic sweetness.
Ingredients
Ice Cream Base
- 2 cups very cold heavy whipping cream
- 1 (14-ounce) can sweetened condensed milk, cold
- 2 teaspoons cotton candy flavoring
- Food coloring: pink and blue, optional
Instructions
- Prepare the Whipped Cream: In a large mixing bowl, pour the very cold heavy whipping cream. Using a hand mixer or stand mixer fitted with a whisk attachment, beat the cream on medium-high speed until stiff peaks form. This will take about 3-5 minutes.
- Combine Flavoring and Condensed Milk: In a separate bowl, gently stir the sweetened condensed milk with the cotton candy flavoring until fully incorporated. If desired, divide the condensed milk mixture into two parts and add a few drops of pink food coloring to one portion and blue to the other to create a whimsical cotton candy look.
- Fold Mixtures Together: Slowly fold the sweetened condensed milk mixture into the whipped cream using a spatula. Do this gently to maintain the airiness of the whipped cream. If using colored portions, fold each color separately or swirl them together to create a marbled effect.
- Transfer to a Container: Spoon the ice cream mixture into a loaf pan or an airtight container. Smooth the top with a spatula for an even surface.
- Freeze: Cover the container tightly with plastic wrap or a lid and place it in the freezer. Let it freeze for at least 6 hours or overnight until firm.
- Serve: When ready to serve, remove the ice cream from the freezer and let it sit at room temperature for 5 minutes to soften slightly for easier scooping. Scoop into bowls or cones and enjoy your homemade no-churn cotton candy ice cream!
Notes
- Do not overbeat the cream; stiff peaks should hold their shape but remain smooth and fluffy.
- Use very cold heavy cream and chilled sweetened condensed milk for best texture.
- Food coloring is optional but adds a fun carnival-style look to the ice cream.
- Store leftover ice cream covered in the freezer for up to 1 week.
- For an adult twist, add a teaspoon of vodka or liqueur to prevent ice crystals (optional).
Keywords: no churn ice cream, cotton candy ice cream, homemade ice cream, cotton candy flavor, easy frozen dessert, no ice cream maker