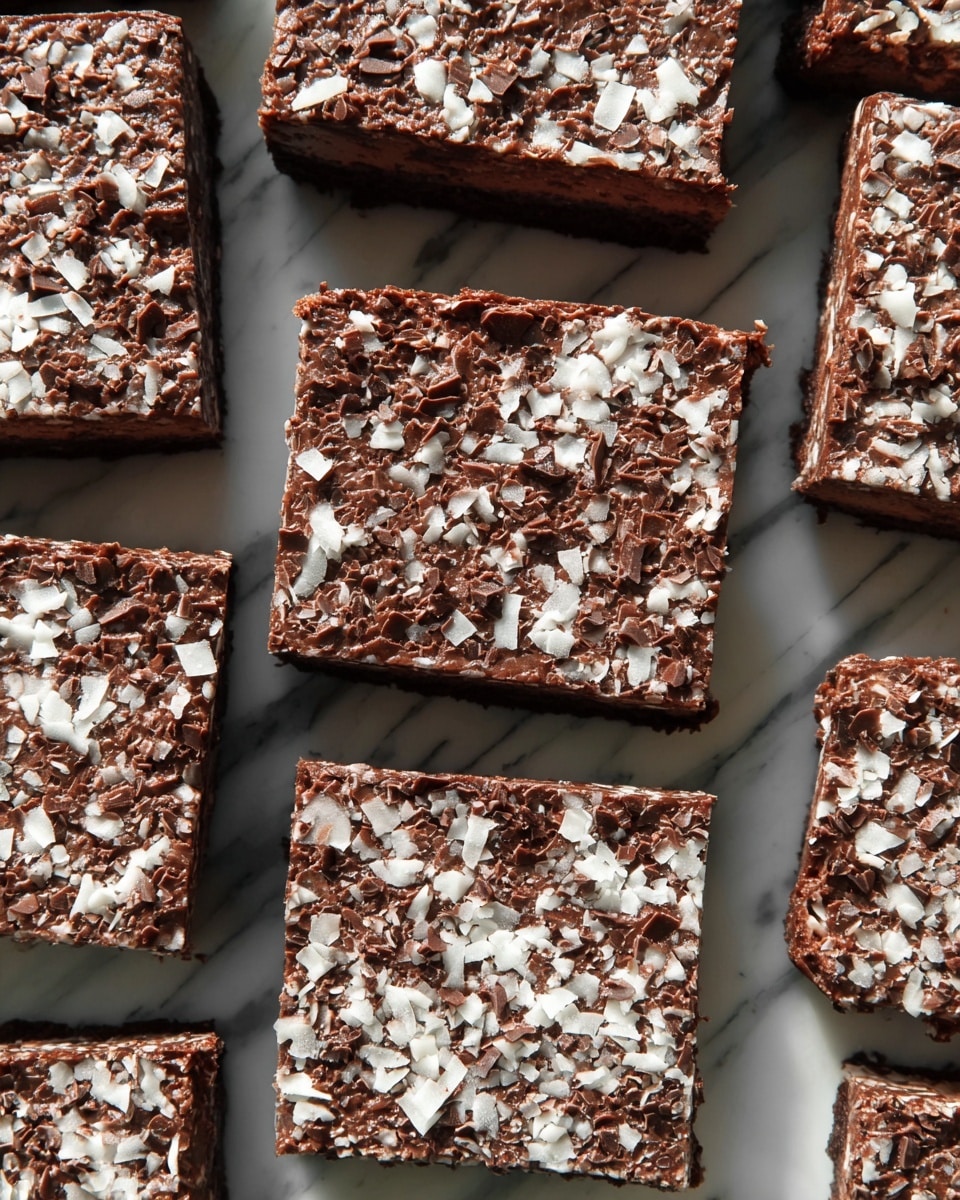
No-Bake Chocolate Coconut Bars Recipe
Let me tell you, this No-Bake Chocolate Coconut Bars Recipe is an absolute game-changer when you want a dessert that’s both indulgent and worry-free. It’s perfect for those moments when you crave something chocolaty and nutty but don’t want to turn on the oven or spend ages in the kitchen. The combination of rich peanut butter and shredded coconut layered with melty chocolate makes for a bar that’s satisfyingly chewy yet crisp with every bite.
One of the best things about this recipe is how quick and straightforward it is. If you’re short on time or just looking for a no-fuss sweet treat, you’ll really appreciate that these bars come together in minutes but need that chill time to set into something truly delicious. Plus, since they’re no-bake, they’re an absolute winner in warmer months or when you want to avoid heating up your kitchen.
Ingredients You’ll Need
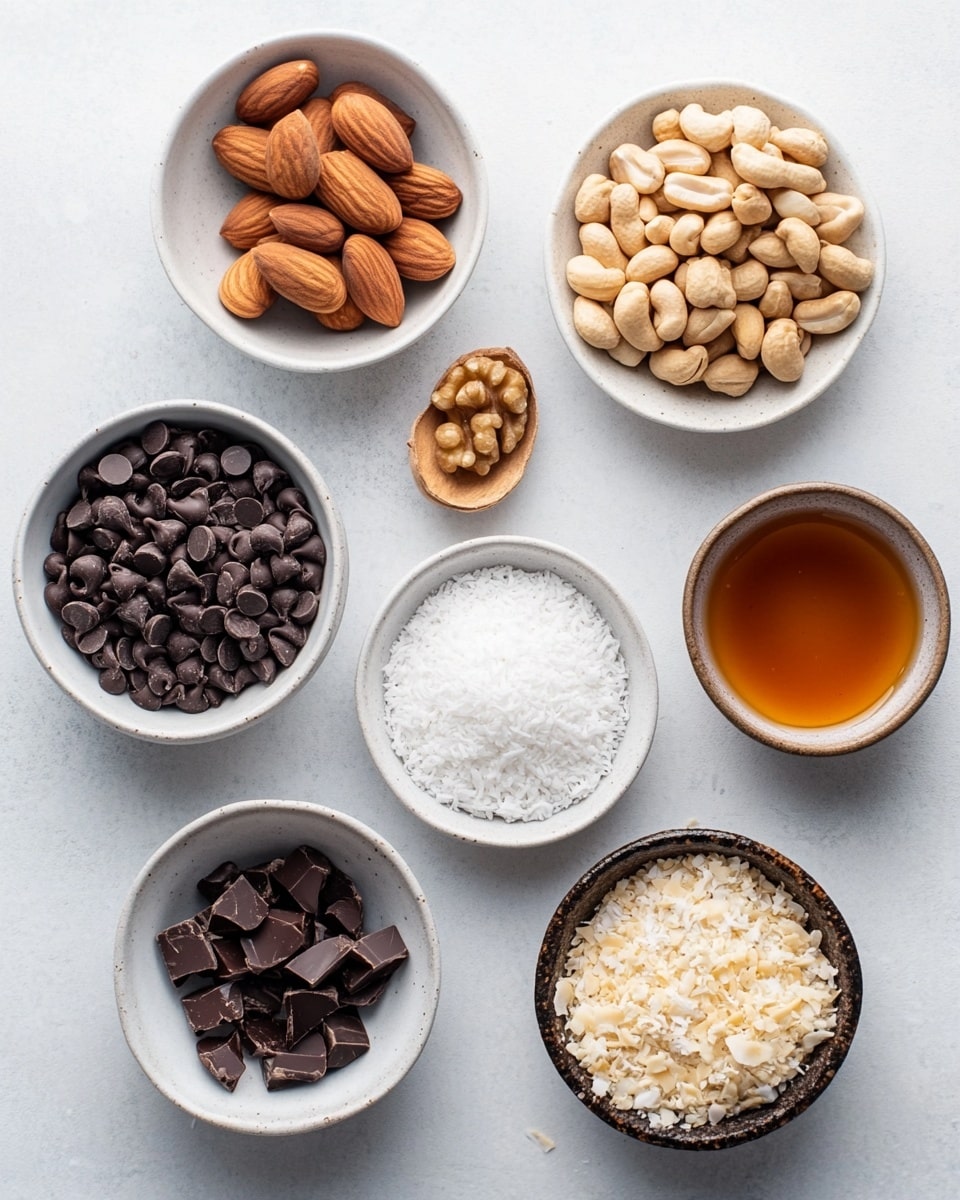
Every ingredient in this No-Bake Chocolate Coconut Bars Recipe plays a key role in balancing texture and flavor. From the creamy peanut butter to the crunchy mix of nuts, and of course that luscious melted chocolate—each item brings its own magic to the bars.
- Peanut Butter: I always go for 100% pure peanut butter without added sugar or salt to control the flavor and sweetness perfectly.
- Sugar-Free Chocolate Chips: Using sugar-free helps keep these bars lower in sugar, but feel free to swap for your favorite kind. Just watch the melting time as different chocolates vary.
- Natural Sweetener (like Swerve): This is my go-to for cutting down sugar without compromising taste. If you prefer honey, it works wonderfully for a low-carb spin.
- Unrefined Coconut Oil (solid): Make sure it’s solid when you start so it blends smoothly with the chocolate as it melts.
- Unsweetened Shredded Coconut: Gives a lovely chewy texture and that tropical flavor burst. Save some for topping—it adds a nice finishing touch.
- Unsalted Roasted Peanuts: Adds crunch and a toasty depth; feel free to use salted if that’s your jam, just reduce the salt elsewhere.
- Chopped Walnuts: I love how walnuts bring a buttery, slightly bitter note to balance sweetness.
- Chopped Cashews: Cashews add a creamy, soft crunch that pairs so well with the chocolate layers.
- Vanilla Extract: Just a teaspoon adds warmth and rounds out the sweetness beautifully.
Variations
I love how flexible this No-Bake Chocolate Coconut Bars Recipe is. Depending on what I have in my pantry (or what I’m craving!), I tweak it to keep things interesting or suit different dietary needs. You should definitely play around and make it your own, you won’t regret it!
- Nut-Free Version: I swapped out the nuts for extra shredded coconut and some sunflower seeds once for a picky guest — still delicious and just as crunchy.
- Vegan Adaptation: Using maple syrup instead of honey or a plant-based sweetener keeps this recipe 100% vegan-friendly without losing richness.
- Extra Chocolatey: I sometimes drizzle melted dark chocolate on top after setting for a glossy finish and double the chocolate fix.
- Spicy Kick: Add a pinch of cayenne or cinnamon to the melted mixture for a little warmth that really wakes up the flavors.
How to Make No-Bake Chocolate Coconut Bars Recipe
Step 1: Gently Melt the Chocolate Mixture
Start by combining the peanut butter, sugar-free chocolate chips, natural sweetener, and solid coconut oil in a microwave-safe bowl. Heat it at 50% power for 1 minute to gently melt everything without burning. Stir well, then continue microwaving at 15-second intervals, stirring in between until your mixture is perfectly smooth. Pro tip: Make sure your bowl is completely dry because even a drop of moisture can cause the chocolate to seize and get clumpy.
Step 2: Fold in the Nuts and Coconut
Once the chocolate mixture is silky, add in the shredded coconut, roasted peanuts, walnuts, cashews, and vanilla extract. Stir everything gently but thoroughly so every nut and shred of coconut is coated. This is where the texture really comes alive, so don’t rush it!
Step 3: Chill and Set the Bars
Pour your mixture into an 8×8-inch pan with a removable bottom if you have one—it makes unmolding way easier. Sprinkle shredded coconut on top for a pretty finish. Pop it in the fridge and let it chill for about 4 hours or until the chocolate hardens completely. Cover loosely so the bars don’t pick up any fridge odors while resting.
How to Serve No-Bake Chocolate Coconut Bars Recipe
Garnishes
I personally like to keep it simple with a sprinkle of extra unsweetened shredded coconut or a few chopped nuts on top. Sometimes I add a tiny drizzle of melted dark chocolate for a bit of extra pizzazz without overdoing it. These little touches always make the bars feel special without complicating the process.
Side Dishes
Serving these bars with a hot cup of coffee or a nutty chai latte is one of my favorite combos. They also pair delightfully with fresh berries or a simple herbal tea for a lighter experience. Honestly, these bars stand strong solo but these sides elevate the whole treat time.
Creative Ways to Present
For celebrations, I’ve cut the bars into fun shapes using cookie cutters or layered them with parchment paper in a decorative box to gift friends. Another time, I sprinkled edible gold dust on top when serving at a dinner party for a touch of glam. These simple tricks really showcase how adaptable this recipe is for special occasions.
Make Ahead and Storage
Storing Leftovers
I always store leftover bars in an airtight container in the fridge to keep them fresh and firm. They last beautifully for up to a week, making them perfect for sneaking a quick bite anytime you need a little pick-me-up.
Freezing
Freezing these bars works like a charm! I wrap individual pieces in parchment paper then place them in a freezer-safe bag. They freeze well for up to 3 months and thaw quickly at room temperature, making batch prep a total breeze.
Reheating
Since these bars are no-bake and set with coconut oil and chocolate, I usually just let them sit out a few minutes before enjoying to soften slightly. If you want them warmer, a quick 10-15 second zap in the microwave works—but be careful not to melt them completely.
FAQs
-
Can I use other nut butters instead of peanut butter?
Absolutely! Almond butter or cashew butter work wonderfully in this recipe. Just opt for natural, unsweetened versions to keep the flavor balanced. The texture might vary slightly, but the bars will still taste fantastic.
-
Do I have to use sugar-free chocolate chips?
Nope! You can use any chocolate chips you love. If you choose regular sweetened chocolate, consider adjusting the sweetener amount to keep the bars from becoming too sweet.
-
Why is it important to use solid coconut oil?
Using solid coconut oil helps create the right texture when melted slowly with the chocolate. It solidifies nicely when chilled, helping your bars set correctly with a smooth, firm finish.
-
How long do these bars stay fresh?
Stored in an airtight container in the fridge, these bars stay fresh and tasty for about a week. Freezing extends their lifespan up to three months.
-
Can I make these bars vegan-friendly?
Yes! Swap honey for maple syrup or your favorite plant-based sweetener, and double-check your chocolate is dairy-free. Doing so keeps this recipe completely vegan without sacrificing flavor or texture.
Final Thoughts
I honestly can’t recommend this No-Bake Chocolate Coconut Bars Recipe enough—whether you’re a kitchen beginner or a seasoned snack maker. It’s one of those recipes that feels fancy but is so incredibly simple to whip up. Next time you want a sweet fix that doesn’t stress you out, give this a shot. I promise you’ll love how easy it is to make, store, and most importantly, how utterly delicious it tastes. Let me know how you personalize yours—I’m always here cheering you on in your kitchen adventures!
Print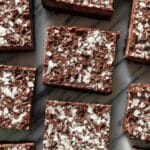
No-Bake Chocolate Coconut Bars Recipe
- Prep Time: 5 minutes
- Cook Time: 0 minutes
- Total Time: 4 hours
- Yield: 16 bars 1x
- Category: Dessert
- Method: No-Cook
- Cuisine: American
- Diet: Low Carb
Description
These No-Bake Chocolate Coconut Bars are a delicious, easy-to-make treat combining rich peanut butter, sugar-free chocolate, and a mix of nuts and shredded coconut. Perfect for a healthy indulgence without turning on the oven, these bars require minimal prep and set in the fridge to create a satisfying chewy texture with a crunchy topping.
Ingredients
Main Ingredients
- 1 cup 100% pure peanut butter
- 1¼ cups sugar-free chocolate chips
- 1 tablespoon natural sweetener like Swerve (or honey for low-carb)
- ½ cup unrefined coconut oil (solid form)
- 1½ cups unsweetened shredded coconut (reserve some for topping)
- 1 cup unsalted roasted peanuts
- 1 cup chopped walnuts
- 1 cup chopped unsalted roasted cashews
- 1 teaspoon vanilla extract
Instructions
- Prepare the melting mixture: In a microwave-safe bowl, combine the peanut butter, sugar-free chocolate chips, natural sweetener, and solid coconut oil.
- Initial heating: Microwave the mixture at 50% power for 1 minute to start melting the ingredients gently.
- Stir the mixture: Remove the bowl and stir the partially melted mixture thoroughly to help even melting.
- Complete melting: Return the bowl to the microwave, heating in 15-second intervals at 50% power, stirring after each until the entire mixture is smooth and fully melted.
- Add remaining ingredients: Stir in the shredded coconut (except the reserved topping), peanuts, walnuts, cashews, and vanilla extract until well combined.
- Transfer and top: Pour the combined mixture into an 8×8-inch removable bottom pan, spreading evenly, then sprinkle the reserved shredded coconut on top for texture and presentation.
- Refrigerate to set: Place the pan in the refrigerator for about 4 hours or until the chocolate mixture hardens and the bars are set.
- Slice and store: Once firm, cut into 16 square pieces and store in an airtight container in the refrigerator to maintain freshness.
Notes
- Ensure the bowl is completely dry and free of moisture before melting the chocolate to prevent seizing.
- Loosely cover the bars in the fridge while they set to avoid absorption of any unwanted odors.
- You can swap the nuts for other varieties to customize the flavor and texture.
- Store the bars in an airtight container in the fridge for optimal freshness.
- For longer storage, freeze the bars in a freezer-safe container or bag for up to 3 months.
Keywords: no-bake, chocolate coconut bars, sugar-free dessert, peanut butter bars, low-carb, healthy snack, vegan dessert