Layered Jello Pie Recipe
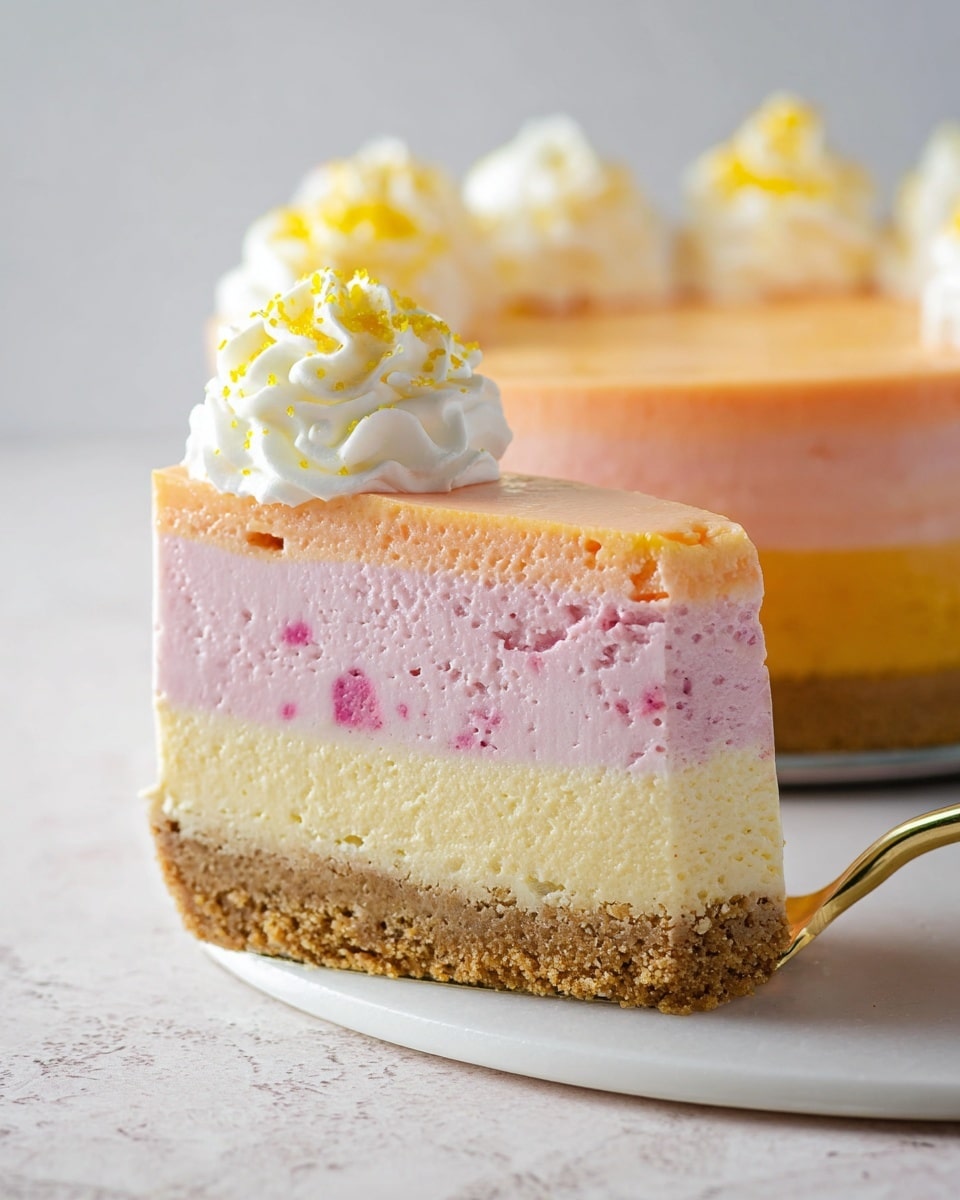
If you’re looking for a dessert that’s as fun to eat as it is to make, you’ll love this Layered Jello Pie Recipe. It’s got vibrant colors, a refreshing lightness, and that nostalgic charm that only Jello can bring. I remember making this with my family on summer afternoons—each layer felt like a burst of joy, and slicing into it revealed a gorgeous rainbow of flavors!
What makes this Layered Jello Pie Recipe really special, though, is how approachable it is. Whether you’re hosting a casual BBQ, a kid’s birthday party, or just craving a bright, fruity treat, this pie comes together quickly and looks impressive. Plus, the creamy whipped topping balances the fruity layers perfectly, making it both a visual and a taste delight you’ve got to try.
Ingredients You’ll Need
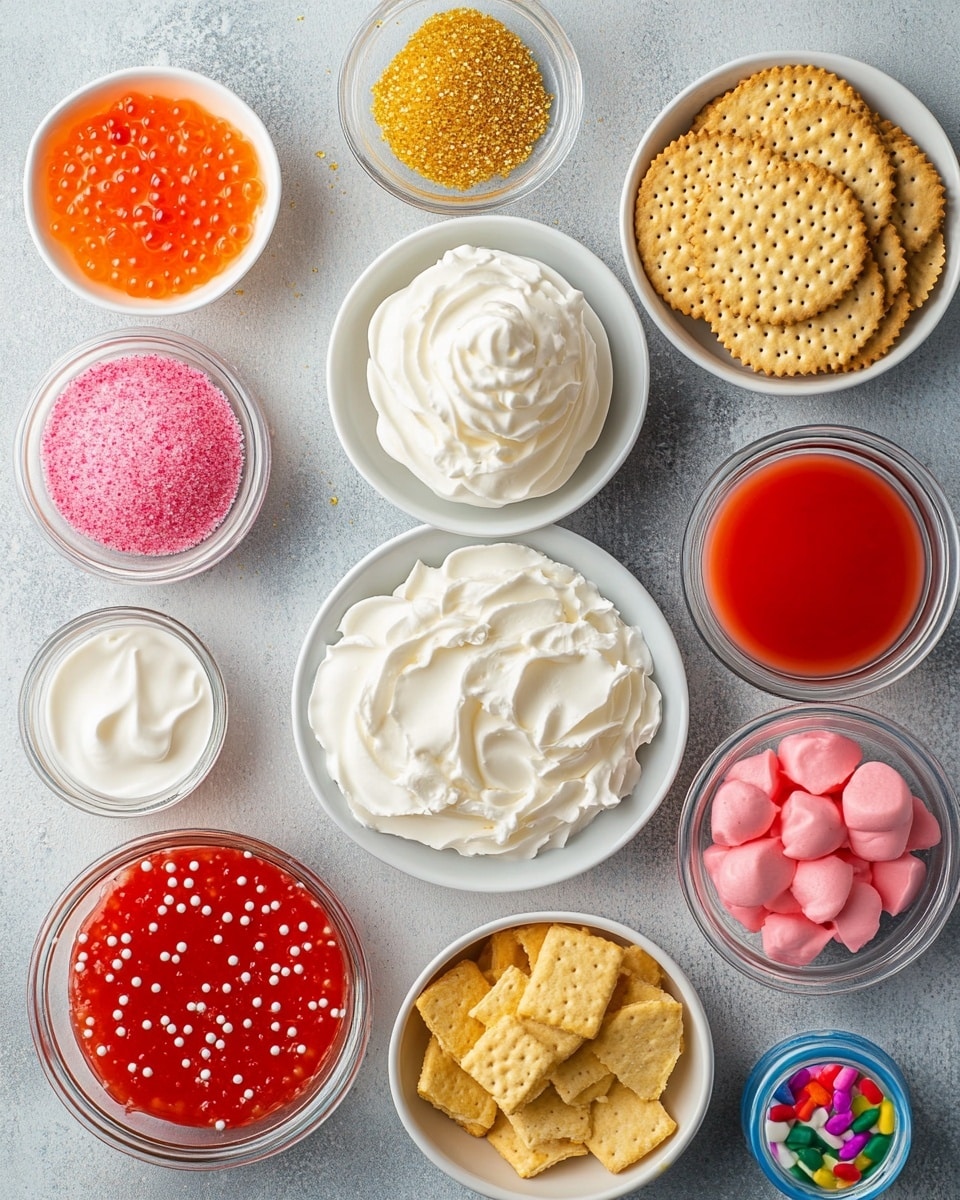
To create each colorful layer of this jello pie, you’ll want good-quality ingredients that complement each other well. The graham cracker crust adds a buttery crunch that grounds the sweet, wobbly layers of flavored gelatin, while the whipped cream topping softens the whole experience with a touch of indulgence.
- Whipped Cream: I like to use pre-whipped cream for convenience, but fresh homemade whipped cream works beautifully too if you have time.
- Red Jello (3 ounces): Choose classic strawberry or cherry flavor; it’s the perfect vibrant start for the base layer.
- Orange Jello (3 ounces): A zesty addition — orange jello provides that bright citrus punch that pairs great with the other fruit flavors.
- Yellow Jello (3 ounces): Lemon or pineapple works here; it lightens the pie and adds a lovely tang.
- Boiling Water: Needed to dissolve the jello powder properly for smooth layers.
- Cold Water: This cools the jello mixture down, helping it set properly layer by layer.
- Pink, Orange, and Bright Yellow Food Coloring: These help intensify each jello layer’s color without affecting the taste.
- Graham Cracker Sheets: For the crust — using sheets makes the crust extra crunchy and easier to slice later.
- Unsalted Butter: Melted and mixed with the graham crackers, it gives the crust that delicious buttery flavor.
- Whipped Cream (optional for garnish): Adds a pretty finish and extra creaminess on top.
- Gold Sanding Sugar (optional for garnish): I love sprinkling this on top for a little sparkle and crunch—makes it feel festive.
Variations
One of the best things about this Layered Jello Pie Recipe is how easy it is to tweak to your liking. I often swap out flavors or adjust colors depending on the occasion. Don’t hesitate to get creative here!
- Variation: For a tropical twist, I’ve replaced the yellow jello with coconut-flavored gelatin and added shredded coconut to the crust—total crowd pleaser.
- Diet-friendly: Use sugar-free jello flavors and light whipped cream to lighten this up, perfect if you’re watching sugar intake.
- Seasonal tweaks: Around Halloween, I swap out colors to purple, green, and orange with matching food colors and garnish with candy eyeballs for a spooky vibe.
How to Make Layered Jello Pie Recipe
Step 1: Prepare the Graham Cracker Crust
Start with the crust—it’s the foundation. Crush your graham cracker sheets finely (if not using pre-crushed) or break up the sheets into small crumbs, then combine them with melted unsalted butter. Press this mixture into a pie pan firmly to create an even layer. I like to set it in the fridge for about 15 minutes to firm up before adding any jello—this prevents sogginess later on.
Step 2: Make the First Jello Layer
Boil 1 cup of water and pour it over the first box of red jello powder. Stir until completely dissolved, then add 1 cup of cold water and a few drops of pink food coloring to intensify the shade. Pour this mixture carefully over the chilled crust. Refrigerate until just set—this can take about 30 minutes. A good tip: the jello should be firm but slightly tacky before adding the next layer to help everything stick together.
Step 3: Repeat for Orange and Yellow Layers
Repeat the jello-making process with the orange and yellow jello packets, boiling 1 cup of water for each and mixing in cold water plus corresponding food coloring. Be patient between layers, letting each set completely before pouring the next. This layering is what makes the pie so stunning—you get those clear, defined stripes that almost glow on the plate.
Step 4: Top with Whipped Cream and Chill
Once all the jello layers have set solidly, spoon or pipe the whipped cream on top for a light, fluffy finish. If you’re feeling fancy, sprinkle gold sanding sugar right over the cream just before serving. Pop the pie back into the fridge for about an hour before cutting—it helps everything come together for the perfect slice.
How to Serve Layered Jello Pie Recipe
Garnishes
I always go for a thick swirl of whipped cream on top plus a light sprinkle of gold sanding sugar—it adds a little sparkle and a fun crunch. For a seasonal touch, I’ve added fresh fruit like strawberries or mandarin slices to complement the fruity flavors and brighten up the presentation.
Side Dishes
This pie pairs wonderfully with light, fresh sides like a crisp green salad or simple fruit salad. If you’re serving this at a party, you can’t go wrong with finger sandwiches or light cheese platters to keep things balanced and refreshing.
Creative Ways to Present
For holidays, I sometimes prepare mini layered Jello pies in clear individual cups to show off the vibrant colors—perfect for single servings at gatherings. Another fun way is to cut the pie into shapes using cookie cutters for kid’s parties—it turns dessert time into a colorful celebration.
Make Ahead and Storage
Storing Leftovers
Layered Jello Pie keeps great in the fridge for 3-4 days. I store leftovers covered tightly with plastic wrap or kept in an airtight container so the pie doesn’t absorb any fridge odors or dry out. Just make sure to store it level so the layers maintain their shape.
Freezing
I generally don’t recommend freezing this dessert because ice crystals can ruin the texture of the jello layers, making them watery and less firm. It’s best enjoyed fresh or within a few days when refrigerated.
Reheating
This is a chilled dessert, so it’s never reheated. Just bring it out of the fridge about 10 minutes before serving if you want to take the chill off slightly—it softens the top whipped cream just right.
FAQs
-
Can I use different jello flavors for the Layered Jello Pie Recipe?
Absolutely! Feel free to swap in your favorite jello flavors to suit your taste or holiday themes. Just make sure to keep the bright colors and complementary flavors for the best visual and taste balance.
-
How long does it take for each jello layer to set?
Each layer typically takes about 30 to 45 minutes to set well enough to add the next. Patience really pays off here to keep those clean layers.
-
Is there a trick to getting the layers to stick together?
Yes! Wait until the layer is firm but still slightly tacky before pouring the next layer on top. This tackiness helps the layers adhere nicely without mixing.
-
Can I make the graham cracker crust ahead of time?
Definitely. You can prepare the crust a day ahead and keep it refrigerated. This actually helps the crust firm up and enhances its crunch when you add the jello layers.
-
How do I slice the Layered Jello Pie without it falling apart?
Use a sharp knife dipped in hot water and wiped dry before each cut. This warms the blade slightly, allowing for clean, smooth slices without crumbling.
Final Thoughts
This Layered Jello Pie Recipe is one of those gems that’s as much fun to make as it is to eat. I’ve shared it with friends and family countless times, and every single experience has been filled with smiles over the bright colors and sweet, creamy flavors. If you want a dessert that’s easy, eye-catching, and downright delicious, this is the one I’d recommend you try next. Trust me, once you nail that perfect layering, you’ll want to make it again and again!
Print
Layered Jello Pie Recipe
- Prep Time: 30 minutes
- Cook Time: 0 minutes
- Total Time: 4 hours 30 minutes
- Yield: 8 servings 1x
- Category: Dessert
- Method: No-Cook
- Cuisine: American
- Diet: Vegetarian
Description
This colorful Layered Jello Pie is a fun and vibrant dessert featuring bright layers of red, orange, and yellow jello set in a buttery graham cracker crust and topped with fluffy whipped cream. Perfect for summer parties or festive gatherings, this no-bake pie combines fruity flavors and a creamy texture with a delightful crunch from the crust. Optional garnishes of whipped cream and gold sanding sugar add an elegant touch.
Ingredients
Jello Layers
- 1 box Red Jello (3 ounces)
- 1 box Orange Jello (3 ounces)
- 1 box Yellow Jello (3 ounces)
- 3 cups Boiling Water
- 3 cups Cold Water
- Pink Food Coloring (optional to enhance red layer)
- Orange Food Coloring (optional to enhance orange layer)
- Bright Yellow Food Coloring (optional to enhance yellow layer)
- 24 ounces Whipped Cream
Crust
- 2 packages Graham Cracker Sheets
- 10 Tablespoons Unsalted Butter, melted
Garnish (Optional)
- Whipped Cream
- Gold Sanding Sugar
Instructions
- Prepare the Graham Cracker Crust: Crush the graham cracker sheets into fine crumbs using a food processor or by placing them in a sealed plastic bag and crushing with a rolling pin. Mix the crumbs thoroughly with the melted unsalted butter until evenly combined. Press the mixture firmly into the bottom and slightly up the sides of a pie dish to form an even crust layer. Refrigerate the crust while preparing the jello layers to allow it to set and firm up.
- Make the Red Jello Layer: In a mixing bowl, dissolve the red jello powder in 1 cup of boiling water, stirring until completely dissolved. Add a few drops of pink food coloring to intensify the red color, if desired. Stir in 1 cup of cold water. Allow the mixture to cool slightly but not set. Pour the red jello mixture over the chilled graham cracker crust, gently spreading it evenly. Refrigerate for about 45 minutes or until the layer is set and firm to touch.
- Prepare the Orange Jello Layer: Dissolve the orange jello powder in 1 cup boiling water, stirring completely. Add orange food coloring for a brighter hue if preferred. Stir in 1 cup cold water. Once the red layer has set, carefully pour the orange jello on top, spreading evenly. Refrigerate again for 45 minutes or until firm.
- Create the Yellow Jello Layer: Repeat the process by dissolving the yellow jello powder in 1 cup boiling water and stirring in 1 cup cold water. Enhance color with bright yellow food coloring if desired. Pour over the set orange jello layer. Refrigerate for at least 45 minutes until completely firm.
- Add Whipped Cream Layer: Once all jello layers are set, gently spread the 24 ounces of whipped cream over the top layer, evenly smoothing it to cover the pie. This adds a creamy, fluffy texture that contrasts beautifully with the jello layers below.
- Garnish and Chill: Optionally, decorate the whipped cream topping with extra whipped cream dollops and sprinkle gold sanding sugar for a festive sparkle. Chill the entire pie for an additional 30 minutes before serving to ensure all layers are well set and flavors melded.
- Serve: Slice the pie using a sharp knife dipped in warm water for clean cuts. Serve chilled and enjoy the vibrant layers and refreshing flavors.
Notes
- For best results, use separate clean utensils for each jello layer to avoid mixing colors.
- Food coloring is optional but helps achieve more vibrant layers if natural jello colors are muted.
- The pie must be refrigerated for adequate time after each layer to ensure firm setting and easy slicing.
- To speed up setting times, place the pie in the coldest part of your refrigerator but avoid freezing.
- You can substitute graham cracker sheets with crushed graham cracker crumbs of equivalent quantity.
Keywords: Layered Jello Pie, graham cracker crust, colorful jello dessert, no bake pie, whipped cream topping, festive dessert