Homemade No Bake Granola Bars Recipe
Whenever I’m craving a wholesome snack that doesn’t involve heating up the oven or standing for ages, this Homemade No Bake Granola Bars Recipe always saves the day. It’s such a simple, yet rewarding treat—perfect for busy mornings, afternoon pick-me-ups, or even a quick post-workout bite. I love how these bars come together in just a few minutes and then firm up in the fridge, making them incredibly convenient yet nourishing.
What makes this recipe extra special is how flexible it is; whether you’re team chocolate chips, dried cranberries, or crunchy nuts, it’s totally customizable to your taste. Plus, since these bars are made with wholesome ingredients like oats and natural nut butters, they’re a great way to fuel your day without any guilt. Trust me, once you try this Homemade No Bake Granola Bars Recipe, you’ll find yourself making them over and over!
Ingredients You’ll Need
The magic of this recipe lies in its simplicity and balance of flavors and textures. Each ingredient complements the others perfectly, offering chewiness, sweetness, and that satisfying crunch. When you shop, try to choose good-quality nut butter and your favorite mix-ins to make these bars truly your own.
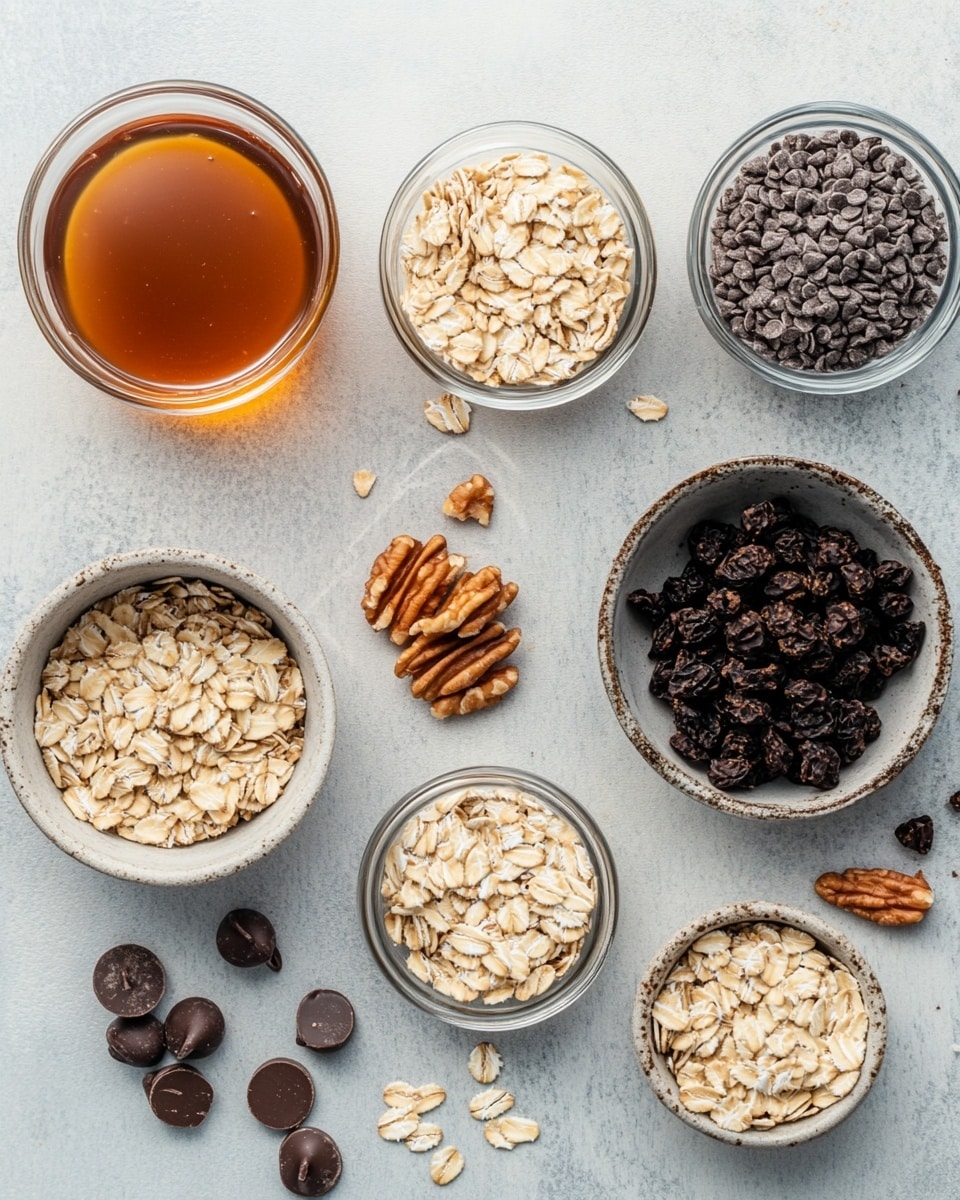
- Old-fashioned rolled oats: These give the bars their hearty, chewy texture. Avoid instant oats—they won’t hold up as well.
- Nut butter (peanut, almond, or cashew): Acts as a binder and adds creaminess. I usually go with natural peanut butter for that rich flavor.
- Honey, maple syrup, or agave: This sweetener not only adds a gentle sweetness but also helps bind everything together.
- Mix-ins (chocolate chips, dried fruit, seeds, or nuts): The fun part! Choose whatever you love for texture and bursts of flavor. I often mix semi-sweet chips with dried cherries.
- Vanilla extract (optional): Just a splash enhances the overall flavor beautifully.
- Pinch of salt: This small addition balances the sweetness and rounds out the taste.
Variations
Personally, I enjoy mixing up this Homemade No Bake Granola Bars Recipe based on what I have in my pantry or the season. Don’t hesitate to make it your own—after all, that’s the beauty of no-bake snacks!
- Nut-Free Version: Swapping nut butter for sunflower seed butter works wonders if you have allergies. I made a batch this way for a friend and it was just as tasty!
- Extra Crunch: Add toasted oats or even puffed rice for some crispy texture—I love that contrast.
- Fruity Twist: Dried mango or blueberry pieces bring a refreshing pop that balances the sweet and nutty elements.
- Chocolate Lover’s Delight: Stir in cocoa powder to the wet mixture and top with extra chocolate chips for a decadent touch.
- Spiced Variation: Sprinkle cinnamon or a dash of pumpkin spice to the dry mix for cozy vibes.
How to Make Homemade No Bake Granola Bars Recipe
Step 1: Prep Your Pan Smartly
Start by lining an 8×8-inch baking dish with parchment paper, making sure to leave enough overhang on the sides. This little trick will make lifting the set bars out a breeze, and you won’t have to worry about them sticking or breaking apart. It’s one of those kitchen hacks that saves time and frustration later on.
Step 2: Mix the Dry Ingredients
In a large bowl, toss together your rolled oats and chosen mix-ins—whether it’s nuts, seeds, or dried fruit. This stage is fun because you get to customize exactly what you want to see and taste in the bars. Don’t skip mixing well; it helps every bite have an even mix.
Step 3: Warm and Blend the Wet Ingredients
Over low heat, gently melt your nut butter with honey or maple syrup in a small saucepan. Stir constantly to combine everything smoothly, and make sure it doesn’t boil or burn—that would change the taste drastically. If you have vanilla extract, add it once you remove the pan from heat; it brings a lovely depth to the bars. A pinch of salt here is also key to balance sweetness.
Step 4: Combine and Coat
Pour that warm, sticky nut butter mixture over the oats and mix-ins. Stir vigorously until all the oats are well coated—this is what makes the bars stick together. Don’t rush this part; taking a minute ensures you get uniform bars that hold up well after chilling.
Step 5: Press and Chill
Transfer your mixture to the lined pan, then press it down firmly with the back of a spoon or spatula. The firmer you press, the better the bars will hold their shape. It helped me a lot to think like I’m packing a suitcase tight! Pop the pan into the fridge for at least two hours—this patience pays off once you cut into perfectly firm bars.
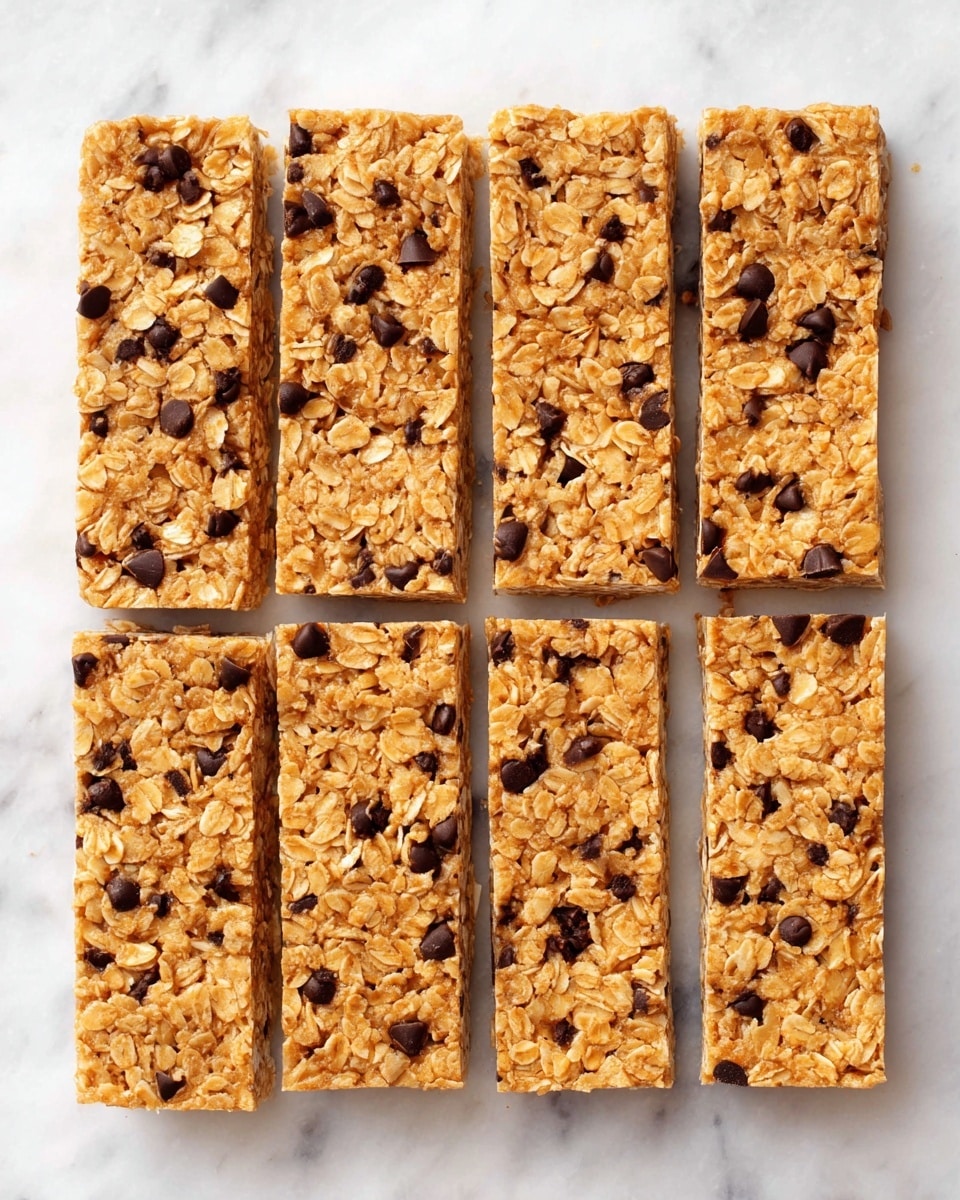
Step 6: Slice and Enjoy
Once chilled and set, use the parchment overhang to lift out the whole block. Slice into 10-12 bars depending on your preferred size. These bars are perfect for on-the-go or packed in lunchboxes—plus, they hold their texture well, so no crumbly mess!
How to Serve Homemade No Bake Granola Bars Recipe
Garnishes
I often sprinkle a few seeds like chia or sunflower on top right after pressing the mixture into the pan—it makes the bars look more appetizing and adds a subtle crunch. Another favorite is drizzling melted dark chocolate over the top for a fancy finish. It’s an easy way to elevate these bars when sharing with friends.
Side Dishes
These bars pair beautifully with a cup of coffee or tea for a mid-morning snack. I also like to serve them alongside fresh fruit like apple slices or berries for a colorful breakfast or afternoon combo that keeps me energized.
Creative Ways to Present
For birthdays or casual gatherings, I’ve wrapped individual bars in parchment paper tied with twine and added a handwritten label. It’s such a thoughtful, homemade touch that guests really appreciate. You can also stack them in a glass jar for a pretty pantry display or gift idea.
Make Ahead and Storage
Storing Leftovers
I store leftover bars in an airtight container in the fridge to keep them fresh and firm. I’ve found that they stay perfect for up to a week, which means you can enjoy these snacks all week long without worrying about them getting stale or messy. Just make sure the container seals well!
Freezing
Freezing these bars is a game-changer for busy weeks. I wrap each bar individually with plastic wrap and pop them into a freezer-safe bag. When I need a quick energy boost, I just grab one and let it thaw at room temperature for 15-20 minutes—it tastes freshly made every time.
Reheating
Because these bars are no bake, reheating isn’t usually necessary. But if you prefer them a bit softer, a few seconds in the microwave (around 10-15 seconds) does the trick. Just be careful not to overheat or the nut butter might get oily.
FAQs
-
Can I use quick oats instead of rolled oats in this Homemade No Bake Granola Bars Recipe?
It’s best to stick with old-fashioned rolled oats for this recipe. Quick oats tend to be finer and can make the bars less sturdy and mushy. Rolled oats provide the perfect chew and structure, helping the bars hold together nicely.
-
What’s the best nut butter to use for no bake granola bars?
Feel free to choose your favorite! Peanut butter is classic and widely loved, almond butter brings a subtle sweetness, and cashew butter adds a creamy, mild flavor. Just make sure it’s smooth for easier melting and mixing.
-
How long will these granola bars stay fresh?
Stored in an airtight container in the fridge, these bars keep well for about a week. You can also freeze them for longer storage, which helps retain their freshness and texture.
-
Can I add protein powder to this Homemade No Bake Granola Bars Recipe?
Absolutely! Adding a scoop of your favorite protein powder can boost the nutrition. Just mix it with the dry ingredients and adjust the wet ingredients slightly if the mixture feels too dry.
-
Why are my no bake granola bars crumbly and not holding together?
This usually happens if the mixture isn’t pressed firmly enough into the pan or if there isn’t enough sticky binder like nut butter and honey. Make sure you press the bars tightly and use the right ratio of wet to dry ingredients for perfect bars.
Final Thoughts
This Homemade No Bake Granola Bars Recipe has become my go-to when I want something quick, healthy, and satisfying. I know you’ll appreciate how effortless it is, especially on those days when time is tight but you still want a nourishing snack. Give it a try—you might just end up loving this little kitchen shortcut as much as I do!
Print
Homemade No Bake Granola Bars Recipe
- Prep Time: 10 minutes
- Cook Time: 5 minutes
- Total Time: 2 hours 15 minutes
- Yield: 10 bars 1x
- Category: Snack
- Method: No-Cook
- Cuisine: American
- Diet: Vegetarian
Description
This Homemade No Bake Granola Bars recipe offers a quick and easy way to make delicious, healthy snacks without any baking. Packed with rolled oats, nut butter, honey, and your choice of mix-ins like chocolate chips or dried fruit, these bars are perfect for an energy-boosting treat or on-the-go snack. Ready in just over two hours including chilling time, this no-bake recipe is simple, customizable, and nutritious.
Ingredients
Dry Ingredients
- 2 cups old-fashioned rolled oats
- ½ cup mix-ins (chocolate chips, dried fruit, seeds, or nuts)
Wet Ingredients
- ½ cup nut butter (peanut butter, almond butter, or cashew butter)
- ⅓ cup honey (or maple syrup, or agave)
- 1 teaspoon vanilla extract (optional)
- Pinch of salt
Instructions
- Prepare Your Pan: Line an 8×8-inch baking dish with parchment paper, leaving extra hanging over the edges to make it easier to lift out the granola bars once set.
- Mix Dry Ingredients: In a large mixing bowl, combine the 2 cups of rolled oats with your chosen ½ cup of mix-ins such as chocolate chips, dried fruits, seeds, or nuts. Stir until evenly distributed.
- Heat Wet Ingredients: Place the ½ cup of nut butter and ⅓ cup of honey (or maple syrup/agave) into a small saucepan over low heat. Gently melt and stir until smooth and fully combined. Remove from heat and stir in the 1 teaspoon of vanilla extract (if using) and a pinch of salt to enhance flavor.
- Combine Wet and Dry Ingredients: Pour the warm melted nut butter mixture over the oat mixture. Stir thoroughly to ensure all the oats and mix-ins are well coated with the sticky binder.
- Press into the Pan: Transfer the combined mixture into the prepared baking dish. Using the back of a spoon or spatula, firmly press the mixture down in an even layer. This compacts the ingredients so the bars hold together properly once chilled.
- Chill: Place the baking dish in the refrigerator. Allow the granola bars to set and firm up for at least 2 hours, which helps them become solid enough to cut cleanly.
- Slice and Serve: After chilling, lift the set granola slab out of the pan using the parchment paper overhang. Cut into 10 to 12 bars with a sharp knife. Serve immediately, or store in an airtight container for convenient snacking later.
Notes
- You can customize the bars by choosing your favorite nut butter and mix-ins like seeds, nuts, or dried fruits.
- For a vegan option, use maple syrup or agave instead of honey.
- If mixture feels too dry to press, warm the nut butter mixture slightly more or add a splash of milk (dairy or plant-based).
- Store bars in the refrigerator to maintain freshness and firmness.
- Pressing firmly is key to ensuring the bars hold their shape after chilling.
Keywords: no bake granola bars, homemade granola bars, healthy snack, no bake snack, easy granola bars, energy bars, oats snack