Heart Shaped Cocoa Cake with Cream Cheese Frosting Recipe
If you’re looking to wow someone special—or just treat yourself to something sweet and charming—this Heart Shaped Cocoa Cake with Cream Cheese Frosting Recipe is pure magic. I’ve made it for both Valentine’s Day and casual weekend gatherings, and it never fails to impress. The rich cocoa flavor paired with creamy, tangy frosting is such a comforting combo, and the heart shape just adds that extra wow factor.
What I love most about this Heart Shaped Cocoa Cake with Cream Cheese Frosting Recipe is how approachable it is. You don’t have to be a baking pro to nail it, yet it feels fancy enough for celebrations. Plus, making that heart shape by combining a round and square pan is a fun little trick I picked up that I’m excited to share with you!
Ingredients You’ll Need
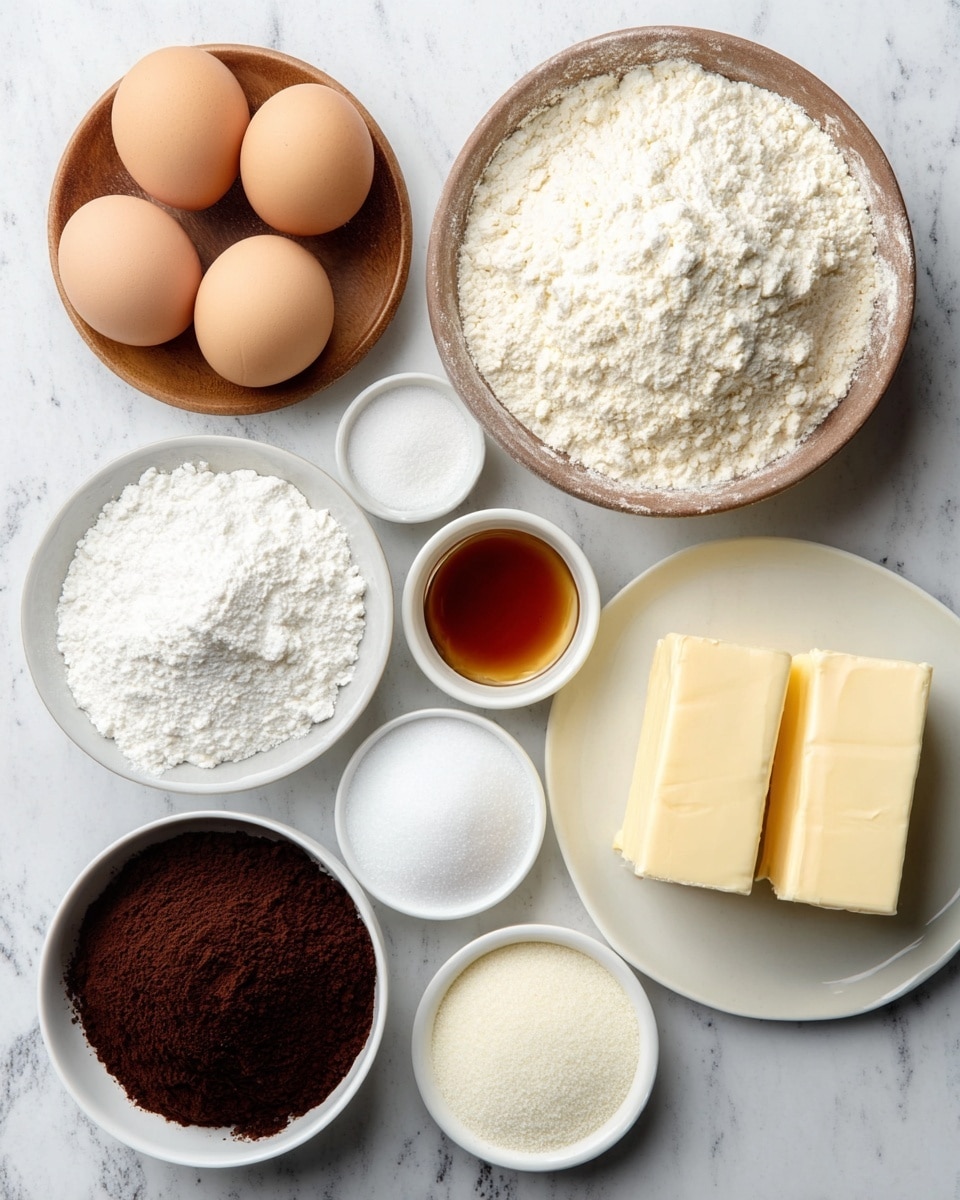
These ingredients all play their part to give you a moist, fluffy cocoa cake with that signature tangy cream cheese frosting. I recommend using fresh, room-temperature ingredients especially for the eggs and cream cheese to get the best texture in both your cake and frosting.
- All-purpose flour: This is your classic cake base; sift it well for airy cake crumb.
- Cocoa powder: Use unsweetened cocoa for deep chocolate flavor.
- Baking soda & baking powder: Both work together to give your cake a great rise and light texture.
- Granulated sugar: Sweetness and structure—don’t skip it!
- Salt: Just a pinch to balance flavors perfectly.
- Buttermilk: This adds a subtle tang and keeps the cake moist—I always use full-fat for richness.
- Vegetable oil: Keeps the cake super moist and tender.
- Large eggs: They bind everything together; room temperature ones blend better.
- White vinegar: Helps with rise and balances the cocoa’s bitterness a little.
- Vanilla extract: A little boost to the overall flavor.
- Liquid red food coloring: Optional for a pretty reddish hue that makes the cake extra festive.
- Cream cheese: For the frosting’s tang and creaminess, make sure it’s softened well.
- Unsalted butter: Adds richness to the frosting; softened to room temp.
- Powdered sugar: For that smooth, sweet frosting texture that spreads easily.
Variations
I love playing with this recipe depending on the occasion or who I’m baking for. Feel free to make the Heart Shaped Cocoa Cake with Cream Cheese Frosting Recipe your own by tweaking flavors or textures.
- Make it dairy-free: I swapped regular buttermilk with almond milk plus a splash of vinegar once, and coconut cream instead of butter in the frosting worked surprisingly well!
- Try espresso powder in the batter: A teaspoon amps the chocolate flavor without adding a coffee taste—my go-to tweak for a grown-up version.
- Use natural food coloring alternatives: Beet juice or hibiscus powder can substitute for red food coloring if you prefer natural ingredients.
- Add fresh berries: I sometimes layer raspberries between the cake and frosting for a tart contrast that’s delightful.
How to Make Heart Shaped Cocoa Cake with Cream Cheese Frosting Recipe
Step 1: Prepare Your Pans and Dry Ingredients
First things first—preheat your oven to 350°F. Grab an 8-inch round pan and an 8-inch square pan and give them a thorough spray with pan spray or butter. I always line the bottoms with parchment paper and spray that too—it makes removing the cakes a breeze and keeps them perfectly intact. Next, sift the flour, cocoa powder, baking soda, and baking powder together in a medium bowl. Then whisk in sugar and salt until everything’s combined and ready for the wet ingredients.
Step 2: Mix Your Wet Ingredients
In a large bowl, whisk together the buttermilk, vegetable oil, eggs, white vinegar, vanilla extract, and red food coloring until you have a smooth, unified mixture. I usually beat the eggs first before adding everything else, just to make sure the batter comes together easily. Using room-temperature eggs here definitely helps the texture.
Step 3: Combine and Bake
Gradually add the dry ingredients to the wet mixture. Whisk gently but thoroughly until the batter is smooth and homogenous, but don’t overmix—overdoing it can make the cake dense. Divide your batter evenly between the two prepared pans and pop them into the oven. Bake for 30–35 minutes, checking towards the end by inserting a toothpick into the center; if it comes out clean or the cake springs back when gently pressed, you’re good to go!
Step 4: Cool and Prepare the Frosting
Let the cakes cool in their pans for 10-15 minutes before transferring them to a wire rack to cool completely. Meanwhile, beat the cream cheese and butter in a bowl until creamy and smooth—this usually takes a few minutes with a hand or stand mixer. Then add vanilla extract and mix well. Gradually sift in powdered sugar while mixing on low speed, then bump it up to high speed for a fluffy, spreadable frosting that’s just right.
Step 5: Assemble Your Heart-Shaped Cake
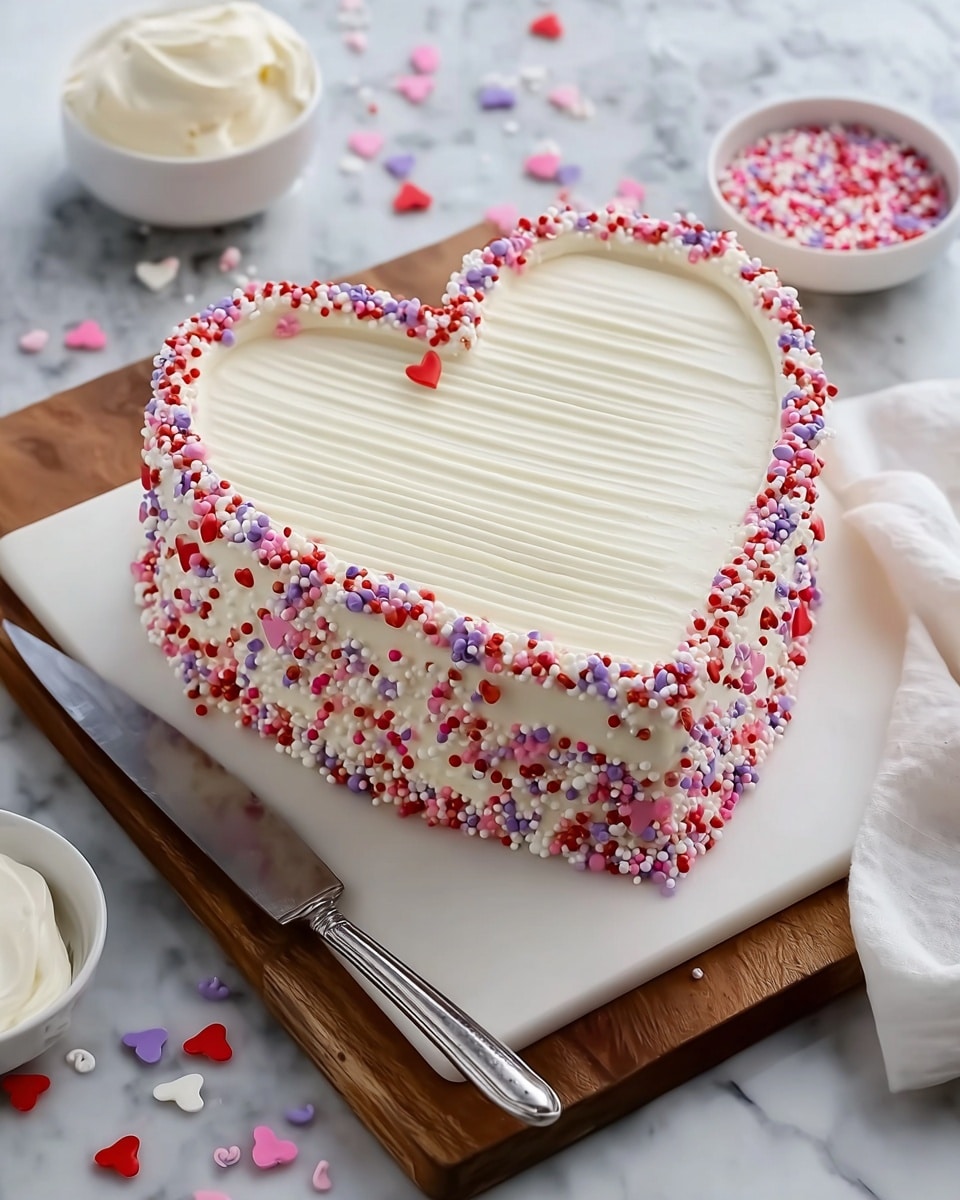
Once your cakes have cooled fully, slice the round cake in half horizontally to make two half circles. Place your square cake in the center of your serving plate. Now, position the two halves of the round cake on adjacent sides of the square to create a heart shape—the edges should fit snugly. Spread a thin crumb coat layer of frosting all over to trap loose crumbs, then chill for about 10 minutes if you can. Finish by spreading the remaining frosting over the cake evenly and decorate as you like!
How to Serve Heart Shaped Cocoa Cake with Cream Cheese Frosting Recipe
Garnishes
I often top this cake with fresh raspberries or strawberries—they add a pop of color and a juicy contrast to the creamy frosting. Sometimes I sprinkle a handful of chocolate shavings or crushed nuts for extra texture. If it’s for a festive occasion, a few edible glitter sprinkles really take it over the top!
Side Dishes
Pairing this cake with a scoop of vanilla ice cream or a simple cup of freshly brewed coffee makes for a perfectly indulgent dessert experience. I’ve also enjoyed it with lightly whipped cream or fresh fruit salad on the side to balance the richness.
Creative Ways to Present
For birthdays or anniversaries, I’ve piped extra cream cheese frosting rosettes around the edges and added a few heart-shaped candies or chocolate pieces. Another fun idea is to write a sweet message with melted chocolate or colored icing right on the cake. Making it look like a giant love note never fails to bring smiles!
Make Ahead and Storage
Storing Leftovers
If you have leftover cake (which almost never happens at my house!), you can store it covered in the fridge for up to 3 days. I like to keep it in an airtight container or loosely covered with plastic wrap to prevent it from drying out or absorbing fridge odors.
Freezing
Freezing the frosted cake isn’t my go-to, but slices freeze beautifully—wrap them tightly in plastic wrap and foil to avoid freezer burn. When I’ve frozen pieces, thawing overnight in the fridge helps keep that creamy frosting intact and ready to enjoy.
Reheating
I usually recommend eating this cake chilled or at room temperature since the frosting holds best that way. If you want to warm a slice slightly, a quick 10-15 second zap in the microwave makes it cozy without melting the frosting, but go slow and watch closely!
FAQs
-
Can I make the Heart Shaped Cocoa Cake without red food coloring?
Absolutely! The red food coloring is optional and mainly adds a festive hue. The cake will still taste delicious and chocolaty without it; you’ll just have a classic cocoa-colored cake.
-
What’s the best way to cut and assemble the heart shape?
Once cooled, cut the round cake in half horizontally or vertically to create two half circles. Position these on two adjacent sides of the square cake to form the heart shape. I find cutting slowly with a serrated knife helps keep clean edges.
-
Can I use canned buttermilk or a substitute?
If you don’t have buttermilk on hand, you can make a quick substitute by mixing 1 ½ cups of milk with 1 ½ tablespoons of white vinegar or lemon juice. Let it sit for 5 minutes until slightly curdled; it works just as well in this recipe.
-
How do I avoid the frosting being too runny?
Make sure your cream cheese and butter are fully softened but not melted before mixing. Adding powdered sugar gradually and mixing well helps control consistency. If it’s too soft, chill the frosting in the fridge for 10-15 minutes before spreading.
-
Is this recipe good for beginners?
Definitely! This Heart Shaped Cocoa Cake with Cream Cheese Frosting Recipe is straightforward with clear steps, plus that simple pan technique for the heart shape is beginner-friendly and fun to try.
Final Thoughts
Honestly, this Heart Shaped Cocoa Cake with Cream Cheese Frosting Recipe holds a special place in my heart because it combines simplicity with a beautiful presentation and incredible flavor. It’s the kind of recipe I turn to when I want to say “I care” without fussing over complicated steps. I hope you enjoy making—and eating—it just as much as I do. Trust me, once you nail this, you’ll have a go-to dessert for all your special occasions!
Print
Heart Shaped Cocoa Cake with Cream Cheese Frosting Recipe
- Prep Time: 40 minutes
- Cook Time: 35 minutes
- Total Time: 1 hour 45 minutes
- Yield: 12 servings 1x
- Category: Dessert
- Method: Baking
- Cuisine: American
Description
This Heart Shaped Cocoa Cake with Cream Cheese Frosting is a visually stunning and delicious dessert perfect for special occasions. Made with rich cocoa powder, buttermilk, and a hint of red food coloring for a subtle tint, this moist cake is layered and shaped into a charming heart. It’s frosted with a smooth and creamy vanilla-flavored cream cheese frosting, making each slice irresistibly soft, tangy, and sweet.
Ingredients
Cake Ingredients
- 2 ½ Cups all-purpose flour
- ¼ cup cocoa powder
- 1 ½ teaspoons baking soda
- 1 teaspoon baking powder
- 1 ½ cups granulated sugar
- ½ teaspoon salt
- 1 ½ cups buttermilk, room temperature
- 1 cup vegetable oil
- 2 large eggs, room temperature
- 1 teaspoon white vinegar
- 2 teaspoons vanilla extract
- 2 tablespoons liquid red food coloring
Frosting Ingredients
- 1 pound cream cheese, room temperature
- 8 ounces unsalted butter, room temperature
- 1 teaspoon vanilla extract
- 1 ½ cups powdered sugar
Instructions
- Prepare Pans: Preheat the oven to 350°F. Spray one 8-inch round pan and one 8-inch square pan with pan spray and line each with parchment paper. Spray the parchment and set aside to prevent sticking.
- Mix Dry Ingredients: In a medium bowl, sift together the flour, cocoa powder, baking soda, and baking powder. Add the sugar and salt, whisk everything together and set aside ensuring even distribution of leavening agents.
- Mix Wet Ingredients: In a large bowl, whisk together the buttermilk, vegetable oil, eggs, white vinegar, vanilla extract, and red food coloring until the mixture is smooth and uniform.
- Combine Wet and Dry: Gradually add the dry flour mixture to the wet ingredients, whisking gently until smooth and fully combined without overmixing to keep the cake tender.
- Bake the Cake: Evenly divide the batter between the prepared pans. Bake for 30-35 minutes, or until a toothpick inserted into the center comes out clean or the cakes spring back when gently pressed, indicating doneness.
- Cool the Cakes: Allow cakes to cool in the pans for 10-15 minutes, then carefully remove them from the pans and transfer to a cooling rack to cool completely to room temperature.
- Prepare Frosting: In a large mixing bowl or stand mixer, beat the cream cheese and unsalted butter together until creamy and smooth, avoiding lumps for a silky frosting.
- Add Flavor: Mix in vanilla extract, scraping the bowl sides as needed to ensure even incorporation of flavor throughout the frosting.
- Add Sugar: Gradually add powdered sugar while mixing on low speed until incorporated, then increase speed and beat until the frosting becomes light, fluffy, and spreadable.
- Assemble Heart Shape: Once cooled, cut the round cake in half to form two half circles. Place the square cake on your serving plate and position the two half circles on adjacent sides to create a heart shape visually appealing for presentation.
- Crumb Coat: Spread a thin layer of frosting over the entire assembled cake to trap loose crumbs and smooth it out. Chill briefly if desired to set the crumb coat.
- Frost Cake: Spread the remaining frosting evenly over the cake surface. Decorate with sprinkles or other desired decorations as preferred.
- Chill to Set: Refrigerate the decorated cake for at least 30 minutes to allow the frosting to set properly before slicing and serving to maintain shape and texture.
Notes
- Room temperature ingredients help the batter combine smoothly and bake evenly.
- Use parchment paper and pan spray to ensure easy cake removal.
- Do not overmix the batter to keep the cake tender and moist.
- Chill the cake after crumb coating for easier frosting applications.
- If red food coloring is unavailable, omit it for a standard cocoa cake or substitute with a small amount of beet juice for natural coloring.
- The cream cheese frosting can be prepared ahead and refrigerated; bring to room temperature before using for ease of spreading.
- Store the finished cake in the refrigerator and consume within 3-4 days for best freshness.
Keywords: Heart Shaped Cake, Cocoa Cake, Cream Cheese Frosting, Valentine Cake, Celebration Cake, Moist Chocolate Cake