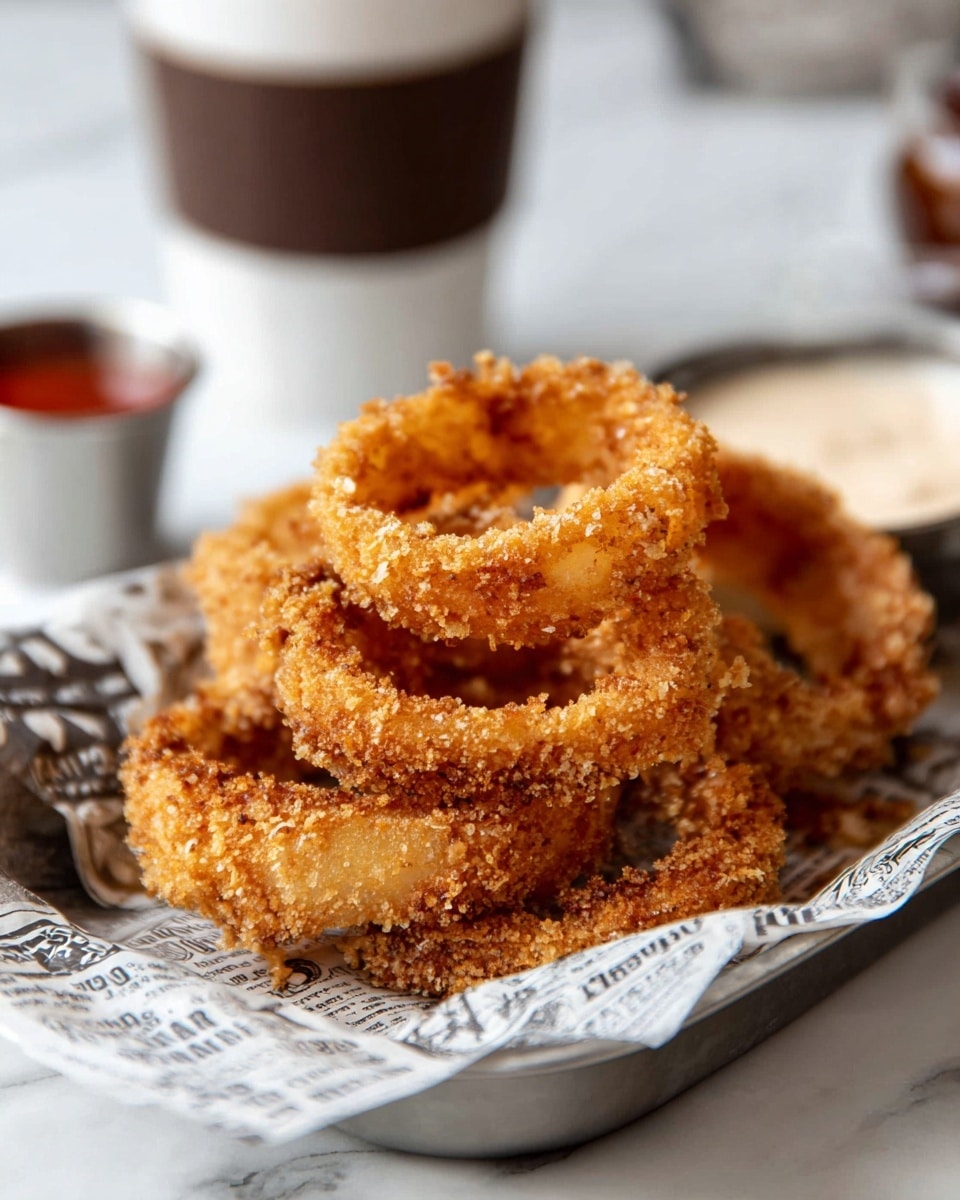
Fried Homemade Onion Rings Recipe
Let me tell you, this Fried Homemade Onion Rings Recipe is a game-changer when it comes to homemade snacks or sides. There’s something incredibly satisfying about biting into perfectly crispy, golden rings with that sweet onion center. They have that wonderful balance of crunch and flavor that you just don’t get with store-bought versions.
What makes this recipe really special is the simple but smart combination of ingredients—from soaking the onion rings in buttermilk to give them that tangy tenderness, to the crispy panko coating with a hint of smoked paprika that adds a subtle smokiness. Whether it’s a weekend treat or something fun for game day, these onion rings never disappoint, and I’m excited for you to try them yourself.
Ingredients You’ll Need
Each ingredient here plays its part in creating the perfect onion ring experience. I always recommend using fresh onions and good quality spices—they really make a difference. Here’s what you’ll gather before diving in:
- Large sweet or yellow onion: Choose firm, fresh onions with thick 1/2-inch slices for the best texture and size.
- Buttermilk: This tenderizes the onion and adds a slight tang, helping the batter stick better.
- Large egg: Acts as a binder to hold the coating on the onions during frying.
- All-purpose flour: Gives structure to the batter for a sturdy coating.
- Cornstarch: Adds extra crispiness to the coating—you won’t want to skip this!
- Smoked paprika: Gives a subtle, smoky flavor that lifts the taste beyond basic seasoning.
- Salt: Enhances all the flavors—season well but don’t overdo it.
- Black pepper: A gentle heat to balance the sweetness of the onions.
- Garlic powder: Adds a savory depth that’s simply irresistible.
- Panko bread crumbs: They create that light, airy crunch everyone loves — perfect for frying.
- Oil for frying: I prefer canola, vegetable, or peanut oil because they handle high heat well and don’t overpower flavors.
Variations
I love experimenting with this Fried Homemade Onion Rings Recipe depending on the mood or occasion. You can definitely tweak it to suit your taste or dietary needs, which makes it really versatile.
- Spicy kick: Add cayenne pepper or chili powder to the dry mix if you want a bold, fiery twist. I tried this once for a game night, and it was such a hit!
- Gluten-free version: Swap all-purpose flour and panko with gluten-free flour and breadcrumbs for anyone avoiding gluten—I’ve done this for guests and it works beautifully.
- Herb-infused batter: Toss fresh chopped parsley or thyme into the batter for an herby aroma that’s fresh and exciting.
How to Make Fried Homemade Onion Rings Recipe
Step 1: Prep the onions and soak in buttermilk
Start by peeling your onion and slicing it into rings about half an inch thick—this thickness helps keep them sturdy during frying. Separate the rings carefully. Next, pour your buttermilk into a bowl, add the onion rings, and let them soak for at least 20 minutes. This step softens the onion just enough and helps the batter stick better. Trust me, skipping this makes a noticeable difference.
Step 2: Mix the batter and prepare the coating station
While your onions soak, whisk together the large egg and remaining buttermilk in a shallow dish. In another bowl, mix the flour, cornstarch, smoked paprika, salt, black pepper, and garlic powder. In a third bowl, pour the panko breadcrumbs. Setting up these three stations makes the breading process clean and straightforward: flour mixture, then egg, then breadcrumbs.
Step 3: Coat the onion rings
Once the onions have soaked, drain them from the buttermilk. Dredge a few rings at a time through the flour mixture, shake off excess, then dip into the egg mixture, and finally coat with the panko breadcrumbs. Make sure they’re evenly coated for maximum crunch. Pro tip: don’t overcrowd the rings while coating or frying—work in batches for best results.
Step 4: Heat the oil and fry to perfection
Heat your oil in a deep pan or fryer to about 350°F (175°C). Use a thermometer if you have one—it makes all the difference in consistent frying. Fry the onion rings in small batches, turning once, until golden brown and crispy, about 2-3 minutes per side. Drain on paper towels to remove excess oil. If the oil gets too cool, your rings will absorb too much oil and get greasy.
How to Serve Fried Homemade Onion Rings Recipe

Garnishes
I like finishing these onion rings with a sprinkle of flaky sea salt right out of the fryer—that simple touch ups the flavor nicely. Sometimes I toss on a few fresh chopped chives for a little color and mild oniony freshness to complement the fried goodness.
Side Dishes
These onion rings are excellent alongside classic burgers, BBQ ribs, or even a big salad when you want some crunch. For dipping, I personally reach for a smoky chipotle mayo or tangy ranch dressing—both add a delicious creamy contrast.
Creative Ways to Present
If you’re serving these for a casual party, arrange the onion rings stacked in a rustic wooden bowl lined with parchment paper. For something fancier, serve them on a platter with small dipping bowls placed around. My favorite trick? Skewer a few rings on a bamboo stick for a fun finger-food twist that’s perfect for mingling guests.
Make Ahead and Storage
Storing Leftovers
If you have leftovers, place them in a single layer on a paper towel-lined plate and cover loosely with foil. Store in the fridge for up to 2 days. Avoid airtight containers right away—it can soften the crunchy coating.
Freezing
I freeze leftover onion rings by flash freezing them on a baking sheet first, then transferring to a freezer bag. This keeps them from sticking together. When you want to enjoy, just pop them straight into a hot oven or air fryer from frozen—you’ll get a nice crisp without re-frying.
Reheating
To reheat and keep them crispy, I recommend the oven or air fryer over the microwave. Set your oven to 375°F (190°C) and warm the onion rings on a baking sheet for about 10 minutes. This helps refresh the crunch, making them taste almost as good as freshly fried.
FAQs
-
Can I use other types of onions for the Fried Homemade Onion Rings Recipe?
Absolutely! While sweet or yellow onions give a great balance of flavor and sweetness, white onions or even red onions can be used if you like a sharper or slightly different taste. Just try to keep your slices thick enough so they hold together when frying.
-
What oil is best for frying onion rings?
I recommend using oils with a high smoke point like canola, vegetable, or peanut oil for frying the onion rings. They can handle the heat well without imparting strong flavors, ensuring a clean, crispy result.
-
How do I make sure my onion rings come out crispy and not soggy?
The key is proper oil temperature (around 350°F) and not overcrowding the fryer. Also, coating the onion rings properly with the flour and panko layers will give you that perfect crunch. Draining on paper towels right after frying also helps remove excess oil.
-
Can I bake these onion rings instead of frying?
You can bake them, but they won’t be as crispy as fried unless you use an air fryer or a convection oven setting. If baking, spray the rings lightly with oil and bake at 425°F for about 20 minutes, flipping halfway through.
-
Is buttermilk necessary in this Fried Homemade Onion Rings Recipe?
Buttermilk tenderizes the onions and helps the batter cling better, but you can substitute with plain milk mixed with a teaspoon of lemon juice or vinegar if needed. The flavor will be slightly less tangy, but still delicious.
Final Thoughts
I honestly can’t recommend this Fried Homemade Onion Rings Recipe enough—it’s one of those recipes that feels fancy but is so straightforward to make. Whenever I share these, everyone asks for the recipe because they’re just that good. I hope you’ll find as much joy in making and eating them as I do. So next time you want a crispy, flavorful snack or side, give these onion rings a try—you might just find your new favorite homemade treat.
Print
Fried Homemade Onion Rings Recipe
- Prep Time: 15 minutes
- Cook Time: 15 minutes
- Total Time: 30 minutes
- Yield: 4 servings (about 16–20 onion rings) 1x
- Category: Appetizer
- Method: Frying
- Cuisine: American
Description
Crispy, golden fried homemade onion rings that are perfectly seasoned and coated in a crunchy panko breadcrumb crust. This recipe uses sweet or yellow onions dipped in a flavorful buttermilk and egg batter, then dredged in a seasoned flour and breadcrumb mixture before frying to perfection. Ideal as a savory snack or side dish.
Ingredients
Onion and Batter
- 1 large sweet or yellow onion, sliced into 1/2-inch thick rings
- 1 cup buttermilk
- 1 large egg
Dry Coating
- 1/2 cup all-purpose flour
- 1 tablespoon cornstarch
- 1 teaspoon smoked paprika
- 1 teaspoon salt
- 1/2 teaspoon black pepper
- 1/2 teaspoon garlic powder
- 1 cup panko bread crumbs
Frying
- Oil for frying (canola oil, vegetable oil, or peanut oil), enough for deep frying
Instructions
- Prepare the Onion Rings: Peel and slice the onion into 1/2-inch thick rings, keeping the rings intact. Separate the slices carefully into individual rings to be coated.
- Make the Buttermilk Batter: In a medium bowl, whisk together the buttermilk and egg until combined. This mixture will soak the onions, helping the dry ingredients stick and adding moisture for a tender interior.
- Prepare the Dry Coating Mix: In another shallow bowl, combine the flour, cornstarch, smoked paprika, salt, black pepper, and garlic powder. In a separate bowl, place the panko bread crumbs.
- Coat the Onion Rings: Dip each onion ring first into the buttermilk batter, allowing excess to drip off, then dredge in the flour mixture, ensuring an even coat. Dip again into the buttermilk mixture, and finally coat thoroughly with the panko breadcrumbs, pressing gently to adhere.
- Heat the Oil: In a deep fryer or large, heavy-bottomed pot, heat oil to 350°F (175°C). Use enough oil to submerge the onion rings for even frying.
- Fry the Onion Rings: Carefully place a few coated onion rings into the hot oil without crowding. Fry for 2-3 minutes or until golden brown and crispy. Use a slotted spoon to transfer the fried rings to a paper towel-lined plate to drain excess oil.
- Serve: Serve the onion rings hot with your favorite dipping sauces like ketchup, ranch, or spicy aioli for extra flavor.
Notes
- Use sweet onions for a milder flavor or yellow onions for a slightly more pungent taste.
- Maintain the oil temperature at 350°F to ensure crispy and non-greasy onion rings.
- Do not overcrowd the pan to avoid oil temperature drop, which can cause soggy coating.
- Panko breadcrumbs provide extra crunch compared to regular breadcrumbs.
- You can prepare the coating stations and batter ahead and assemble just before frying for efficiency.
Keywords: onion rings, fried onion rings, homemade onion rings, crispy onion rings, appetizer, snack