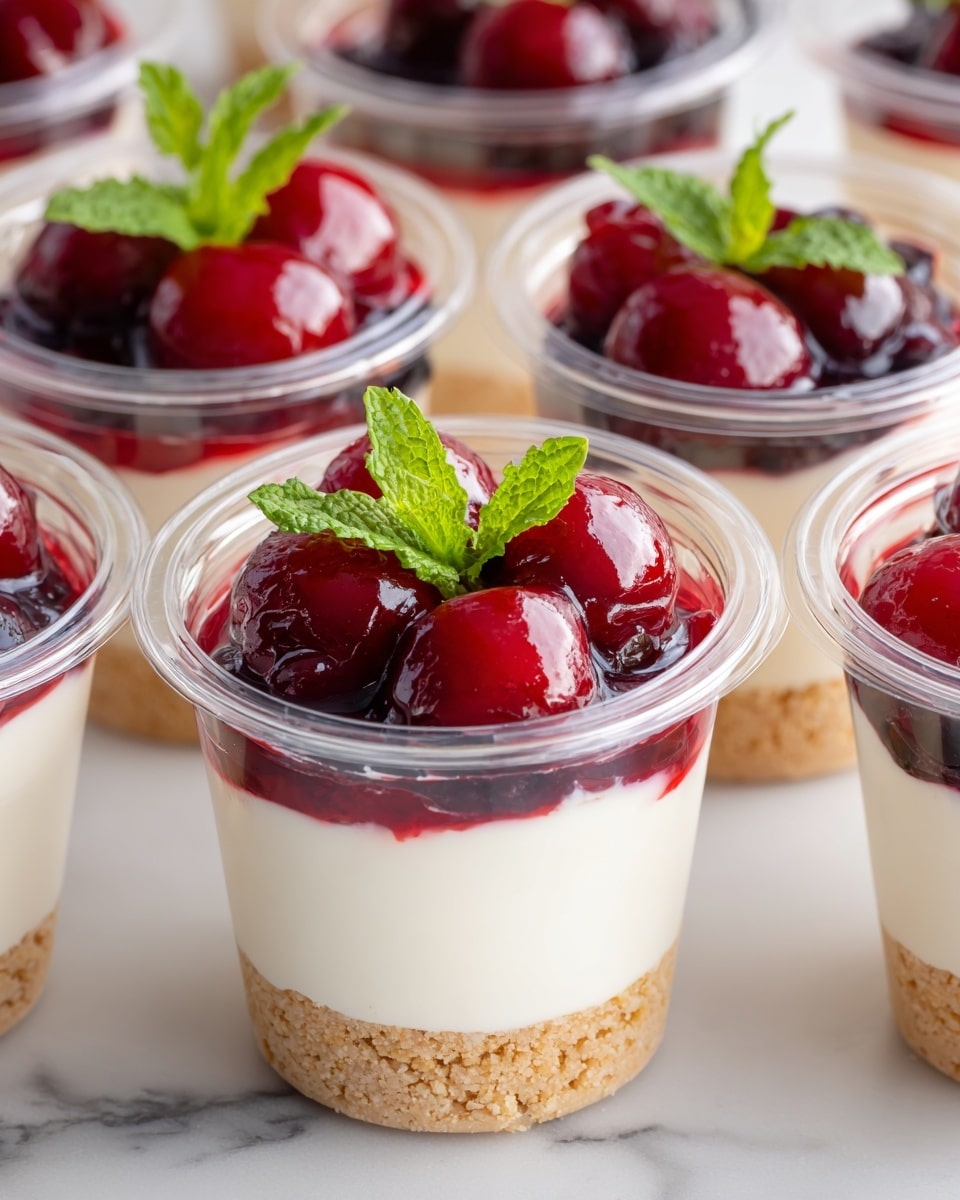
Easy Cheese Cake Cups Recipe
If you’re on the hunt for a dessert that’s as delightful as it is simple, this Easy Cheese Cake Cups Recipe might just become your new favorite. I love how these little cups bring all the creamy goodness of cheesecake into a fun, bite-sized form, perfect for casual get-togethers or an elegant finish to dinner. Plus, they’re super straightforward to whip up — no fancy equipment or baking skills needed!
What makes this Easy Cheese Cake Cups Recipe so special is how versatile it is. I often make these when guests drop by unexpectedly, and they never fail to impress. Whether you’re craving a quick sweet treat or planning a party platter, these cheesecake cups always come through as a crowd-pleaser that’s effortlessly chic.
Ingredients You’ll Need
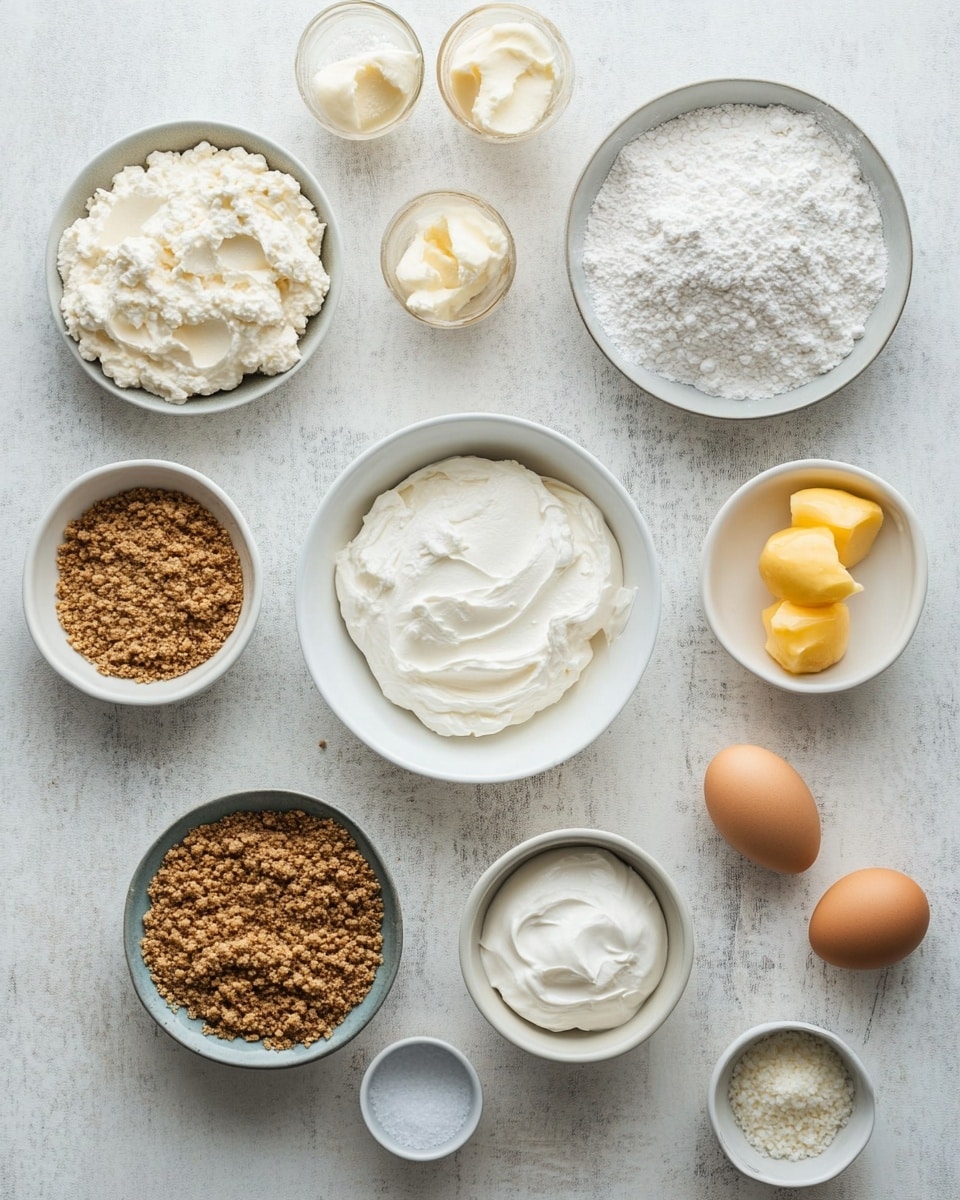
The ingredients for this recipe all work harmoniously to give you that silky, rich cheesecake flavor while keeping things light thanks to the whipped cream. A quick tip: using full-fat cream cheese and fresh lemon juice really amps up the taste and texture, so it’s worth grabbing the best quality you can find.
- Graham cracker crumbs: This forms the crunchy base of the cup. I like to press them down gently so they hold together well.
- Full fat cream cheese: Bring it to room temperature for easier mixing and a smoother filling.
- Heavy whipping cream: Chilling your mixing bowl beforehand helps it whip up faster and fluffier.
- Powdered sugar: Divided between the cream cheese and whipped cream, it sweetens evenly without graininess.
- Fresh lemon juice: Just a splash brightens the flavor and cuts through the creaminess in a delightful way.
- Vanilla extract: Adds a subtle warmth and depth that balances the tangy lemon.
Variations
I love making this Easy Cheese Cake Cups Recipe my own by swapping out crusts or toppings depending on the season or my mood. It’s one of those recipes where a little twist can really elevate the experience, so don’t be shy about experimenting!
- Crust Swap: Switching the graham cracker crumbs for crushed Oreos or gingersnap cookies adds a fun, different crunch. I tried crushed Oreos once, and it brought a nostalgic chocolatey vibe my kids adored.
- Topping Twist: Fresh berries are my go-to — but on holidays, I top them with chocolate ganache or a tangy lemon curd for extra flair.
- Dairy-Free Version: If you need a dairy-free spin, using coconut whipped cream and a vegan cream cheese works surprisingly well!
How to Make Easy Cheese Cake Cups Recipe
Step 1: Prep Your Cups and Crust
Choose your cup size wisely; I usually go for 9 oz cups because they’re perfect for a generous dessert serving without feeling heavy. Start by spooning your graham cracker crumbs into each cup — about 2 tablespoons for the larger cups or 1 tablespoon if you’re using smaller ones. Press them down lightly so they create a compact base that won’t shift when you add the filling.
Step 2: Chill Your Mixing Bowl
Pop a metal or glass mixing bowl in the freezer for about 15 minutes. This little trick is a game changer when whipping heavy cream — it helps it reach stiff peaks faster and stay stable. Definitely don’t skip this step; I learned the hard way that room-temperature bowls just don’t cut it.
Step 3: Cream the Cheese and Sugar
In a separate bowl, beat the softened cream cheese with 1 cup of powdered sugar using an electric mixer. Don’t rush this part — mixing thoroughly until it’s smooth and creamy (about 1-2 minutes) ensures no lumps sneak into your cheesecake filling.
Step 4: Whip the Cream to Perfection
Take your chilled bowl out of the freezer and pour in the heavy whipping cream, remaining ½ cup powdered sugar, lemon juice, and vanilla extract. Whip on medium-high speed until stiff peaks form, which usually takes around 4-5 minutes. You’ll know you’re there when you lift the beaters and the cream stands tall without collapsing.
Step 5: Fold Cream Cheese and Whipped Cream Together
Add the cream cheese mixture to the whipped cream and gently mix on low speed. The goal here is to combine without deflating all that fluffy whipped cream, so don’t overmix. After 1-2 minutes, stop when the filling looks uniform and silky.
Step 6: Pipe or Spoon Into Cups
For a neat finish, I like to transfer the filling to a piping bag (or a ziplock bag with a corner snipped off) and pipe it into each crust-lined cup. Fill them about three-quarters of the way full to leave room for toppings. This step makes your cheesecake cups look professionally done, even if you’re just chilling at home.
Step 7: Chill and Add Toppings
Refrigerate the cheesecake cups for at least 1-2 hours to let them set up properly. I often cover them with plastic wrap and leave them overnight if I’m prepping ahead — it really helps the flavors meld beautifully. When ready, add your favorite topping like cherry pie filling, fresh fruit, or even chocolate shavings.
How to Serve Easy Cheese Cake Cups Recipe
Garnishes
I’m a sucker for fresh raspberry or strawberry sauce on top because it balances the rich creaminess with a little tang. Sometimes I sprinkle crushed Oreos or chopped mint chips to add texture and surprise. The best part is you can tailor the garnish to whatever you have on hand or what you’re craving.
Side Dishes
Serve these cheesecake cups alongside a light salad or a refreshing fruit platter. If it’s a party, pairing with coffee or sparkling wine really sets a casual yet classy mood. I once paired these with a lemon sorbet for a double citrus pop that guests raved about!
Creative Ways to Present
For birthdays or festivities, I’ve arranged these in a tiered cupcake stand decorated with edible flowers for a stunning display. Another fun idea is to serve them in mini mason jars topped with colorful sprinkles or chocolate curls—makes them feel extra special and gift-worthy.
Make Ahead and Storage
Storing Leftovers
Any leftovers can be safely stored in the fridge covered tightly with plastic wrap or in an airtight container. I find they stay fresh and creamy for up to 3 days, which is perfect if you want to prepare in advance or save some for the next day.
Freezing
While I haven’t personally frozen these cheesecake cups, others have had success by freezing before adding fresh toppings. Just make sure to thaw fully in the fridge overnight for the best texture. Keep in mind, the crust might soften a bit after thawing, but the filling remains tasty.
Reheating
Since these are chilled desserts, I don’t recommend reheating. If you want to soften them slightly before serving, letting them sit at room temperature for 10-15 minutes works wonders to bring out the creamy texture without melting.
FAQs
-
Can I use low-fat cream cheese for this Easy Cheese Cake Cups Recipe?
Technically, yes, but I recommend full-fat cream cheese for the best texture and flavor. Low-fat versions tend to be softer and can result in a less creamy, slightly watery filling.
-
Do I have to use a piping bag to fill the cups?
Not at all! A piping bag just makes it neater and faster, but spooning the filling with a small spoon works just fine. You’ll still end up with delicious cheesecake cups.
-
How long should I whip the cream to get stiff peaks?
Usually about 4-5 minutes on medium-high speed if you’ve chilled your bowl beforehand. Watch closely because overwhipping can turn cream grainy and eventually into butter.
-
Can I prepare these cheesecake cups the day before serving?
Absolutely! In fact, chilling them overnight helps the flavors marry and the cups set perfectly. Just cover them well to prevent drying out.
-
What toppings would you recommend for this recipe?
Fresh berries, pie fillings like cherry or blueberry, chocolate ganache, and crushed cookies are all fantastic options. Pick whatever suits your taste or occasion — that’s the beauty of this recipe!
Final Thoughts
This Easy Cheese Cake Cups Recipe holds a special place in my kitchen because it combines simplicity with indulgence in the best way possible. Whenever I make these, I’m reminded that you don’t need complicated techniques to create something impressive and delicious. I truly encourage you to give this recipe a try — whether it’s for a casual family dessert or your next party standout. Trust me, once you taste these creamy, dreamy cheesecake cups, you’ll wonder how you ever lived without them!
Print
Easy Cheese Cake Cups Recipe
- Prep Time: 15 minutes
- Cook Time: 0 minutes
- Total Time: 1 hour 15 minutes
- Yield: 8 servings 1x
- Category: Dessert
- Method: No-Cook
- Cuisine: American
- Diet: Vegetarian
Description
These Easy Cheesecake Cups are a delightful no-bake dessert featuring a creamy cream cheese and whipped cream filling layered over a graham cracker crumb crust. Perfectly portioned for individual servings, they’re simple to prepare and can be customized with your favorite toppings, making them ideal for any occasion.
Ingredients
Crust
- Graham cracker crumbs: 2 tablespoons per 9 oz cup (16 tablespoons total for 8 cups)
Cheesecake Filling
- 16 oz full fat cream cheese (2 packages, room temperature)
- 1 cup (112g) powdered sugar
- 2 cups (473 ml) heavy whipping cream
- ½ cup (56g) powdered sugar
- 1 tablespoon fresh lemon juice
- 2 teaspoons vanilla extract
Instructions
- Prepare Cup Size and Crust. Decide on the cup size you are using to determine the amount of graham cracker crumbs to place at the bottom. For 9 oz cups, use 2 tablespoons of crumbs per cup; smaller 4-6 oz cups require 1 tablespoon. I used 9 oz cups and made 8 servings.
- Add Graham Cracker Crumbs. Place the specified amount of graham cracker crumbs into the bottom of each cup to form a crust base for the cheesecake filling.
- Chill Mixing Bowl. Set a metal or glass mixing bowl in the freezer for 15 minutes; this will be used for whipping the cream.
- Beat Cream Cheese and Sugar. In a separate mixing bowl, beat the cream cheese and 1 cup of powdered sugar together using an electric mixer until smooth and creamy, about 1-2 minutes.
- Whip the Cream. Remove the chilled bowl from the freezer and add heavy whipping cream, ½ cup powdered sugar, lemon juice, and vanilla extract. Beat on medium-high until stiff peaks form, approximately 4-5 minutes.
- Combine Cream Cheese and Whipped Cream. Gently fold the whipped cream mixture into the cream cheese mixture using a low speed on the mixer for 1-2 minutes until fully combined with no visible distinction between the two.
- Fill the Cups. Transfer the cheesecake filling into a piping bag or a ziplock bag with a corner cut off, and pipe the filling into the cups, filling them about three-quarters full.
- Refrigerate. Place the filled cups in the refrigerator for 1-2 hours to set. For longer storage, cover with plastic wrap and refrigerate overnight if desired.
- Add Toppings and Serve. Before serving, top the cheesecake cups with your preferred toppings such as cherry pie filling, blueberry pie filling, fresh fruit, chocolate ganache, or crushed cookies.
Notes
- Crust Variations: Substitute graham cracker crumbs with a whole vanilla wafer, Oreo, gingersnap cookie, or use crushed versions of these cookies for variety.
- Topping Variations: Enhance your cheesecake cups with fresh berries, raspberry puree, lemon curd, sautéed apples, chocolate shavings, crushed candy bars, mint chips, or any creative toppings you like.
Keywords: easy cheesecake cups, no-bake cheesecake, individual cheesecake desserts, cream cheese dessert, graham cracker crust, homemade cheesecake cups