Crispy Potato Cheese Sticks with Bacon and Green Onion Recipe
There’s something incredibly satisfying about biting into Crispy Potato Cheese Sticks with Bacon and Green Onion Recipe — the way the crunchy outer layer gives way to melty cheese and tender potato inside is just pure comfort food magic. I first made these on a chilly weekend when I wanted something cozy but also a little fun to snack on, and they quickly became a household favorite. Trust me, this recipe nails that perfect balance between crispy texture and rich flavors, making it a standout anytime you’re craving a tasty, hearty treat.
Whether you’re serving these as appetizers at a casual gathering or just sneaking a batch during a quiet night, these potato cheese sticks really deliver. Plus, the addition of smoky bacon and fresh green onion takes a simple snack up several notches. If you love snack foods that satisfy meat-eater and cheese-lover cravings alike, this Crispy Potato Cheese Sticks with Bacon and Green Onion Recipe should definitely make its way onto your menu.
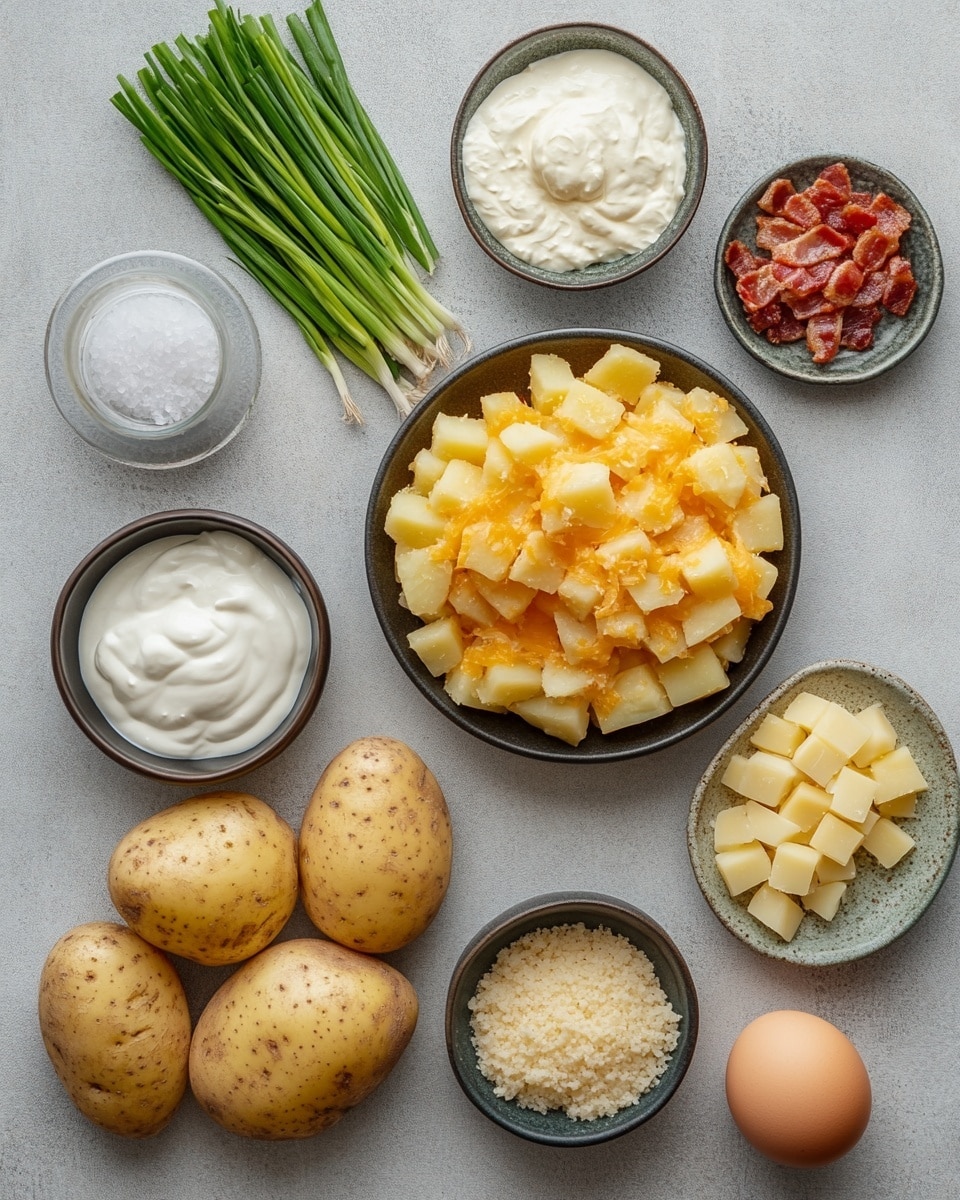
Ingredients You’ll Need
Each ingredient in this recipe plays a crucial role in creating the texture and flavor that make these potato cheese sticks irresistible. Picking fresh green onions and sharp cheddar cheese really enhances the overall satisfaction of every bite.
- Russet potatoes: Their starchy texture is perfect for that creamy interior without falling apart.
- Cheddar cheese: Choose a block with good quality sharpness—it melts beautifully inside the sticks.
- Bacon: Adds a smoky, savory crunch, balancing the richness of cheese perfectly.
- Green onion: Freshness and mild oniony flavor brighten up each bite.
- Cornstarch: Helps maintain that crisp exterior without being greasy.
- Panko breadcrumbs: Give a lighter, flakier crunch compared to regular breadcrumbs.
- Flour, egg: Essential for the batter that holds everything together before frying.
- Vegetable oil (or canola/peanut oil): For frying — choose a neutral oil with a high smoke point for the best results.
- Sour cream: Adds a bit of tang and creaminess, mixing nicely into the potato base.
- Salt and pepper: Simple but necessary seasoning to bring all the flavors forward.
Variations
I love tweaking this recipe depending on what I have on hand or what mood I’m in, and you should definitely feel free to get creative with it too. It’s such a flexible snack base that welcomes plenty of personal touches.
- Variation: Swap out the cheddar for mozzarella for a gooey, milder cheese pull that kids especially love.
- Variation: For a spicy kick, add some finely chopped jalapeños or a sprinkle of cayenne pepper into the potato mixture.
- Variation: Make this vegetarian by eliminating bacon and boosting flavor with smoked paprika—still delicious!
- Variation: Use sweet potatoes instead of russets for a slightly sweeter, colorful twist that pairs wonderfully with sharp cheddar.
How to Make Crispy Potato Cheese Sticks with Bacon and Green Onion Recipe
Step 1: Prepare the potatoes and bacon
Start by boiling your russet potatoes until they’re fork-tender—this usually takes about 15-20 minutes. I like to peel and cube them before boiling to speed things up and get even cooking. While that’s happening, crisp up your diced bacon in a pan—it’s key to getting that smoky crunch without any chewiness. Set the cooked bacon on paper towels to drain excess fat, then dice it finely to mix into the potato base.
Step 2: Mix the potato base
Once your potatoes are cool enough to handle, mash them up but keep a few small lumps for texture—smooth mash is great, but a little chunkiness adds interest. Stir in the sour cream, diced green onions, cooked bacon, salt, and pepper. Taste as you go; you want a well-seasoned but balanced mix because that potato base carries a lot of flavor.
Step 3: Assemble the sticks
Take your block of cheddar and slice it into strips about the size you want for your sticks (roughly finger-width). Shape the potato mixture around each cheese strip, forming tight sticks so the cheese is fully encased. If they’re too loose, they can leak while frying, so take your time here for the best results.
Step 4: Coat with flour, egg, and panko
Set up a breading station: one dish with flour, one with beaten egg, and one with panko mixed with cornstarch. Lightly dust each potato cheese stick in flour first, then dip in egg, and lastly roll in the panko mixture. This triple layer helps achieve that perfect crispy crust without absorbing too much oil during frying.
Step 5: Fry to golden perfection
Heat a litre of vegetable or peanut oil in a deep pot to around 350°F (175°C). Fry the sticks in batches, being careful not to overcrowd the pan. They’ll take about 3-4 minutes each batch to turn golden and crispy. Use a slotted spoon to remove them, letting excess oil drip off on a wire rack or paper towels. If you find they’re browning too fast and not cooking through, lower the heat slightly.
How to Serve Crispy Potato Cheese Sticks with Bacon and Green Onion Recipe
Garnishes
I like to sprinkle a little extra chopped green onion and fresh parsley on top right out of the fryer—it adds a pop of color and freshness. Sometimes, I dust a pinch of smoked paprika for an eye-catching finish. These simple touches really elevate the presentation and flavor.
Side Dishes
These sticks pair beautifully with tangy dipping sauces like sour cream mixed with a bit of garlic and dill or a spicy chipotle mayo. I often serve them alongside a crisp green salad or roasted veggies to balance out the richness. A cold beer or sparkling lemonade makes a nice pairing if you’re entertaining.
Creative Ways to Present
For parties, I’ve tried arranging these potato cheese sticks upright in a hollowed-out bread bowl filled with dip—super fun for sharing and keeps them warm longer. Another idea is skewering a few on cocktail sticks for easy handheld snacks. It turns a casual appetizer into something memorable that guests love.
Make Ahead and Storage
Storing Leftovers
If you happen to have leftovers (though they rarely last long at my place!), place them in an airtight container and refrigerate. They’ll keep well for up to 2 days. Just be aware the panko coating will soften a bit in the fridge.
Freezing
I’ve successfully frozen these sticks after assembling and breading them but before frying. Lay them on a baking sheet, freeze until solid, then transfer to a freezer bag. When you want a quick snack, fry them straight from frozen—just add an extra minute or two to cook through.
Reheating
To keep that crispy exterior, I pop leftover sticks in a hot oven or air fryer at 375°F for about 5-7 minutes. Microwaving will warm them up but usually turns the crust soggy, so avoid that if you can.
FAQs
-
Can I make the Crispy Potato Cheese Sticks with Bacon and Green Onion Recipe gluten-free?
Absolutely! Just swap the all-purpose flour and panko breadcrumbs for gluten-free alternatives. Gluten-free panko or crushed gluten-free cornflakes work well for that crispy texture. Make sure to also check that your cornstarch and other ingredients are labeled gluten-free.
-
What type of cheese melts best for this recipe?
Cheddar is my go-to because of its sharp flavor and excellent melting properties, but mozzarella or a blend of cheddar and mozzarella can also create a stretchy, gooey center. Just avoid very hard cheeses like Parmesan, as they won’t melt well inside the sticks.
-
How can I avoid the cheese leaking out while frying?
Make sure to mold the potato mixture tightly around each cheese strip so the cheese is fully encased. Also, don’t skip the triple coating of flour, egg, and panko—that seals the sticks and helps keep everything intact during frying.
-
Can I bake these instead of frying?
You can try baking them for a lighter version. Preheat your oven to 400°F and bake on a parchment-lined sheet for about 20-25 minutes, flipping halfway through until they’re golden. However, frying will give you the crispest, most traditional results.
Final Thoughts
Crispy Potato Cheese Sticks with Bacon and Green Onion Recipe is one of those dishes that always brings a smile to my face. They’re perfect for sharing, impressing friends, or just treating yourself after a long day. Once you get the hang of molding and frying, it becomes your go-to comfort snack because it’s that reliably delicious. If you haven’t tried making these yet, I really encourage you to do so—you’ll love how simple ingredients come together to create something so special and satisfying.
Print
Crispy Potato Cheese Sticks with Bacon and Green Onion Recipe
- Prep Time: 25 minutes
- Cook Time: 20 minutes
- Total Time: 45 minutes
- Yield: About 12–15 sticks 1x
- Category: Appetizer
- Method: Frying
- Cuisine: American
Description
Crispy and cheesy Potato Cheese Sticks are a delightful snack perfect for any occasion. Made with mashed russet potatoes, cheddar cheese strips, and a crispy breadcrumb coating, these sticks are seasoned with green onion, bacon, and spices for a flavorful bite every time. Deep-fried until golden and crunchy, they make an irresistible appetizer or side dish.
Ingredients
Potato Mixture
- 3 russet potatoes, cooked and cubed
- 1 teaspoon salt
- ½ teaspoon pepper
- ¼ cup green onion, diced
- ½ cup sour cream
- ¼ cup bacon, diced
Coating
- ⅔ cup cornstarch
- Flour, for dredging, about 1 cup
- 1 egg, beaten
- 100 g panko breadcrumbs
Other
- 1 block cheddar cheese, cut into strips
- 1 litre vegetable oil or canola/peanut oil, for deep frying
Instructions
- Prepare the potatoes: Boil the russet potatoes until tender, then drain and cube them. In a large bowl, mash the potatoes until smooth.
- Mix the potato filling: Add salt, pepper, diced green onions, sour cream, and cooked diced bacon to the mashed potatoes. Mix thoroughly until all ingredients are well incorporated.
- Form the cheese sticks: Take a small amount of the potato mixture and flatten it in your palm. Place a cheddar cheese strip in the center, then carefully wrap the potato mix around the cheese, forming a stick shape. Repeat with remaining mixture and cheese strips.
- Prepare the coatings: Set out three shallow dishes—one with flour, one with beaten egg, and one with panko breadcrumbs mixed with the cornstarch for extra crispiness.
- Coat the sticks: Roll each potato cheese stick first in the flour, then dip into the beaten egg, and finally coat thoroughly with the panko-cornstarch mixture.
- Heat the oil: In a deep pan or fryer, heat 1 litre of vegetable, canola, or peanut oil to 350°F (175°C) for deep frying.
- Fry the sticks: Carefully place the coated sticks in the hot oil in batches, avoiding overcrowding. Fry for 3-5 minutes or until they turn golden brown and crispy.
- Drain and serve: Remove from oil with a slotted spoon and drain on paper towels. Serve hot as a delicious appetizer or snack.
Notes
- Make sure the oil temperature is maintained at 350°F to avoid greasy cheese sticks.
- You can substitute cheddar with mozzarella for a different cheesy flavor.
- Ensure the cheese is fully enclosed to prevent leaking during frying.
- Serve immediately for best crispiness.
- Leftovers can be reheated in an oven but may lose some crispiness.
Keywords: potato cheese sticks, crispy cheese sticks, fried cheese sticks, appetizer, snack