Red Velvet Cheesecake Bliss Recipe
Alright, if you’ve ever dreamed of combining that classic velvety red cake with a creamy, dreamy cheesecake, then I’m about to share a gem with you — the Red Velvet Cheesecake Bliss Recipe. It’s the kind of dessert that feels fancy but is oddly comforting, perfect for impressing guests or just treating yourself after a long day. Whenever I whip this up, I can’t help but smile because it’s just so rich, vibrant, and totally worth the effort.
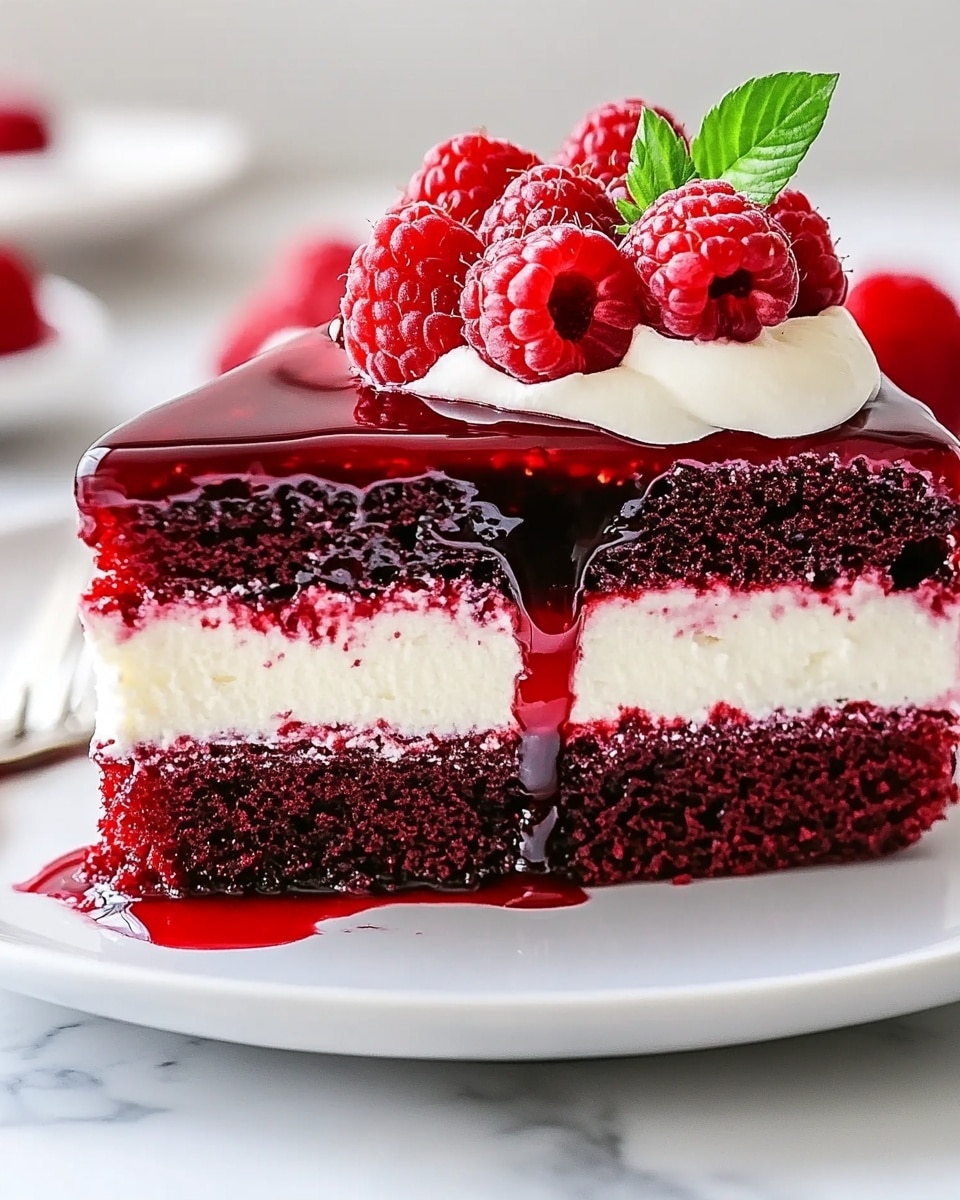
What makes this Red Velvet Cheesecake Bliss Recipe really stand out is the perfect balance between the moist, slightly tangy red velvet cake layer and the smooth, luscious cheesecake layer on top. Plus, the whipped cream topping adds that gentle, fluffy finish that ties everything together. Trust me, once you try this, you’ll want to make it again and again — it’s a total crowd-pleaser and surprisingly straightforward!
Ingredients You’ll Need
Each ingredient plays its part to create this delicious multi-layered delight. I always recommend using fresh and good-quality products, especially for the dairy components, as they really elevate the flavor and texture.
- All-purpose flour: Gives the red velvet layer structure without being too dense.
- Granulated sugar: Sweetens both the cake and cheesecake layers perfectly.
- Cocoa powder: Provides that subtle chocolate undertone classic in red velvet.
- Baking powder and baking soda: Help the cake rise nicely and stay tender.
- Salt: Enhances all the flavors and balances sweetness.
- Buttermilk: Adds tang and moisture to the cake layer for softness.
- Eggs: Bind ingredients and add richness in both layers.
- Vegetable oil: Keeps the cake moist and luscious.
- Red food coloring or beetroot powder: Your choice of vibrant color naturally or with traditional dye.
- Vanilla extract: Brings warmth and depth to both layers.
- White vinegar: Reacts with baking soda for that light texture in cake.
- Cream cheese: The star of the cheesecake layer, make sure it’s softened for smooth mixing.
- Sour cream: Adds tenderness and richness to the cheesecake.
- All-purpose flour (for cheesecake): Keeps the cheesecake stable without toughness.
- Heavy cream: For the whipped cream topping; cold cream whips best.
- Powdered sugar: Sweetens the whipped cream smoothly without grit.
- Fresh berries and red velvet cake crumbs (optional garnish): Adds a fresh and festive touch.
Variations
I love how versatile the Red Velvet Cheesecake Bliss Recipe can be. Over time, I’ve tweaked it here and there based on what I have on hand or the occasion — and you should definitely feel free to do the same!
- Natural coloring with beetroot powder: I switched to beetroot powder once when I wanted to skip artificial dyes — it gives a lovely, earthy red tone and subtly sweet flavor.
- Gluten-free option: Using a 1:1 gluten-free flour blend works surprisingly well; just make sure to check your baking powder is gluten-free too.
- Mini cheesecakes: I’ve made individual portions in ramekins for a party – easier to serve and always a hit!
- Chocolate drizzle: For extra indulgence, drizzle melted dark chocolate over the whipped cream topping; it’s decadent and so pretty.
- Berry compote topping: Instead of fresh berries, a warm berry compote adds a cozy contrast that’s perfect for cooler months.
How to Make Red Velvet Cheesecake Bliss Recipe
Step 1: Make the Red Velvet Cake Layer
Start by preheating your oven to 350°F (175°C) and greasing a 9-inch springform pan — trust me, lining it with parchment paper on the bottom helps with a clean release! Mix the dry ingredients: flour, sugar, cocoa powder, baking powder, baking soda, and salt until well combined. In a separate bowl, combine the buttermilk, egg, oil, red food coloring (or beetroot powder), vanilla extract, and vinegar. Slowly add the wet ingredients into the dry, mixing until just smooth. Pour this batter into your pan and pop it into the oven for about 25 minutes — a toothpick inserted should come out with a few moist crumbs but not wet batter.
Step 2: Prepare the Cheesecake Layer
While the cake layer cools just a bit (about 15 minutes), whip up the cheesecake layer. Beat the softened cream cheese until creamy and lump-free, then add the sour cream, sugar, eggs, vanilla, and flour. Make sure everything is incorporated smoothly but don’t overbeat — that helps avoid cracks later. Gently pour this cheesecake mixture over the slightly cooled red velvet cake layer in the pan, smoothing it out evenly.
Step 3: Bake and Chill
Bake the whole thing together at 325°F (160°C) for 45-50 minutes until the cheesecake layer is mostly set but still slightly jiggly in the center — it’ll firm as it cools. Let it cool down to room temperature on a wire rack, then cover and refrigerate for at least 4 hours or overnight. This chilling step is key for that clean slice and fully melded flavors.
Step 4: Whip the Cream Topping
Just before serving, whisk the cold heavy cream with powdered sugar and vanilla extract until soft peaks form. This whipped cream adds a light and airy finish that complements the rich layers underneath beautifully — it’s my favorite part to dollop generously on each slice.
How to Serve Red Velvet Cheesecake Bliss Recipe
Garnishes
I like to keep it simple but elegant with fresh berries like raspberries or strawberries, plus a sprinkle of red velvet cake crumbs from any trimming or leftover batter. It adds a pop of color and texture, which looks stunning on the creamy white topping and adds a little extra tang and crunch.
Side Dishes
This cheesecake is a dessert star, so I usually serve it after a light, simple meal. A warm cup of coffee or a bold black tea pairs wonderfully, and if you’re feeling fancy, a small scoop of vanilla bean ice cream on the side never hurts!
Creative Ways to Present
For birthdays or special celebrations, I’ve layered the Red Velvet Cheesecake Bliss Recipe in clear glass trifle bowls, showing off every beautiful stripe and layer. You could also pipe rosettes of whipped cream around the edges or add edible gold leaf for an extra touch of luxury. Presentation is simple but impactful!
Make Ahead and Storage
Storing Leftovers
I keep leftovers tightly covered in the fridge — usually wrapped with plastic wrap over the springform pan or transferred to an airtight container. It stays moist and fresh for up to 5 days, though I’ve rarely had any leftovers last that long!
Freezing
This recipe freezes well, which is a game changer. I freeze whole or individual slices wrapped tightly in plastic wrap, then foil, and they thaw beautifully in the fridge overnight. The texture remains creamy, though the whipped cream topping is best freshly whipped when serving.
Reheating
I usually enjoy this cheesecake chilled, so I don’t reheat it. If you prefer a warmer slice, let it sit at room temperature for 10-15 minutes first to soften up the cream cheese layer without risking breaking it down or melting the topping.
FAQs
-
Can I make the Red Velvet Cheesecake Bliss Recipe without cream cheese?
Cream cheese is essential for that classic cheesecake texture and tang, so I don’t recommend substituting it. However, if you’re avoiding dairy, you might experiment with vegan cream cheese alternatives, but the texture and taste could vary.
-
Why does the cheesecake crack sometimes?
Cracks usually form if the cheesecake is overbaked or rapidly cooled. To prevent this, bake at a lower temperature and allow it to cool slowly in the oven with the door slightly open before refrigerating. Also, avoid overmixing your batter.
-
Can I use natural beetroot powder instead of red food coloring?
Absolutely! Beetroot powder gives a lovely natural red hue and a subtle sweetness. Just keep in mind the color may be a bit softer, and it could add a hint of earthiness, which I find delicious.
-
How long should I chill the cheesecake before serving?
For the best texture and flavor, chill the cheesecake for at least 4 hours or preferably overnight. This resting period helps everything set beautifully, making slicing easier and the flavors more harmonious.
-
Can I make this recipe in smaller pans or cupcakes?
Definitely! I’ve made mini Red Velvet Cheesecake Bliss in muffin tins lined with cupcake liners. Just adjust the baking time — start checking around 20 minutes—and keep a close eye as smaller portions bake faster.
Final Thoughts
Honestly, the Red Velvet Cheesecake Bliss Recipe holds a special place in my kitchen because it’s one of those desserts that bring smiles and “wow” moments every time. It’s rich yet balanced, festive but comforting, and a perfect way to celebrate any occasion or simply add a touch of joy to an ordinary day. I hope you’ll love making it as much as I do — and once you try it, you’ll understand why it’s a true bliss in every bite!
Print
Red Velvet Cheesecake Bliss Recipe
- Prep Time: 25 minutes
- Cook Time: 75 minutes
- Total Time: 5 hours 40 minutes
- Yield: 10 servings 1x
- Category: Dessert
- Method: Baking
- Cuisine: American
Description
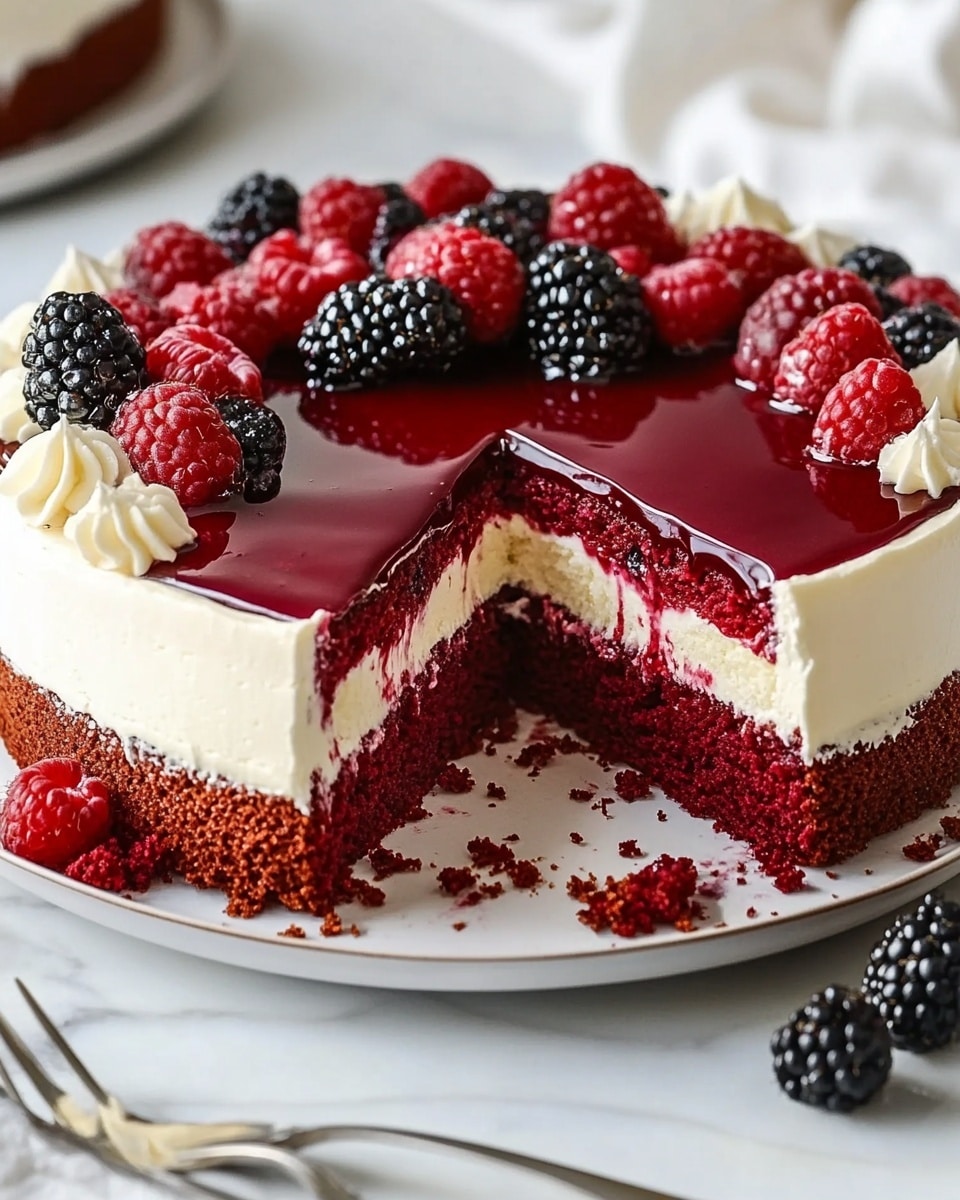
This Red Velvet Cheesecake Bliss is a decadent dessert featuring a moist red velvet cake base layered with a smooth, creamy cheesecake filling and topped with light whipped cream. Garnished with fresh berries and cake crumbs, it offers a perfect balance of flavors and textures, ideal for special occasions or indulgent treats.
Ingredients
Red Velvet Cake Layer
- 1 ½ cups all-purpose flour
- 1 cup granulated sugar
- 1 tbsp cocoa powder
- 1 tsp baking powder
- ½ tsp baking soda
- ½ tsp salt
- 1 cup buttermilk
- 1 large egg
- ½ cup vegetable oil
- 2 tbsp red food coloring or beetroot powder (for natural option)
- 1 tsp vanilla extract
- 1 tsp white vinegar
Cheesecake Layer
- 16 oz cream cheese, softened
- ½ cup sour cream
- ½ cup granulated sugar
- 2 large eggs
- 1 tsp vanilla extract
- 2 tbsp all-purpose flour
Whipped Cream Topping
- 1 cup heavy cream
- 2 tbsp powdered sugar
- 1 tsp vanilla extract
Garnish (optional)
- Fresh berries
- Red velvet cake crumbs
Instructions
- Prepare Red Velvet Cake Batter: In a large mixing bowl, sift together all-purpose flour, cocoa powder, baking powder, baking soda, salt, and granulated sugar. In another bowl, whisk buttermilk, egg, vegetable oil, red food coloring or beetroot powder, vanilla extract, and white vinegar until well combined. Gradually add the wet ingredients to the dry ingredients, mixing until smooth and fully incorporated.
- Bake Red Velvet Cake Layer: Preheat your oven to 350°F (175°C). Grease and flour a 9-inch springform pan or line with parchment paper. Pour the red velvet batter into the prepared pan and bake for about 25-30 minutes, or until a toothpick inserted into the center comes out clean. Remove from oven and allow to cool slightly.
- Prepare Cheesecake Filling: While the cake layer cools, beat softened cream cheese with an electric mixer until smooth and creamy. Add sour cream and granulated sugar, continuing to beat until fully combined. Add eggs one at a time, beating gently after each addition. Mix in vanilla extract and flour until just combined, taking care not to overmix.
- Layer and Bake Cheesecake: Pour the cheesecake filling over the slightly cooled red velvet cake layer in the springform pan, spreading evenly. Return the pan to the oven and bake at 325°F (163°C) for 40-50 minutes, or until the cheesecake is set but slightly jiggly in the center. Turn off the oven and leave the cheesecake inside with the door slightly open for an hour to prevent cracking.
- Cool and Chill: Remove the cheesecake from the oven and let it cool completely at room temperature. Then refrigerate for at least 4 hours, preferably overnight, to allow it to set firmly and enhance the flavors.
- Prepare Whipped Cream Topping: Using a chilled bowl and beaters, whip the heavy cream with powdered sugar and vanilla extract until soft peaks form. Be careful not to overwhip.
- Assemble and Garnish: Before serving, spread the whipped cream topping evenly over the chilled cheesecake. Garnish with fresh berries and sprinkle red velvet cake crumbs on top for a beautiful finishing touch.
- Serve: Carefully remove the cheesecake from the springform pan, slice using a sharp knife dipped in hot water for clean cuts, and serve chilled. Enjoy your rich, creamy Red Velvet Cheesecake Bliss!
Notes
- Use beetroot powder instead of red food coloring for a natural alternative.
- Make sure all cream cheese and eggs are at room temperature for a smooth batter.
- To avoid cracking, do not overbake and cool cheesecake gradually.
- Chill the whipped cream bowl and beaters for best whipping results.
- Red velvet cake crumbs can be made from extra cake layer trimmings or scraps.
Keywords: red velvet cheesecake, layered cheesecake, red velvet cake, creamy cheesecake, whipped cream topping, festive dessert