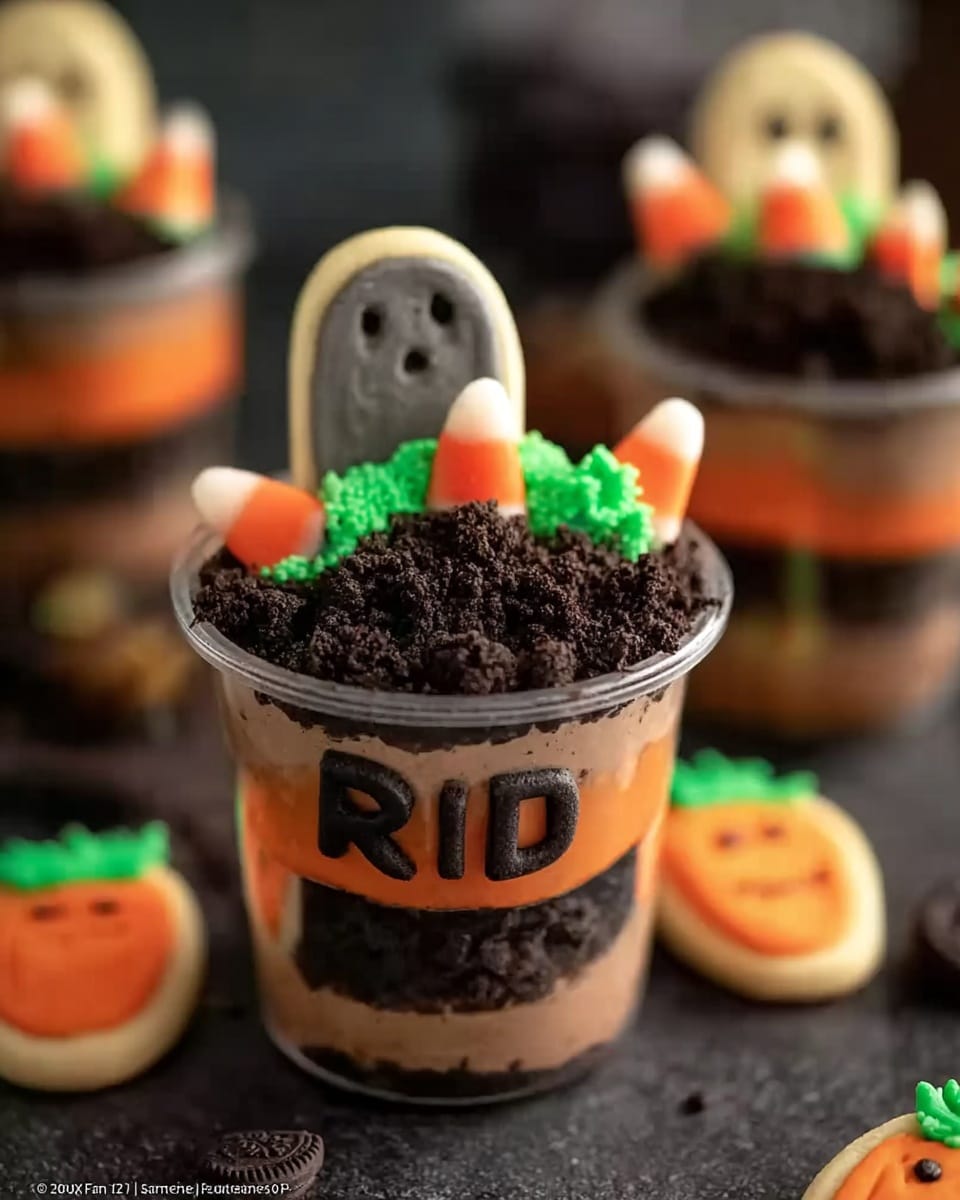
Halloween Dirt Cups Recipe
Hey there! If you want a dessert that’s as fun to make as it is to eat, these Halloween Dirt Cups Recipe are an absolute must-try. They’re perfect for Halloween parties, classroom treats, or any spooky gathering. What I love most is how simple the ingredients come together to create this playful “dirt” effect—think creamy chocolate pudding layered with crushed Oreos and topped off with gummy worms creeping out of the cup. It’s a delight for both kids and adults alike!
This Halloween Dirt Cups Recipe is a huge hit in my family every year. It’s one of those foolproof desserts that always gets devoured before the night’s over. Plus, it requires no baking, which means less time in the kitchen and more time enjoying the festivities. I’ll walk you through the process so you can get that perfect dirt cup with minimal fuss and maximum fun.
Ingredients You’ll Need
Each ingredient plays a special role in making these Halloween Dirt Cups Recipe a showstopper. From crunchy Oreos for that dirt texture to silky pudding for richness, I’ve found these combo to offer the best balance.
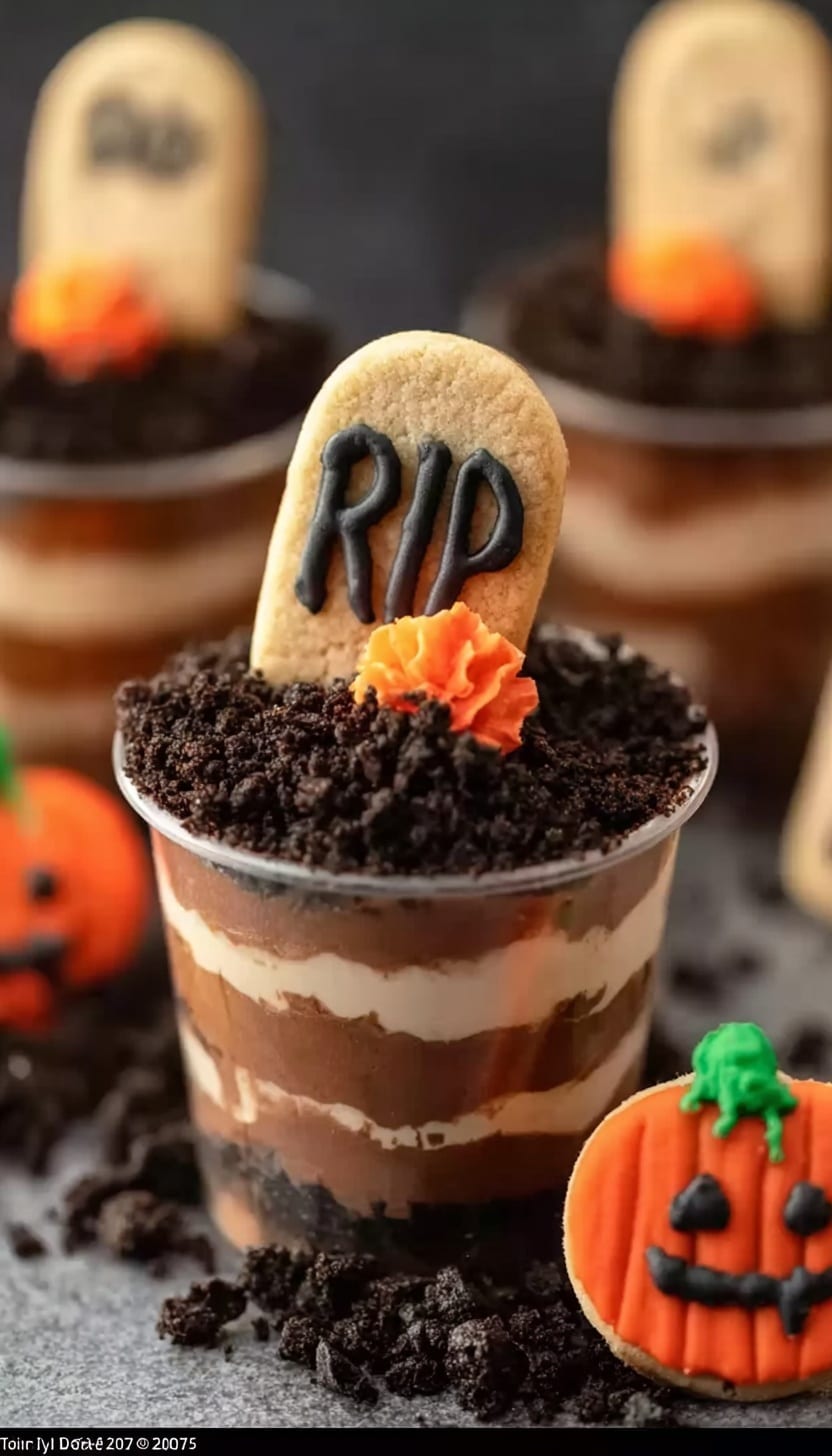
- Oreo Cookies: Crushing these gives you that signature “dirt” look. Choose regular Oreos for best flavor and texture.
- Cool Whip: Lightens the pudding mixture, making the cups creamy and airy without being too heavy.
- Instant Chocolate Pudding Mix: The chocolate base that brings the dessert together. Easy and quick to prepare.
- Milk: Needed to prepare the pudding mix smoothly; whole or 2% milk works fine.
- Milano Cookies: These add a buttery crunch as a fun twist against the soft pudding.
- Gummy Worms and Candy Pumpkins (optional): For that extra dose of Halloween whimsy—I love how the worms give it a creepy-crawly vibe.
- Wilton Black Writing Icing: Perfect for adding cute (or spooky) faces to your pumpkins or writing fun messages.
Variations
I like making this Halloween Dirt Cups Recipe my own by swapping in ingredients or adding extras that fit the mood or dietary needs. It’s super flexible, so feel free to get creative!
- Dairy-Free Variation: I once swapped the Cool Whip and milk for coconut whipped topping and almond milk—still creamy and delicious!
- Spooky Twist: Instead of gummy worms, try edible eyes or candy spiders—makes the cups extra creepy and perfect for kids.
- Mocha Upgrade: Add a teaspoon of instant espresso powder to the pudding mix for a subtle coffee kick I adore.
- Nut-Free Version: Simply omit Milano cookies or substitute with your favorite nut-free cookie to avoid allergens.
How to Make Halloween Dirt Cups Recipe
Step 1: Mix the Chocolate Pudding
Start by whisking together the instant chocolate pudding mix and milk. I like using a medium bowl and whisking vigorously—it only takes a couple of minutes for it to thicken. Make sure your milk is cold to get the best texture. Once it’s thickened, set it aside for a few minutes; it’ll firm up nicely as you prep the other ingredients.
Step 2: Crush the Oreos
Here’s a fun part: crush the Oreo cookies until they resemble dirt. I usually zip mine in a plastic bag and gently crush them with a rolling pin—keeping some chunks for texture is fine. The crushed Oreos are that signature “dirt” layer that gives these cups their name and unique charm.
Step 3: Fold in the Cool Whip
Once the pudding is ready, gently fold in the Cool Whip with a spatula. You want to keep it light and fluffy, so don’t overmix. This step gives the dessert a creamy, dreamy consistency that melts in your mouth.
Step 4: Assemble Your Dirt Cups
Now to build your dirt cups! Start with a layer of crushed Oreos at the bottom of each cup, then add a layer of the pudding mixture. Repeat until you fill the cups but save some crushed Oreos for the very top layer. This layering creates a fun contrast between creamy pudding and crunchy “dirt.”
Step 5: Add Cookies and Candy Garnishes
Top your dirt cups with Milano cookies, gummy worms, candy pumpkins, and any other spooky treats you love. I like to gently poke gummy worms partially into the pudding—it looks like they’re coming right out of the dirt, which is just too fun!
How to Serve Halloween Dirt Cups Recipe
Garnishes
For garnishes, I’m all about adding that extra Halloween flair. Gummy worms are a must, of course—I can’t resist how they wiggle through the dirt. Candy pumpkins add a cute pop of color, and the Wilton black writing icing lets you personalize or decorate the tops with little faces or messages. It takes these cups from simple to memorable!
Side Dishes
Since these dirt cups are pretty rich, I like pairing them with lighter sides like fresh fruit or a crisp salad during a party. If you’re serving a Halloween meal, consider pairing them with mummy hot dogs or pumpkin soup for a fun, themed spread.
Creative Ways to Present
One year, I served my Halloween Dirt Cups Recipe in mini flower pots lined with parchment paper—it was such a hit! You can also use clear glass jars or small mason jars to show off the layered “dirt,” and tie creepy ribbons or Halloween tags around the cups for a festive touch.
Make Ahead and Storage
Storing Leftovers
Once assembled, cover the cups tightly with plastic wrap and store them in the refrigerator. They keep well for up to 3 days, but honestly, they rarely last that long in my house! The Oreo “dirt” softens a bit over time, but the texture is still delicious.
Freezing
I don’t typically freeze Halloween Dirt Cups Recipe because the texture of Cool Whip and pudding can get a little compromised. If you must, freeze the pudding mixture alone before assembling, but for best results, enjoy these fresh or refrigerated.
Reheating
No reheating needed here! These dirt cups are best enjoyed chilled. Just pull them from the fridge about 10 minutes before serving if you want to avoid them being too cold.
FAQs
-
Can I make Halloween Dirt Cups Recipe without Cool Whip?
Absolutely! You can use whipped cream instead, but it may not have the same stability and texture. If using whipped cream, fold it gently into the pudding and serve shortly after assembling to prevent it from deflating.
-
Are there any allergy-friendly options for this recipe?
Definitely. For nut allergies, just omit any nut-based additions or use nut-free cookies instead of Milano. For dairy-free needs, try coconut-based whipped toppings and plant-based milk. Always check labels to ensure they fit your dietary restrictions.
-
Can I prepare Halloween Dirt Cups Recipe in advance?
Yes! This dessert actually tastes better after it has chilled for a few hours, making it a perfect make-ahead treat. Just keep them covered in the fridge until ready to serve.
-
What can I use instead of gummy worms?
You can substitute gummy worms with candy spiders, chocolate chips, or even edible candy eyes for a fun, spooky touch with less mess.
-
How do I keep the crushed Oreos crunchy?
Crush the Oreos just before assembling the cups and avoid mixing them with the pudding too far ahead of time. The longer they sit, the softer they’ll get—but don’t worry, a bit of softness still tastes fantastic.
Final Thoughts
Honestly, this Halloween Dirt Cups Recipe is one of my absolute go-tos when I want a dessert that’s festive, fun, and crazy easy. It adds such a playful vibe to the Halloween table and always gets compliments for looking spooky yet tasting indulgent. If you’re on the fence, just give it a shot—I promise the process is simple, but the enjoyment you and your guests will get is huge. Now, grab those Oreos and gummy worms, and let’s get dirt-y!
Print
Halloween Dirt Cups Recipe
- Prep Time: 15 minutes
- Cook Time: 0 minutes
- Total Time: 1 hour 15 minutes
- Yield: 6 servings 1x
- Category: Dessert
- Method: No-Cook
- Cuisine: American
Description
Halloween Dirt Cups are a fun and spooky dessert perfect for Halloween parties. Layers of creamy chocolate pudding, crushed Oreo cookies resembling ‘dirt’, and gummy worms create a playful treat that is both delicious and visually appealing. This no-bake recipe is quick and easy to prepare, making it ideal for festive gatherings or family fun.
Ingredients
Base Ingredients
- 12 Oreo Cookies
- 1 box Instant Chocolate Pudding Mix (3.3 oz)
- 2 cups Milk
- 16 oz Cool Whip
Decorations
- 8 Milano Cookies
- Gummy Worms and Candy Pumpkins (optional)
- Wilton Black Writing Icing
Instructions
- Crush Oreos: Place the 12 Oreo cookies in a plastic bag and crush them into fine crumbs using a rolling pin or the back of a spoon to resemble dirt.
- Prepare Pudding: In a mixing bowl, whisk together the instant chocolate pudding mix and 2 cups of milk until thickened, about 2 minutes.
- Combine Pudding and Cool Whip: Gently fold the 16 oz of Cool Whip into the prepared pudding until well blended and smooth.
- Layer the Cups: In serving cups or jars, start by adding a layer of crushed Oreos to mimic soil, then add a layer of the pudding and Cool Whip mixture. Repeat layers, finishing with a top layer of crushed Oreos.
- Add Decorations: Garnish the top with Milano cookies arranged as tombstones, using Wilton black writing icing to write spooky messages or RIP on them. Add gummy worms and candy pumpkins around for a creepy effect.
- Chill and Serve: Refrigerate the dirt cups for at least 1 hour before serving to allow flavors to meld and the dessert to set.
Notes
- For a firmer pudding layer, prepare the pudding mixture a bit thicker by reducing milk slightly to 1 3/4 cups.
- Use full-fat Cool Whip or whipped topping for a creamier texture.
- Milano cookies can be substituted with any other crisp cookies or homemade edible tombstones.
- The dessert can be prepared a day ahead and stored in the refrigerator covered tightly.
- Add gummy worms just before serving to prevent them from becoming sticky or melting into the pudding.
Keywords: Halloween dessert, dirt cups, chocolate pudding, Oreo dessert, no-bake dessert, spooky treats, holiday dessert